0040 / 1921710E / 9
English
Brake force is adjusted through a hole in the locking de-
vice of reel hub by tightening/loosening the adjustment
screw with a screwdriver.
Adjust the brake force as so big that the wire does not
spill from the full reel when the rotation of the reel stops.
The need for brake force is increased with wire feed speed.
Standard accessory: 200 mm wire reel adaptor
Make sure that the welding gun is designed for maximum welding current! Never use a damaged welding gun!
Return current cable
Fasten earth clamp of return current cable carefully, preferably direct to welding piece. Contact surface of the clamp
always should be as large as possible.
Clean the fastening surface from paint and rust!
Use in your Kempoweld equipment copper cables. Too small cross-sectional area might cause overheating of
connectors and insulations. Make sure that the welding gun is designed for maximum welding current! Never use a
damaged welding gun!
Shielding gas
As MIG shielding gas uses carbon dioxide, mixed gases and argon. Shielding gas flow rate is defined by welding
current size. The typical rate of gas in welding of steel is 8-15 l / min.
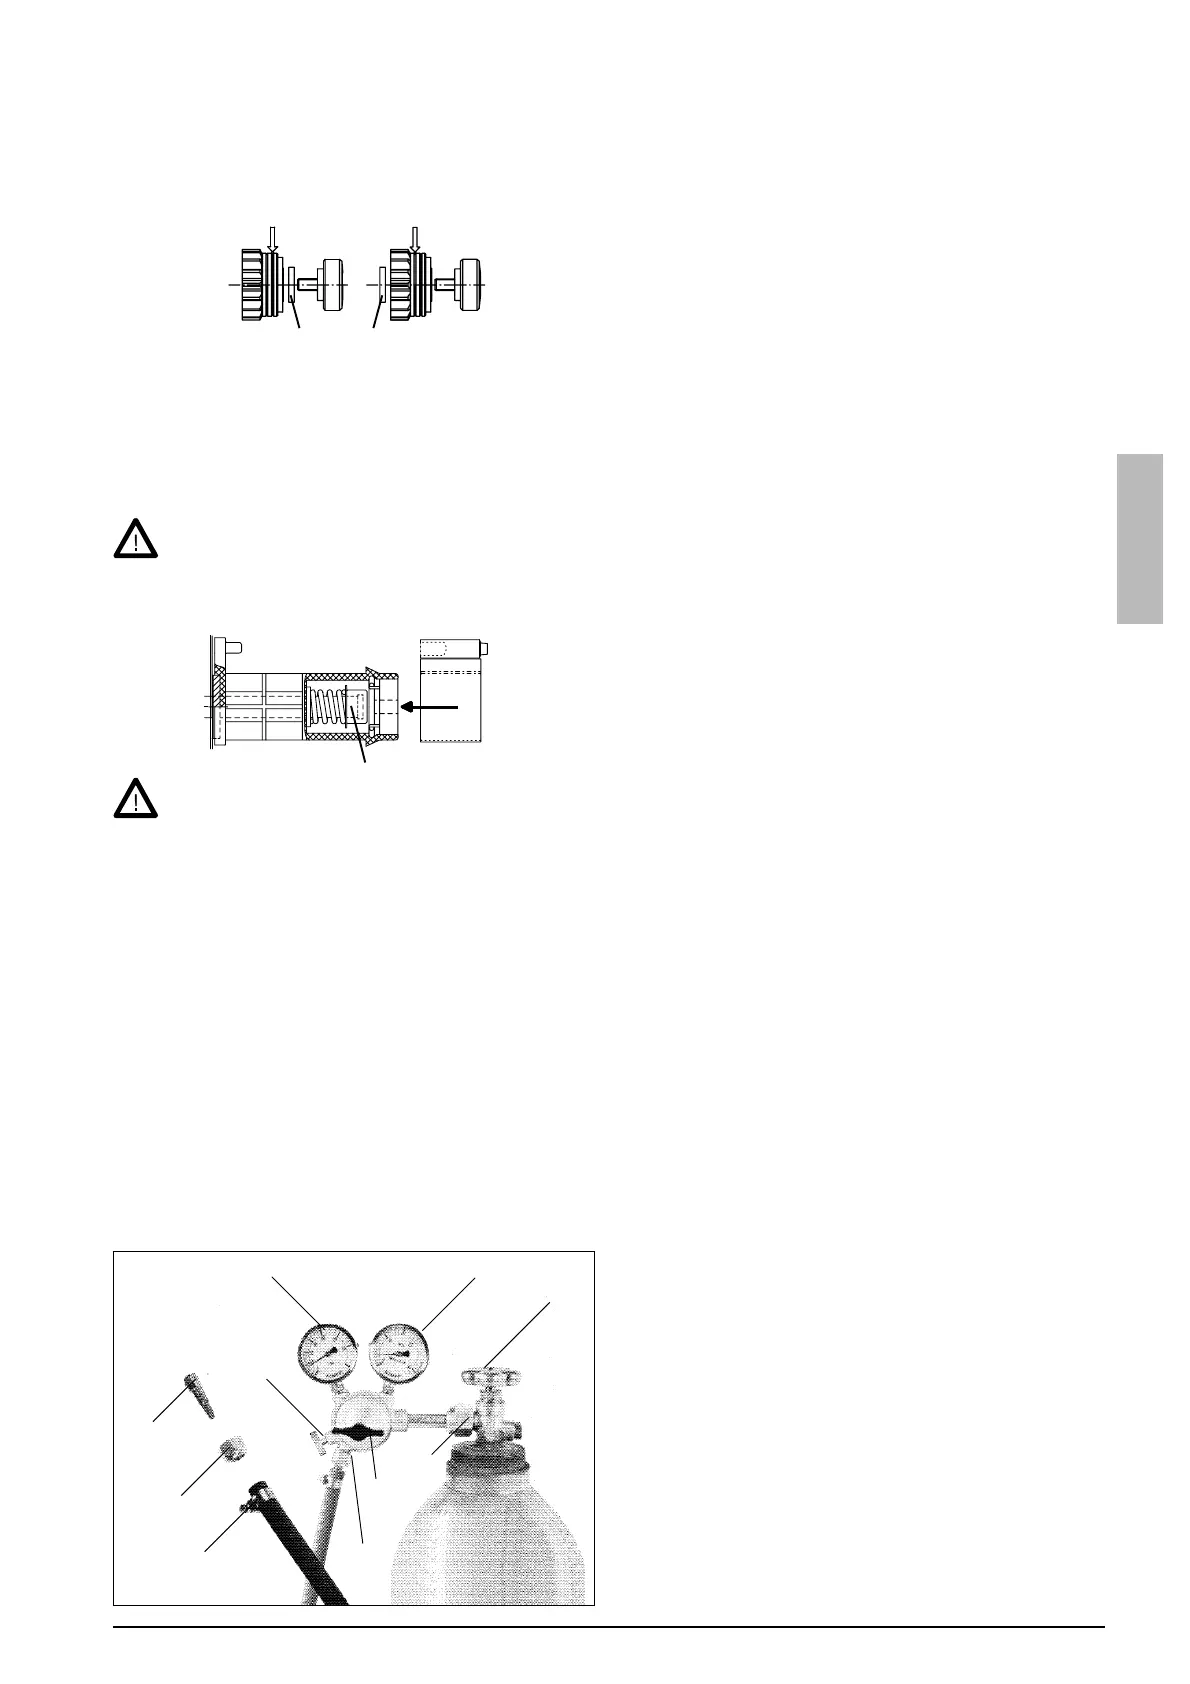
Gas flow regulator
Gas flow regulator should be suitable for shielding gas. The regulator used may be different to the one in picture.
However, following general instructions are valid for all pressure regulators.
Before mounting of flow regulator
Step aside and open cylinder valve (51). This way
you can blow out any dirt that may be in the valve of
bottle.
Turn the press regulation screw (52) of the regulator
outwards until no spring pressure can be felt (screw
is turning freely).
Close needle valve (53) if there is one in the regulator.
Connect regulator onto valve of bottle
Tighten connecting nut (54), preferably with a wrench.
Attach hose spindle (55) of regulator with jacket nuts
(56) onto the. Connection should be ensured with a
hose clamp (57).
Connect the hose onto the regulator and machine,
and tighten the jacket nuts.
56
55
57
56
53
P1P2
51
52
54
adjustment screw
Release the wire end from the reel and cut off the bent length. Be careful that the wire does not spill from the
reel to the sides!
Straighten approximately 20 cm of the wire and ensure that the end of it has no sharp edges. If they occur, file
these off. A sharp edge may damage the wire guide tube and contact tip of the welding gun.
Draw a piece of loose wire from wire reel. Feed wire through back liner to feed rolls. Do not release the pressure
of the feed rolls!
Press the gun switch or wire inch switch and feed a
piece of wire through feed rolls to the gun. Ensure
that wire is in the grooves of both feed rolls!
Continue to hold down the switch until the wire has
come through the contact tip.
groove selecting washer
Automatic feed may sometimes fail with thin wires (Fe, Ss: 0,6...0,8 mm, Al, Fc: 0,8...1,0 mm). In this case, you
must open feed rolls and feed the wire through manually.
Adjustment of pressure
Adjust the pressure of the feed rolls with the control screw, so that the wire is fed into the wire guide tube evenly,
and allows a little braking when coming out from the contact tip, without slipping at the feed rolls.
Excessive pressure causes flattening of the filler wire and damage to the coating. It also causes friction and
undue wear of the feed rolls.
Adjustment of tightness of wire reel brake
 Loading...