• Canceling the test mode
When the POWER button is pressed, the test mode is canceled, and the POWER OFF state is set.
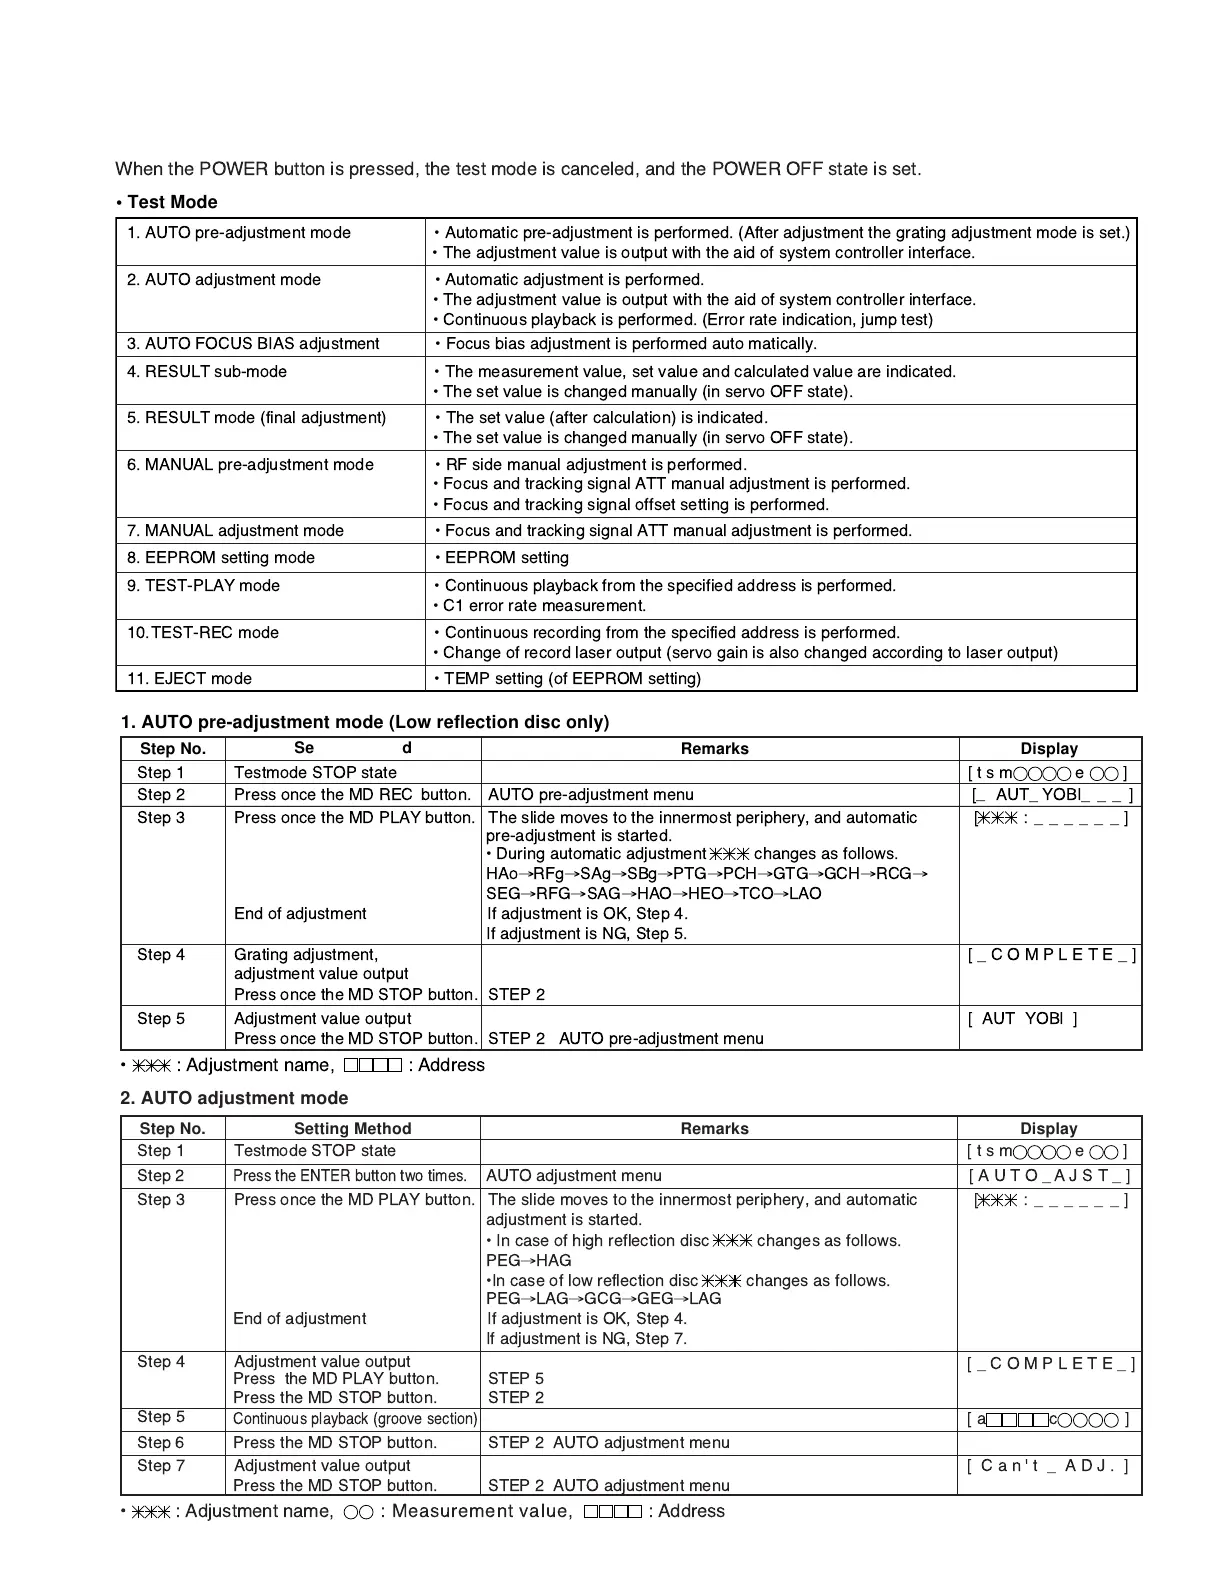
• Test Mode
1. AUTO pre-adjustment mode ¥ Automatic pre-adjustment is performed. (After adjustment the grating adjustment mode is set.)
¥ The adjustment value is output with the aid of system controller interface.
2. AUTO adjustment mode ¥ Automatic adjustment is performed.
¥ The adjustment value is output with the aid of system controller interface.
¥ Continuous playback is performed. (Error rate indication, jump test)
4. RESULT sub-mode ¥ The measurement value, set value and calculated value are indicated.
¥ The set value is changed manually (in servo OFF state).
3. AUTO FOCUS BIAS adjustment ¥ Focus bias adjustment is performed auto matically.
5. RESULT mode (final adjustment) ¥ The set value (after calculation) is indicated.
¥ The set value is changed manually (in servo OFF state).
6. MANUAL pre-adjustment mode ¥ RF side manual adjustment is performed.
¥ Focus and tracking signal ATT manual adjustment is performed.
¥ Focus and tracking signal offset setting is performed.
7. MANUAL adjustment mode ¥ Focus and tracking signal ATT manual adjustment is performed.
8. EEPROM setting mode ¥ EEPROM setting
9. TEST-PLAY mode ¥ Continuous playback from the specified address is performed.
¥ C1 error rate measurement.
10.TEST-REC mode ¥ Continuous recording from the specified address is performed.
¥ Change of record laser output (servo gain is also changed according to laser output)
11. EJECT mode ¥ TEMP setting (of EEPROM setting)
1. AUTO pre-adjustment mode (Low reflection disc only)
Step No.
Setting Method
Remarks Display
Step 1 Testmode STOP state [tsm e ]
Step 2 Press once the MD REC button. AUTO pre-adjustment menu [ AUT_ YOBI_ _ _ ]
Step 3 Press once the MD PLAY button. The slide moves to the innermost periphery, and automatic [ :_
_
_____]
pre-adjustment is started.
¥ During automatic adjustment changes as follows.
HAo
®
RFg
®
SAg
®
SBg
®
PTG
®
PCH
®
GTG
®
GCH
®
RCG
®
SEG
®
RFG
®
SAG
®
HAO
®
HEO
®
TCO
®
LAO
End of adjustment If adjustment is OK, Step 4.
If adjustment is NG, Step 5.
Step 4 Grating adjustment, [_COMPLETE_]
adjustment value output
Press once the MD STOP button. STEP 2
Step 5 Adjustment value output [ AUT YOBI ]
Press once the MD STOP button. STEP 2 AUTO pre-adjustment menu
¥ : Adjustment name, : Address
2. AUTO adjustment mode
Step No.
Setting Method
Remarks Display
Step 1 Testmode STOP state [tsm e ]
Step 2
Press the ENTER button two times.
AUTO adjustment menu [ A U T O _ AJST_]
Step 3 Press once the MD PLAY button. The slide moves to the innermost periphery, and automatic [ :______]
adjustment is started.
¥ In case of high reflection disc changes as follows.
PEG
®
HAG
¥In case of low reflection disc changes as follows.
PEG
®
LAG
®
GCG
®
GEG
®
LAG
End of adjustment If adjustment is OK, Step 4.
If adjustment is NG, Step 7.
Step 4 Adjustment value output
[_COMPLETE_]
Press the MD PLAY button. STEP 5
Press the MD STOP button. STEP 2
Step 5
Continuous playback (groove section)
[a c ]
Step 6
Press the MD STOP button. STEP 2 AUTO adjustment menu
Step 7 Adjustment value output [ Can't _ ADJ. ]
Press the MD STOP button. STEP 2 AUTO adjustment menu
¥ : Adjustment name, : Measurement value, : Address

 Loading...