EasyManua.ls Logo

Kirsch Cellular Shade Series - User Manual

Default Icon
24 pages
Print Icon
To Next Page IconTo Next Page
Loading...
Cellular Shade Collection
Automation III Installation Instructions
CONTENTS
GETTING STARTED .............................................................1
Product View ...................................................................... 1
Tools and Fasteners Needed ............................................. 2
INSTALLATION ....................................................................3
Installation Overview ........................................................ 3
STEP 1: Mount the Installation Brackets ......................... 3
Mount the Installation Brackets Inside Mount ........... 4
Mount the Installation Brackets Outside Mount ....... 5
Mount the Installation Brackets End Mount .............. 6
STEP 2: Mount the Battery Wand (If Applicable) .......... 7
STEP 3: Install the Shade .................................................. 8
STEP 4: Connect the Power Source ................................ 9
Testing the Shade .............................................................. 11
Attach Magnetic Hold-Down Brackets (Optional) ......... 11
OPERATION .........................................................................13
Operating the Automation App and III Remote ............. 13
Resetting the Shade, If Necessary ....................................15
Level the Rail(s), If Necessary ............................................16
TROUBLESHOOTING .........................................................17
Troubleshooting ................................................................. 17
CARE ......................................................................................20
Removing the Shade, If Necessary ................................... 20
Cleaning Procedures .......................................................... 20
CHILD SAFETY .....................................................................21
DECLARATIONS ..................................................................22
WARRANTY .........................................................................23
Rev. D 5/3/22
Question and Answer IconNeed help?

Do you have a question about the Kirsch Cellular Shade Series and is the answer not in the manual?

Overview

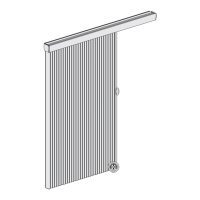
This document describes the Kirsch® Cellular Shade Collection, an automated window treatment system designed for ease of installation, operation, and maintenance. The shades offer various configurations, including standard automation, top-down/bottom-up, and day/night options.

Function Description

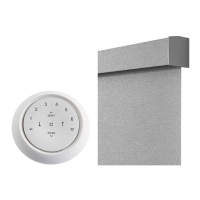
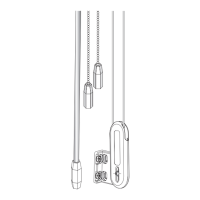
The Kirsch Cellular Shade is an automated window covering that provides light control and privacy. It operates using a control button or a remote, allowing users to raise, lower, and adjust the shade to preferred positions. The system supports various power options, including battery wands and 18V DC power supplies, with daisy-chain connections for multiple shades.

Important Technical Specifications

Installation Brackets:

  • Two types of installation brackets are available: one for 3/8" and 3/4" cell sizes, and a larger one for 1 1/4" cell size.
  • End mount brackets are used up to a maximum width of 72".
  • A 1/2" spacer block is pre-attached to the back of the installation bracket for battery wand clearance.
  • Minimum of 15" is required for battery wand placement on the right-side motor end.
  • Mounting depths vary based on the fabric cell size and mounting type (inside mount, outside mount, end mount, flush mount, minimum mounting surface height).
  • Inside Mount: Minimum depth ranges from 1" to 1 1/4" depending on cell size.
  • Outside Mount: Minimum depth ranges from 1" to 1 1/4" depending on cell size.
  • End Mount: Minimum depth ranges from 1 1/4" to 1 1/2" depending on cell size.
  • Flush Mount: Minimum depth ranges from 2 3/8" to 3 1/4" depending on cell size.
  • Minimum Mounting Surface Height: Ranges from 1 1/4" to 1 1/2" depending on cell size.

Power Supply:

  • Battery Wand: Standard power option.
  • Low Mount Battery Bracket (Optional): Allows for lower placement of the battery wand.
  • Satellite Battery Pack: 18V DC power supply for up to 16 shades.
  • 18V DC Power Supply: Connects to the motor, with an LED indicating readiness for operation. An extension cable can be used.
  • 18V DC Power Supply with Daisy-Chain Connections: Allows up to three automated shades to be powered by a single 18V DC Power Supply. Y-adapters and additional extension cables are available for daisy-chaining.

Fasteners (Not Provided):

  • #6 x 1 1/2" Hex Head Screw (for installation brackets).
  • Longer #6 Hex Head Screw for Use with Spacer Blocks (if using spacer blocks).
  • #6 Flat Head Screw for Use with End Mounts.
  • Speed Nut for Screws (provided with each extension bracket).
  • Drywall anchors for mounting into drywall.

Tools and Fasteners Needed (Not Provided):

  • 3/4" Hex, Flat Blade and Phillips Screwdrivers.
  • Level (laser level is recommended).
  • Measuring tape and pencil.
  • Power drill, 3/32" drill bit, and 1/4" hex driver.

Usage Features

Installation Steps:

  1. Mount the Installation Brackets: Determine mounting type (inside, outside, end mount) and secure brackets using appropriate screws. Spacer blocks are used for battery wand clearance.
  2. Mount the Battery Wand (If Applicable): Hook the battery wand clip onto the back channel of the headrail. For rechargeable battery wands, ensure the clip is positioned to allow the battery wand to be between installation brackets.
  3. Install the Shade: Fit the front channel of the headrail onto the front lip of the installation brackets and push the headrail up and back until it snaps into place. Ensure the bottom of the headrail is snapped into the base of each bracket.
  4. Connect the Power Source: Connect the battery wand or 18V DC power supply to the motor. For satellite battery packs, position the battery wand so the power cable is easily connected.

Operating the Automation App and III Remote:

  • Remote Control: Activate the remote by pulling plastic tabs. Download the Automation App from getshadeapp.com.
  • Syncing: Open the Automation App and follow steps to set up new shades and remotes.
  • Basic Operation: Wake up the remote by pressing STOP. Press group numbers (1-6) to select shades. Press selected group numbers a second time to deselect.
  • Bottom-Up Shades:
    • OPEN: Press once to raise bottom and middle rails, opening the shade(s) from the bottom-up. Press twice to raise the bottom rail.
    • LEFT ARROW: Press once to lower the bottom rail. Press twice to lower the middle rail.
    • RIGHT ARROW: Press once to raise the middle rail. Press twice to raise the middle rail.
    • ALL: Press to select all groups.
    • CLOSE: Press to lower the bottom and middle rails. Press twice to lower the bottom rail.
    • STOP: Stops motion.
    • FAVORITE: Press once to send shade(s) to the first favorite position. Press twice to send shade(s) to the second favorite position.
  • Top-Down / Bottom-Up and Day/Night Shades: Similar controls to Bottom-Up shades, with additional options for adjusting the middle rail to control the top-down portion.
  • Top-Down Shades: Similar controls, but focused on adjusting the top rail.

Further Operation and Programming Information:

  • Automation App: The app allows for comprehensive setup and operation of Kirsch® shades, remotes, and gateways.
  • Automation III Gateway: Used to control shades in larger projects and integrate with third-party systems.
  • Automation III Remote: Digital remote control for operation and programming.
  • Resetting the Shade: Calibration reset to recalibrate the shade's travel limits.
  • Resetting Shade Programming: Modify or reset any shade programming to Automation III Remotes and Gateways.

Electronic Limit Adjustments:

  • Level the Rail(s): Lift the bottom rail to locate pockets on the underside of the rail. Adjust the key in the pocket to raise or lower the rail. For Day/Night shades, adjust the key in the middle rail pocket.
  • Adjusting the Day/Night Middle Rail: Hex pockets are found at the ends of the middle rail. Insert the key and turn to raise or lower the middle rail.

Attaching Magnetic Hold-Down Brackets (Optional):

  • Hold-down brackets provide stability and prevent swaying.
  • Place the magnetic hold-down bracket near one end of the bottom rail.
  • The magnet should attract to the magnet that is already in the bottom rail.
  • Mark the location and install the bracket using a 3/32" drill bit and screw.
  • Slide the bracket cover over the magnetic hold-down bracket and mark the screw hole.
  • Remove the bracket cover and drill the pilot hole.
  • Attach the cover using the screw provided.
  • Repeat for the second magnetic hold-down bracket.
  • Verify that the bottom rail is level.

Maintenance Features

Troubleshooting:

  • Shade not fitting into installation brackets: Check bracket level, alignment, and ensure correct headrail insertion.
  • Shade not responding to Automation III remote: Check group number selection, battery status, and ensure correct group number is selected on the remote.
  • Shade not operating using the control button: Check power cable connection, battery status, and ensure the power source is securely connected.
  • Shade operating slowly or does not raise or lower completely: Replace batteries or check power source connection.
  • Shade raises or lowers unevenly or the bottom rail is uneven when fully raised: Lower the shade completely to allow it to "self-correct" skewing. Adjust the bottom rail if necessary.
  • Shade limits need to be adjusted: Refer to "Electronic Limit Adjustments" on page 16.
  • Batteries in the battery wand need to be replaced: Squeeze the cap latch to release the cap and remove the cap from the battery wand. Install new alkaline batteries according to instructions.
  • Rechargeable battery wand is charged but not working: Check temperature (optimal operating range is 50°F to 76°F). If the temperature is outside this range, the battery will temporarily shut off.
  • Rechargeable battery needs recharging: Plug the dual charging station into a standard AC outlet. Insert the nose of the rechargeable battery wand into one of the slots. A red light indicates charging, green indicates fully charged. Charging takes up to three hours.
  • Recharging Via the Single Charger: Attach the plug adapter to the charger and plug into a standard AC outlet. A red light indicates charging, green indicates fully charged.

Removing the Shade, If Necessary:

  • Lower the shade approximately 4".
  • While holding the headrail, push back on the bottom tab of the installation bracket with a flat head screwdriver to release the bottom of the headrail.
  • Roll the back of the headrail down and out from the bracket.

Cleaning Procedures: Kirsch® Cellular Shades are made of anti-static, dust-resistant fabric.

  • Dusting: Regular light dusting with a feather duster.
  • Vacuuming: Gently vacuum with a brush attachment (CAUTION: Do not vacuum Oceanside fabrics).
  • Compressed Air/Hair Dryer (Cool Setting): Use compressed air or a hair-dryer on a cool setting to blow dust and dirt off shades.
  • Spot-Cleaning: Prepare a solution of warm water and a mild detergent. Dampen a clean cloth and dab the spot until removed (CAUTION: Do not spot-clean Harmony, Naturelle, Oceanside, and Sonora fabrics). Allow shade to dry completely lowered.
  • Bathtub Cleaning/Water Immersion: Immerse the shade in a basin or bathtub filled with warm water and a mild detergent (IMPORTANT: Never immerse the headrail). Rinse with clean water. Fully raise the shade and tilt to allow excess water to drain off. Dry completely lowered (CAUTION: Do not immerse Harmony, Naturelle, Oceanside, and Sonora fabrics).
  • Ultrasonic Cleaning: Specify a mild detergent solution (CAUTION: Do not ultrasonically clean Reflections fabrics). IMPORTANT: Never immerse the headrail. Dry completely lowered.
  • Injection/Extraction Cleaning: Professional cleaning method that injects and extracts cleaning solution. Use dry method for Oceanside fabrics. For Harmony and Naturelle fabrics, specify no chemicals (water only).
  • Headrail Cleaning: Dampen a soft, clean cloth in warm water and wring it out. Gently wipe the headrail to remove dirt and dust (CAUTION: Never use abrasive cleaning methods or harsh chemicals).

Warranty: Kirsch® provides a 10-year limited warranty on all Kirsch Custom Window Covering products. This warranty covers defects in materials, workmanship, and failure to operate for 10 years from the date of purchase. It does not cover abuse, accidents, misuse, exposure to elements (sun damage, wind, water/moisture, salt air), discoloration or fading over time, normal maintenance associated with motors and related accessories, failure to follow instructions, or shipping charges.

Kirsch Cellular Shade Series Specifications

General IconGeneral
BrandKirsch
ModelCellular Shade Series
CategoryWindow Blinds
LanguageEnglish

Related product manuals