Removing Slide Tray
You
can
remove
the
tray
from
the
pro-
jector
at
any
time-with
the
power
switch
turned
off
or
on:
1. Press
the
select
bar
and
hold
it
down. With
the
power
switch
in
the
OFF
position, you will need to push
the sel
ect
bar
all the way down.
2.
Rotate
the
tray
until
the
tray
index
bar
is opposite
the
gate
index.
3.
Release
the
select
bar
and
lift off
the tray.
NO
TE:
When
the
projector
pow-
er
cord is
not
plugged
in
,
the
se-
lect
bar
will function
manually
only when
the
power switch is
in
the
OFF
position.
SELECT BAR
Showing Single Slides
1.
With
the
projector
turned
on, i
nsert
a slide (correctly oriented) in
to
the
projector
gate
.
Push
the
slide down
into
the
gate
as far as
it
will go.
2.
After viewing
the
slide, press
the
se-
l
ect
bar
to
eject
the
slide from
the
gate. You
can
then
insert
another
slide
into
the
gate. You
can
project
slides
up
to l IB-inch
thick
by
this
method.
A
fter
the
Show
Slide
the
power
switch
to
OF
F
and
re-
move
the
slide tray.
Then if
yo
u
've
been
us
in
g the
bu
ilt
-in
viewe
r
/Sli
de-
Scan
scree
n
(models
52
00, 5200-
K,
and
5600):
1.
Push
the
viewer
back
into
the
pro
-
jector
as described on page 6.
2.
Replace
the
projection lens
in
the
projector
as described on page
10.
POWER REQUIREMENTS
Or
if
y
ou
've
be
en
pro
jec
ting
s
lid
es
on a
la
r
ge
scr
ee
n:
1.
As
you support the front
of
the pro-
jector, release
the
front
elevating
foot by pressing
the
re
lease.
Then
lower
the
front
of
the
projector;
the
el
evating
foot will be
retracted
into
the
projector.
2.
Retract
the
rear
leveling foot.
3.
Retract
the
lens by
turning
the
fo-
cus
knob
counterclockwise
.
Then
unplug
the
power
and
remote-
control
cords. Wind
the
power cord
around
the
CORD
RETAINER
on
the
un-
derside
of
the
projector. Fold
the
re-
mote-control cord
by
placing
the
ends
together
and
folding
it
in
about
4-
i
nch
lengths
.
Then
place
it
in
the
cord com-
partment.
PROJECTOR CARE
Your
CAROUSEL
Projector
requires
no
lubrication; all
bearings
are
self-lubri-
cating.
Projection-Lamp Replacement
CA
UTI
ON: Be
certain
that
the
proj
ector
and
the
proj
ection
lamp
have
cooled before you re-
move
the
lamp.
Your
projector is equipped
with
a
code
FHS
projection lamp
with
a
rated
li
fe
of70 hours.
There
are
also two spe-
cial-application lamps available.
For
l
onger
lamp life (but less brightness),
use a code EXY lamp
with
a
rated
life
of
200
hours.
For
25-percent
greater
brightness
than
offered by
the
FHS
lamp, use a code EXR lamp
with
a rat-
ed life of
35
ho
urs. Use
of
high-brigh
t-
ness lamps may
cause
some
buckling
or
premature
fading
of
your
slides.
All
the
lamp-life
ratings
given above
are
for
projectors
with
the
power
switch
set
at
HI.
La
mp li
fe
ca
n be ex-
tended by as
much
as 3 times by
using
the
LO setting.
If
your
lamp
should
burn
out
during
use, you
can
set
the
power switch
at
FAN
to speed cooling. It is better
to
turn
off
the projector
and
let it cool
wit
h
out
the fan (about
10
minutes).
When
the
projector
and
lamp
have
cooled sufficiently,
turn
the
projector
off
and
unplug
the
power cord.
Open
the
LAMP
DOOR
by pressing
down on
the
latch.
Grasp
the
small
PULLOUT
HANDLE
on
the
LAMP-BRACKET
ASSEMBLY
, and pu
ll
it
away from the
projector
to
the
stop
position.
If
you
cannot
wait
10
minutes
for
the
projector
to
cool
without
the
fan, you
may
want
to use a complete,
spare
lamp module
with
an
extra
(cool) lamp
already
in place. See
back
cover.
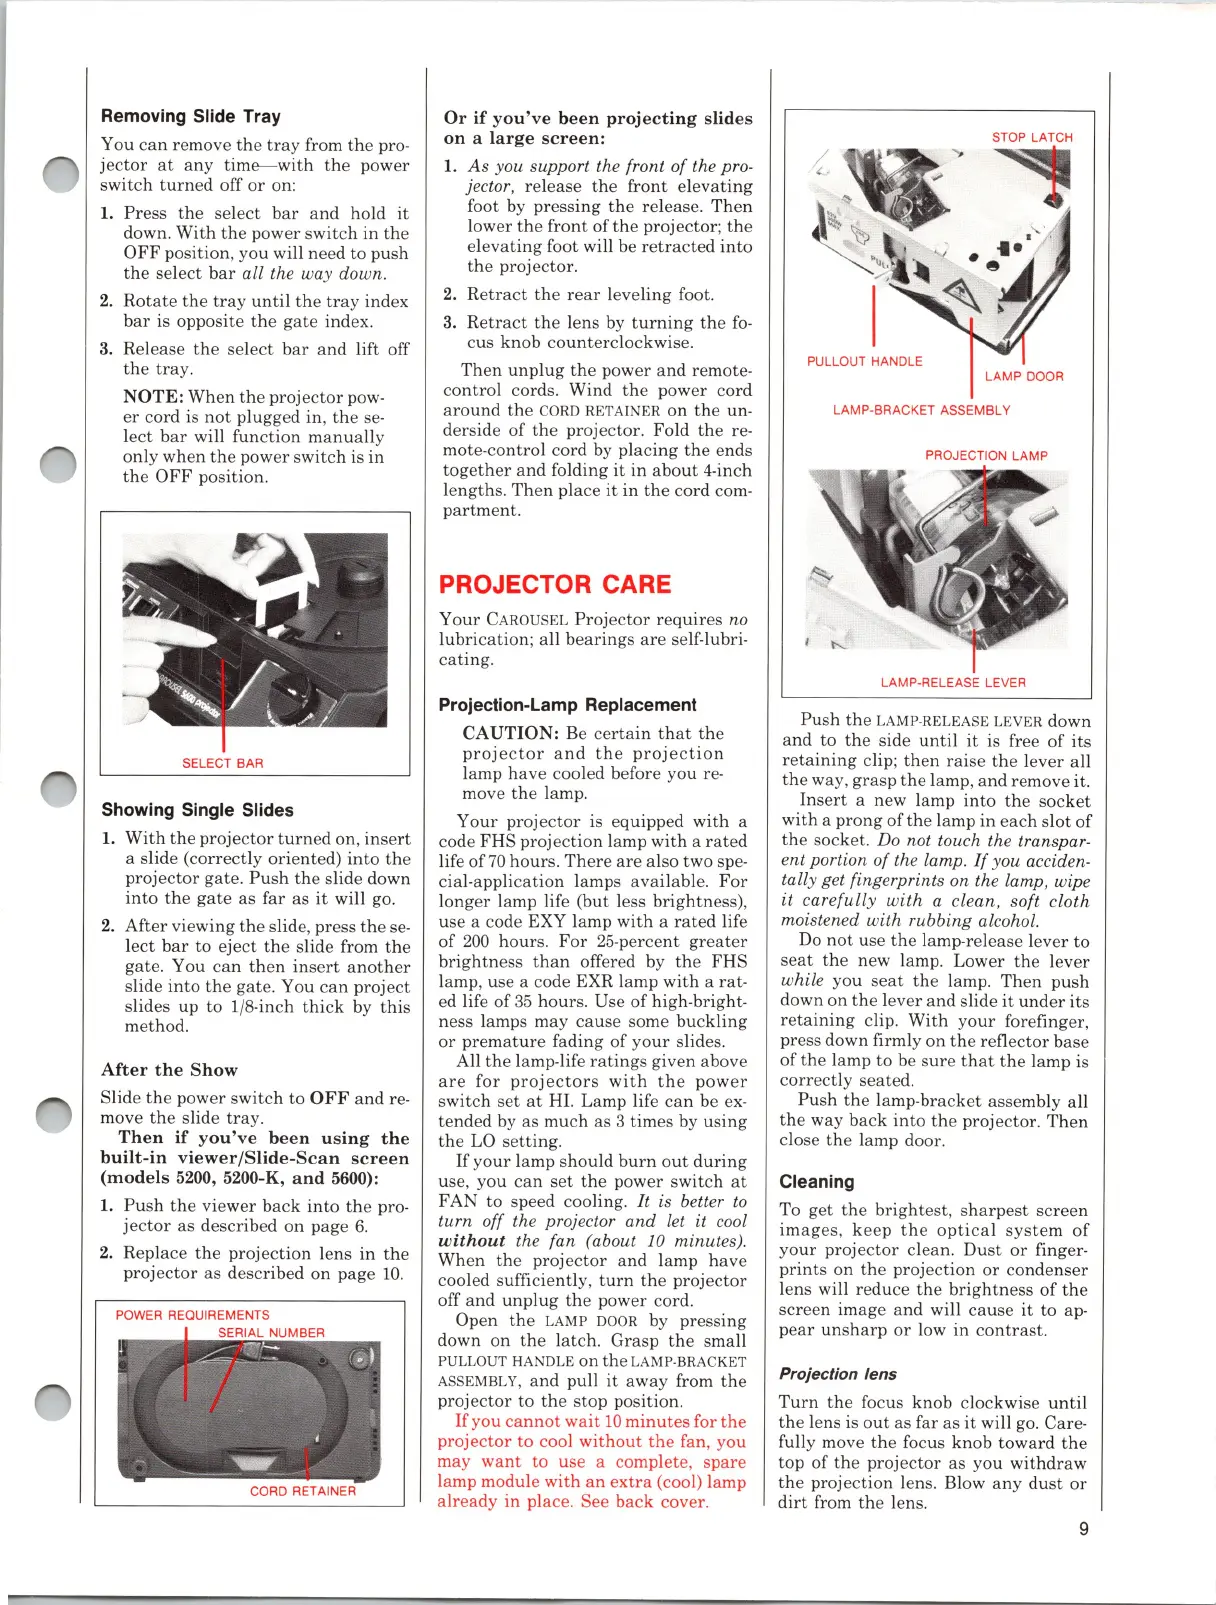
STOP LATCH
PULLOUT HANDLE
LAMP DOOR
LAMP-BRACKET ASSEMBLY
PROJECTION LAMP
LAMP-RELEASE LEVER
Push
the
LAMP·RELEASE
LEVER
down
and
to
the
side
unti
l
it
is free
of
its
retaining
clip;
then
raise
the
lever all
the
way,
grasp
the
lamp,
and
remove it.
Insert
a new lamp
into
the
sock
et
with a prong
of
the
lamp
in
each
slot
of
the
socket
. Do not touch the transpar-
ent portion
of
the lamp.
If
you acciden-
tally get fingerprints on the lamp, wipe
it
carefully
with
a clean, soft cloth
moistened with rubbing alcohol.
Do
not
use
the
lamp-release lever to
seat
the
new lamp. Lower
the
lever
while you
seat
the
lamp.
Then
push
down on
the
lever and slide
it
under
its
retaining
clip. With
your
forefinger,
press down firmly on
the
reflector
base
of
the
lamp to be
sure
that
the
lamp is
correctly seated.
Push
the lamp-bracket assembly all
the
way
back
into
the
projector. Then
close
the
lamp door.
Cleaning
To get
the
brightest,
sharpest
screen
images,
keep
the
optica
l
system
of
your
projector
clean.
Dust
or
finger-
prints
on
the
projection
or
conden
ser
lens will reduce
the
brightness
of
the
screen image
and
will
cause
it
to ap-
pear
unsharp
or
low in
contrast.
Projection le
ns
Turn
the
focus knob clockwise
unti
l
the
lens is
out
as far
as
it
will go. Care-
fully move
the
focus
knob
toward
the
top
of
the
projector
as you
withdraw
the
projection lens. Blow
any
du
st
or
dirt
from
the
lens.
9