EasyManua.ls Logo

Kohler MEMOIRS User Manual

Kohler MEMOIRS
8 pages
To Next Page IconTo Next Page
Page #1 background imageLoading...
Page #1 background image
, 2013
Copyright Kohler China Ltd., 2013
MEMOIRS
SINGULIER
INSTALLATION INSTRUCTIONS
8mm
HINGED, ANGLE, 1DR2PAN, 8mm
K-36938T/K-36952T
10mm
HINGED, ANGLE, 1DR2PAN, 10mm
K-36945T/K-36959T
-1-
13-1 528437
·
·
·
·
·
·
2
80mm
3mm/m
·
·
·
·
·
·
Before you install your shower door, please read
these instructions carefully to familiarize yourself
with the required tools, materials, and installation
sequences. Follow the sections that pertain to your
particular installation. This will help you avoid costly
mistakes. In addition to proper installation, read all
operating and safety instructions.
All information is based on the latest product
information available at the time of publication.
Kohler China Ltd. reserves the right to make
changes in product characteristics, packaging, or
availability at any time without notice.
These instructions contain important care, cleaning,
and warranty information-
Make sure that the bath and the finished wall
material are completely and correctly installed prior
to installing your shower door. Prepare waterproof
layer to wall and floor of the showering area. It is not
allowed for any presence of electric switches and
sockets. Make sure the floor drain runs smoothly.
Before starting the door installation, lay out and
identify all the parts. Use the exploded view
illustrated on page 2 for reference.
For the installation method of customized shower
with different dimensions, please refer to this
instructions.
Tempered glass cannot be cut, drilled or knocked
by hard object. Make sure corner area of the
glass refraining from knocking so as to cause
personal injury due to broken glass.
Please install this door on Kohler
receptors or curbs (Not included). If the curb is not
Kohler-branded, please note its top width should fall
above 80mm.
The shower door requires a flat vertical
finished wall. The squareness of the wall is
recommended no more than 3 mm/m. KOHLER
Company won't take responsibility of the installation
quality.
please leave these
instructions for the consumer.
CAUTION: Risk of injury or product damage.
ATTENTION:
IMPORTANT:
1146426-T01-B
Question and Answer IconNeed help?

Do you have a question about the Kohler MEMOIRS and is the answer not in the manual?

Kohler MEMOIRS Specifications

General IconGeneral
BrandKohler
CategoryShower Cabins
CollectionMEMOIRS
FinishWhite
Drain PlacementCenter
ADA CompliantYes
WarrantyOne-Year Limited Warranty

Summary

Before You Begin

Roughing-In and Dimensions

Parts Identification

Installation Steps

Step 1: Prepare Glass and Wall Clips

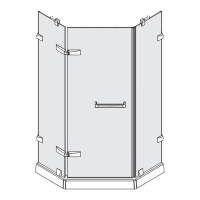
Fix gasket to glass and affix wall clip to glass with screws not locked.

Step 2: Secure Wall and Floor Clips

Fix wall clips and floor clips, ensuring correct alignment and securing.

Step 3: Level Glass and Secure Clips

Align glass to level and lock the wall and floor clips securely.

Step 4: Install Second Side Glass

Complete glass installation on the other side following the same steps.

Step 5: Attach Hinges to Glass

Affix hinges to the top and bottom holes of the glass, screws not locked.

Step 6: Attach Hinges to Glass (Continued)

Affix hinges to bottom glass holes and ensure correct orientation.

Step 7: Align and Secure Hinges

Align door glass with hinge locations and affix, securing hinge plates.

Step 8: Level Glass and Lock Hinges

Align cams with tools to level the glass and then lock the screws.

Step 9: Fix Handle

Install the shower door handle.

Step 10: Install Bottom Components

Fix the bottom gasket and install bottom frame channel and cap.

Step 11: Fix Magnetic Stripe and Gasket

Install the magnetic stripe and gasket.

Step 12: Adjust Door Alignment

Adjust wall clip and floor clip if door opens unwell for complete closure.

Step 13: Fix Tierod

Install the tierod for structural support.

Step 14: Install Cover Caps

Fix the cover caps to the wall clips and hinges for a finished look.

Step 15: Apply Waterproof Gel

Fix the bottom of the glass and apply waterproof gel for sealing.

Step 16: Post-Installation Wait Time

Do not use the enclosure for at least 24 hours after installation.