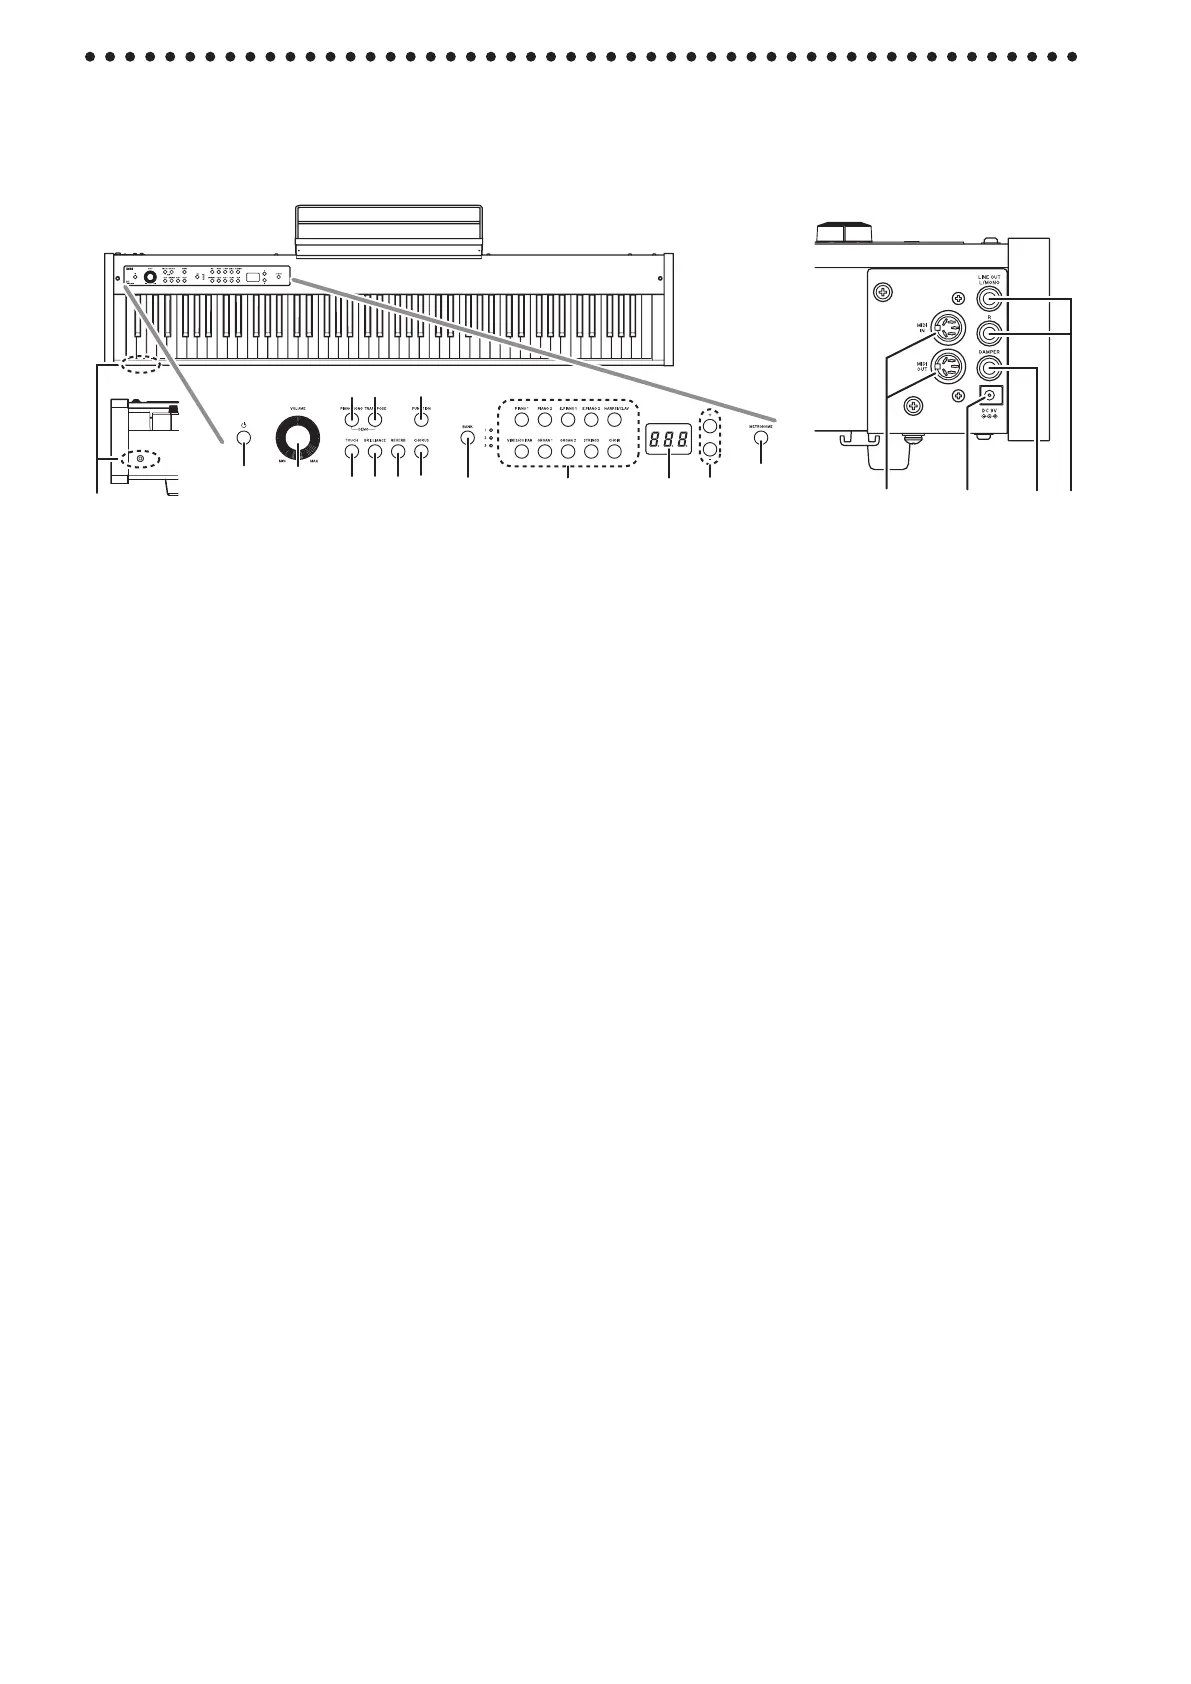
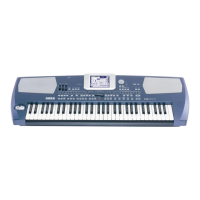
4
12. Soundbuons:
This button is used to select from 30 sounds (10 × 3
banks).Twobuonscanbepressedtoplaytwosounds
simultaneously (Layer mode).
13. Display:
Thedisplayshowsseings,forexample,fortheFunc-
tion mode and the metronome.
14. +,–buons:
Thesebuonsareusedtoselectavalueforthevarious
seings.
15. METRONOMEbuon:
Thisbuonisusedtostart/stopthemetronome.While
themetronomeisbeingused,thebuonlightsup.In
addition,holddownthebuontoentertheMetronome
seingsmode,wherevariousmetronomeseingscan
bespecied.
16. MIDI(IN,OUT)connectors:
These are connectors that are used to connect other
MIDIdevices(sequencer,keyboards,etc.).
IN: Data input
(tobeconnectedtotheMIDIOUTconnectorof
anotherMIDIdevice).
OUT: Data output
(tobeconnectedtotheMIDIINconnectorof
anotherMIDIdevice).
17. DC9Vjack:
Connect the included AC adapter here.
18. DAMPERjack:
Connect the damper pedal included with the D1, or a
DS-1H damper pedal (sold separately).
19. LINEOUT(L/MONO,R)jack:
These are the main audio output jacks. Use an audio
cable with a standard phone jack to connect the D1 to
the input jacks of a speaker with amplifier or to the
AUX IN of other audio equipment.
UsetheVOLUMEknobtosettheoutputvolume.
2
3
8
7
10
11
9
4
6
5
12
14
13
15
17 18
16
19
Control panel Rear panel
1. Headphonesjack:
A stereo mini plug for headphones can be inserted
here.
2. Powerbuon:
ThisbuonturnstheD1onoro.
3. VOLUMEKnob:
This knob adjusts the volume for the LINE OUT and
the headphones jack.
4. PIANOSONGbuon:
ThisbuonisusedtoenterthePianosongmode,after
which the button lights up. Simultaneously pressing
this button and the TRANSPOSE button enters the
Sound demo song mode.
5. TRANSPOSEbuon:
Thisbuonisusedtoadjusttransposition.Whiletrans-
posing,thebuonlightsup.Simultaneouslypressing
this button and the PIANO SONG button enters the
Sound demo song mode.
6. FUNCTIONbuon:
ThisbuonisusedtoentertheFunctionmode,where
pitch, temperament and other settings can be speci-
ed.HolddownthebuontoentertheMIDIfunction
mode,whereMIDIseingscanbespecied.Thebuon
lights up when the D1 enters the Function mode and
blinkswhenitenterstheMIDIfunctionmode.
7. TOUCHbuon:
Thisbuonletsyouselectthekeyboardsensitivity.
8. BRILLIANCEbuon:
Thisbuonisusedtoadjustthebrightnessofthetone.
9. REVERBbuon:
Thisbuttonisusedtoturnon/offthereverb,which
addsambiencetothesound.Whenthiseectison,the
buonwillbelitup.
10. CHORUSbuon:
Thisbuttonisusedtoturnon/offthechorus,which
addsrichnesstothesound.Whenthiseectison,the
buonwillbelitup.
11. BANKbuon/LEDs:
This button is used to select the desired sound bank.
The LED for the bank that’s currently selected will
light up.
Parts and their functions