7
Installation
Your AT-1000Pro is intended for indoor use only; it is not water-resistant. If you use it outdoors
(Field Day, for example) you must protect it from rain. Place your AT-1000Pro as near as
practical to your exciter (your transceiver or transmitter) and your amplifier, keeping free access
to the front panel controls. You should avoid placing other equipment on top of your AT-1000Pro
if possible.
Grounding will significantly improve the safety and performance of your tuner. Attach the ground
connection on the back panel to a suitable ground using heavy-gauge wire or metal braid. A
dedicated outside ground rod is best, but a nearby cold water pipe is sometimes satisfactory. The
ground connection on an AC outlet will not work satisfactory.
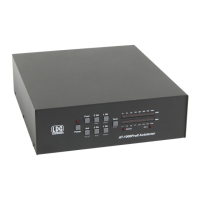
Connect the socket marked “Transmitter” on the back of your AT-1000Pro to your amplifier
output using high-quality 50-ohm coaxial cable and PL-259 plugs. Do not use crimp-on plugs for
this connection; only properly soldered plugs will be safe and provide satisfactory performance.
The coaxial cable should be rated for the maximum output of your amplifier. Keep the cable as
short as practical.
Attach your antenna lead-in coax to the desired antenna socket, either Ant 1 or Ant 2 on the rear
of the tuner with a soldered PL-259 plug. You can have two antennas connected at the same time
and switch between them using the front panel switch. Use cable rated for the maximum power
output of your amplifier. Your AT-1000Pro is intended for use with coax-fed (unbalanced)
antennas only. If you wish to use it with antennas fed with ladder-line, or with longwire antennas
you must provide a suitable balun to adapt your AT-1000Pro to the balanced load. LDG does not
presently sell a balun that handles 1,000 watts, but they are readily available from many ham
radio vendors.
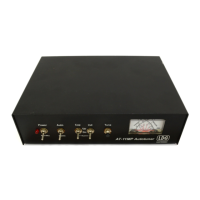
Your AT-1000Pro requires 11 – 15 volts DC at 1 Amp. If your radio runs on 12 volts DC, you
can use the same power supply for your AT-1000Pro if it can provide the necessary 1 Amp
current; otherwise, you will need a separate power supply. We recommend a regulated supply be
used for satisfactory results. Connect the power supply to the DC power jack on the back of your
AT-1000Pro using the provided 2.5 x 5.5 mm coaxial power plug. Be sure to observe proper
polarity; the center pin and the red lead are positive.
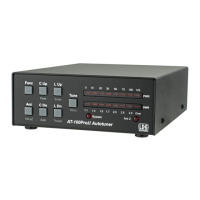
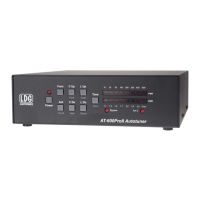
Setup
There are three power-up options, selected by holding down one ore more buttons while applying
DC power (typically by plugging in the DC power connector).
Version Display:
Press and hold the Power button while applying DC power to the tuner. The upper three LEDs
(on Auto, C Up and L Up switches) will blink the version number. The left-hand LED will blink
the whole number, the middle LED the decimal point (one blink) and the right-hand LED the
fractional part of the version number. For example, if your tuner has Version 3.2 of the software,
the left-hand LED will blink three times, the center once and the right-hand LED twice: 3.2.
This is only an example; your tuner may have a different software version number.
 Loading...