Page 26
5- Make sure the connections are tight.
Discharge and suction pressures should operate at their
normal start‐up ranges.
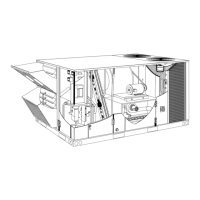
FIGURE 19
REFRIGERANT CIRCUITS
092/150
1
2
(BOTH FANS ARE ENERGIZED
WITH A Y1 DEMAND)
EVAPORATOR
COIL STAGE 2
EVAPORATOR
COIL STAGE 1
D-Safety or Emergency Shutdown
Turn off power to unit. Close manual and main ga valves.
IV-CHARGING
WARNING
Refrigerant can be harmful if it is inhaled. Refrigerant
must be used and recovered responsibly.
Failure to follow this warning may result in person
al injury or death.
WARNING-Do not exceed nameplate charge under any
condition.
This unit is factory-charged and should require no further
adjustment. If the system requires additional refrigerant, re
claim the charge, evacuate the system and add required
nameplate charge.
NOTE - System charging is not recommended below 60°F
(15°C). In temperatures below 60°F (15°C) , the charge
must be weighed into the system.
If weighing facilities are not available, or to check the
charge, use the following procedure:
1- Attach gauge manifolds and operate unit in cooling
mode with economizer disabled until system stabilizes
(approximately five minutes). Make sure outdoor air
dampers are closed.
2- Check each system separately with all stages operating.
3- Use a thermometer to accurately measure the outdoor
ambient temperature.
4- Apply the outdoor temperature to tables 7 through 10
to determine normal operating pressures.
Pressures are
listed for sea level applications at 80°F dry bulb and 67°F wet
bulb return air.
5- Compare the normal operating pressures to the pres
sures obtained from the gauges. Minor variations in
these pressures may be expected due to differences in
installations. Significant differences could mean that
the system is not properly charged or that a problem
exists with some component in the system. Correct
any system problems before proceeding.
6- If discharge pressure is high, remove refrigerant from
the system. If discharge pressure is low, add refrigerant
to the system.
S Add or remove charge in increments.
S Allow the system to stabilize each time refrigerant
is added or removed.
7- Use the following approach method along with the nor
mal operating pressures to confirm readings.
TABLE 7
KGA092 NORMAL OPERATING PRESSURES
Outdoor
Coil
Entering
Air Temp
CIRCUIT 1 CIRCUIT 2
Dis
charge
+
10 psig
Suction
+
5 psig
Dis
charge
+
10 psig
Suction
+
5 psig
655 F 260 130 269 132
755 F 301 133 311 133
855 F 343 135 354 136
955 F 388 138 401 139
1055 F 435 140 449 141
1155 F 481 142 497 144
TABLE 8
KGA102 NORMAL OPERATING PRESSURES
Outdoor
Coil
Entering
Air Temp
CIRCUIT 1 CIRCUIT 2
Dis
charge
+
10 psig
Suction
+
5 psig
Dis
charge
+
10 psig
Suction
+
5 psig
655 F 262 128 270 129
755 F 299 131 310 131
855 F 342 134 353 134
955 F 386 137 399 136
1055 F 434 140 448 139
1155 F 487 143 501 142
TABLE 9
KGA120 NORMAL OPERATING PRESSURES
Outdoor
Coil
Entering
Air Temp
CIRCUIT 1 CIRCUIT 2
Dis
charge
+
10 psig
Suction
+
5 psig
Dis
charge
+
10 psig
Suction
+
5 psig
655 F 275 135 282 136
755 F 313 137 323 138
855 F 355 140 366 141
955 F 400 142 414 143
1055 F 447 145 464 145
1155 F 499 148 517 148
 Loading...