Wiring 6 The wiring of you unit and switch controls are shown in the
diagrams at the end of this section. Please ensure that you
follow the diagram for your system (Dual Direction or Single
Direction).
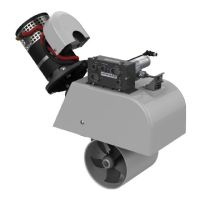
7 Mount the control box close to the motor, (within 1 meter),
preferably in a dry environment.
8 Connect the electrical cables from the control to the motor
(customer supply). Ensure that the cables are secure and
that the rubber boots are fitted before final crimping of the
terminal ends. Check that the cables are connected as per
the wiring diagram, before operating the windlass under
power.
9 Run the electrical cables from the control box to the batteries
(customer supply). Ensure that the cables are secure and
that the rubber boots are fitted before final crimping of the
terminal ends. Check that the cables are connected as per
the wiring diagram, before operating the windlass under
power.
10 Smear all terminals with grease, for extra protection against
corrosion, before fitting the rubber boots.
NOTE AIR Deck Switches
If using an AIR deck switch system. Please ensure that the
small breather hole, located on the underside of the switch
body, is kept clear and free from sealing compound on
installation.
ELECTRIC Deck Switches
Use 16/0.2 wire to connect the deck switches to the control
box.