§
()
=
::J
.:-
g:
::J
r-
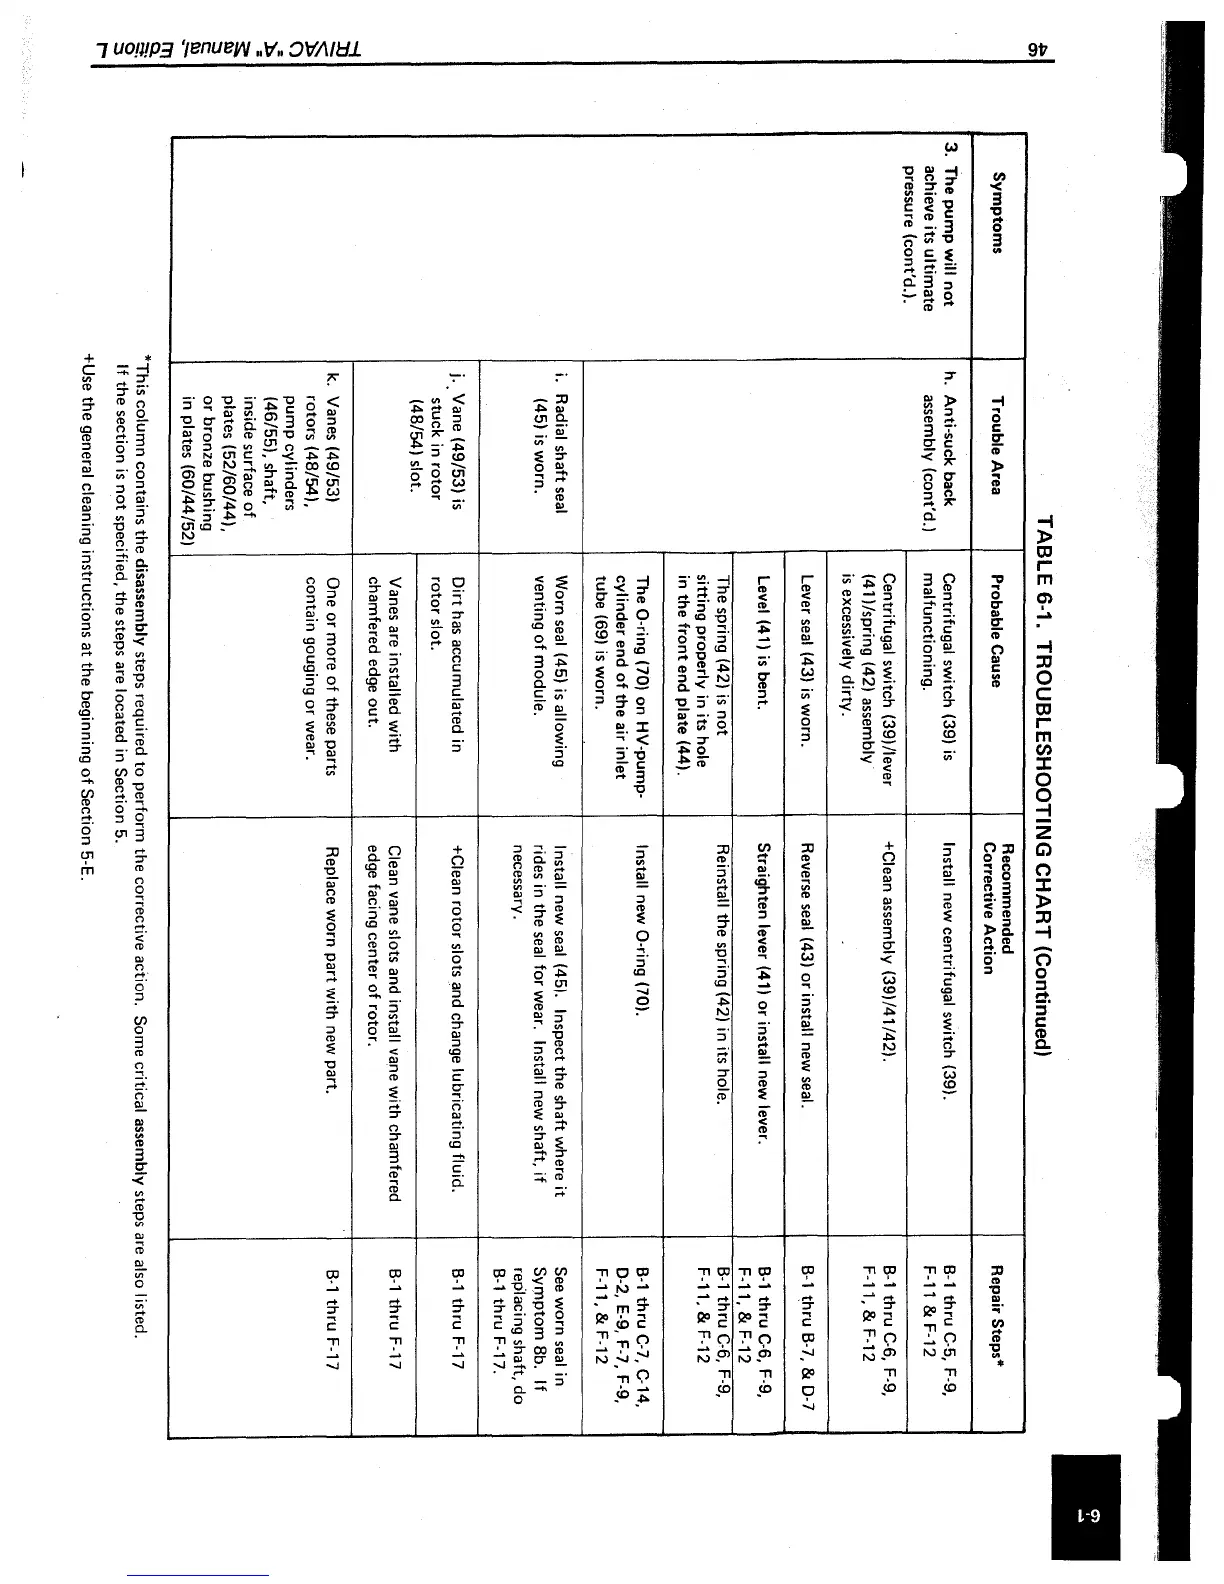
Symptoms
3.
The
pump
will
not
achieve its ultimate
pressure (cont'd.).
TABLE
6-1.
TROUBLESHOOTING
CHART
(Continued)
Trouble Area
Probable Cause
Recommended
Repair Steps*
Corrective Action
h.
Anti·suck back
Centrifugal switch (39)
is
Install new centrifugal switch (39).
B-1
thru
C-5,
F-9,
assembly (cont'd.)
malfunctioning.
F-ll
& F-12
Centrifugal switch (39)/lever +Clean assembly (39)/41/42).
B-1
th ru
C-6,
F-9,
(41
)/spring (42) assembly
F-l1,
& F-12
is
excessively dirty.
Lever seal (43)
is
worn. Reverse seal (43)
or
install new seal.
B-1
thru
B-7,
&
0-7
Level (41)
is
bent. Straighten lever (41)
or
install new lever.
B-l
thru
C-6,
F-9,
F-ll,
& F-12
The spring (42)
is
not
Reinstall
the
spring (42)
in
its hole.
B-l
thru
C-6,
F-9,
sitting properly
in
its hole
F-ll,
& F-12
in
the
front
end
plate (44).
The
a·ring
(70)
on
HV·pump·
Install
new
a·ring
(70).
B-l
thru
C-7,
C-14,
cylinder end
of
the air inlet
0-2,
E-9, F-7, F-9,
tube
(69)
is
worn.
F-l1,
& F-12
i.
Radial shaft seal
Worn seal (45)
is
allowing
Install new seal (45). Inspect the shaft where it
See worn seal
in
(45)
is
worn.
venting
of
module.
rides
in
the
seal for wear. Install new shaft,
if
Symptom
8b.
If
necessary.
replacing shaft,
do
B-l
thru
F-17.
j
..
Vane (49/53)
is
Dirt has accumulated
in
+Clean
rotor
slots and change lubricating fluid.
B-l
th
ru
F-17
stuck
in
rotor rotor
slot.
(48/54) slot.
Vanes are installed with Clean vane slots and install
vape with chamfered
B-l
thru
F-17
chamfered edge
out.
edge facing
center
of
rotor.
k.
Vanes (49/53) One or more
of
these parts
Replace worn
part
with new part.
B·l
thru
F-17
rotors (48/54), contain gouging
or
wear.
pump
cylinders
(46/55), shaft,
inside surface
of
plates (52/60/441.
or
bronze bushing
in
plates
(60/44/52)
*This
column
contains
the
disassembly steps required
to
perform
the
corrective action. Some critical assembly steps are also listed.
If
the
section
is
not
specified,
the
steps are located
in
Section 5.
+Use
the
general cleaning instructions
at
the
beginning
of
Section 5-E.
 Loading...