12
1. Overview
2. Set Up & Use /
Daily Operation
3. Optional Accessories
4. Maintenance &
Troubleshooting
5. Warranty, Safety
& Specifications
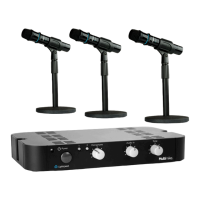
2A. CONNECT MULTIMIKE TO AMPLIFIER
STANDARD UNBALANCED CONNECTION
BALANCED CONNECTION FOR LONGER CABLE RUNS
REGISTER
USB POWER
5V/0.2A
+
–
AUDIO IN BAL. AUDIO OUT
AUDIO OUT
MIC LINE
AUDIO OUT/DC IN
AUDIO AMPLIFIER
INPUT CONNECTION
3.5MM AUDIO CABLE
(INCLUDED)
1. Plug one end of the included 3.5mm
cable into the AUDIO OUTPUT
connection on the Multimike.
2. Plug the other end into a microphone or
audio input connection on an amplifier.
NOTE: Depending on the type of input
jack on the amplifier, an adapter or other
audio cable with matching plug may be
required (not included).
3. Set the MIC/LINE level switch in the
appropriate position. Generally LINE
level is used unless the amplifier input
is specifically marked as a “Microphone
Input.”
In the event the Multimike must be located
more than 12 feet away from the amplifier,
it is recommended to use the balanced
audio output on the Multimike. To ensure a
fully balanced connection, there must be a
true balanced input on the amplifier and a
balanced audio cable must be used.
1. Connect the stripped wires into the
marked openings on the euro-block
connector:
A. Insert the positive and negative
signal wires to the marked
terminals.
B. Insert the shield to the ground
terminal.
4. Secure the inserted wires by tightening
the retaining screws.
5. Connect the other end of the cabling to a
balanced input on the existing amplifier.
REGISTER
USB POWER
5V/0.2A
+
–
AUDIO IN BAL. AUDIO OUT
AUDIO OUT
MIC LINE
AUDIO OUT/DC IN
AUDIO AMPLIFIER
BALANCED INPUT CONNECTION
BALANCED AUDIO
CABLE (NOT INCLUDED)