19
1. Overview
2. Set Up & Use /
Daily Operation
3. Optional Accessories
4. Maintenance &
Troubleshooting
5. Warranty, Safety
& Specifications
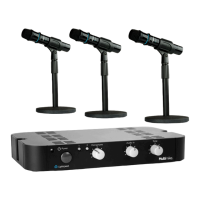
1. Make sure the charger is plugged
into a wall outlet. Connect barrel end
of the charging cable into the jack
labeled CHARGE on the bottom of the
Sharemike.
2. Plug the other end into the USB jack
on the back of the cradle charger.
(Figure 1)
3. When cradle charger is not included
with a Sharemike-only system,
connect the USB end of the charging
cable into the charging adaptor and
the barrel end into the jack labeled
CHARGE on the bottom of the
Sharemike. (Figure 2)
4. Plug the 5V power supply into the
power jack on the charging adaptor
and plug power supply into a wall
outlet.
5. The MIC 2 light on the microphone will
glow red to indicate charging.
6. Leave the Sharemike plugged in
overnight (8-10 hours) to obtain a full
charge. The light will turn green when
charging is complete.
7. During charging the blue status light
will stay on.
SHAREMIKE: CHARGING
PLEASE NOTE: The Multimike and microphone(s) are registered together at the
factory. If you have purchased a Sharemike with your Multimike, keep all components
together as a system. Moving them from one system, or room, to another will result in
the need to re-register.
Figure 1
REGISTER
USB POWER
5V/1.5A
TONE
TREBLE BASS
Figure 2