Rev: 02.01.21 Page 1 CCD-0004129
PSX1™ STABILIZER MOTOR REPLACEMENT
TI-379
LEVELING AND STABILIZATION
Purpose
This document outlines the removal and replacement of the PSX1 Stabilizer Motor.
Safety
Resources
• 4 mm hex wrench
• 8 mm combination wrench
• Rotary cutting/grinding tool
Procedure
Motor Removal
1. Disconnect power to the motor from the power source of the unit.
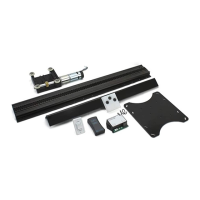
2. Using the 8 mm combination wrench and 4 mm hex wrench, remove the two socket cap screws and
nuts securing one side of the motor to the motor mounting plate.
3. Using the 4 mm hex wrench only, remove the remaining two socket cap screws securing the motor to
the motor mounting plate.
The “CAUTION” symbol above is a sign that a safety risk is involved and may cause personal injury
and/or product or property damage if not safely adhered to and within the parameters set forth
in this manual.
Always wear eye protection when performing this installation procedure. Other safety
equipment to consider would be gloves and possibly a full face shield, depending on the
nature of the installation procedure.
Fig. 1
Socket Cap Screw
Nut
NOTE: Motor mounting plate not
shown for clarity.