12
lippert.com 432-LIPPERT (432-547-7378) Rev. 09.29.23
JT’s Strong Arm
™
Installation and Owner’s Manual
(For Aftermarket Applications)
CCD-0001455
Installation
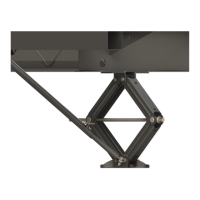
1. Measure 1 1/4” from the edge of the footpad inward and onto one of the star points on top of the footpad. The front face
of the lug will be placed here with the back of the lug continuing to move inward.
2. Use a non-permanent method of marking (such as a pencil) to mark lug locations.
3. Using a cordless or electric drill or screw gun, drill a 3/8” hole under the footpad.
4. Bolt lugs to footpad using a liquid thread locker on the bolts.
NOTE: The best practice is to bolt footpads using provided screws. However, users with an advanced skill level and using
best safety and welding practices may choose to weld the lugs and footpads.
NOTE: Fourth rear footpad not shown.
Manual information may be distributed as a complete
document only, unless Lippert Components provides
explicit consent to distribute individual parts.
All manual information is subject to change without
notice. Revised editions will be available for free
download at lci1.com. Manual information is considered
factual until made obsolete by a revised version.
Please recycle all obsolete materials and contact
Lippert Components with concerns or questions.
Notes

 Loading...