Do you have a question about the Louet David and is the answer not in the manual?
Instructions for assembling and attaching the back part, noting its folding capability for storage.
Steps for attaching the brake disc and wooden dowel to the protruding end of the warp beam.
Instructions for threading the brake cable through the brake handle.
Steps for mounting the brake handle, washers, and cap nut onto the warp beam support.
Connecting the brake cable to the eye bolt and securing it with the knurled nut.
Instructions for adjusting brake cable tension and managing the ratchet for brake use.
The Louët David loom is a sophisticated weaving machine designed for both novice and experienced weavers, offering a blend of traditional craftsmanship and modern engineering. Its primary function is to facilitate the creation of woven textiles by manipulating warp and weft threads. The loom is designed to be assembled by the user, with clear instructions provided to guide through each step, from connecting the main frame to installing the intricate braking system.
The David loom operates on the principle of creating a "shed" – an opening between sets of warp threads – through which the weft thread is passed. This is achieved by a system of shafts, lams, and treadles. The loom features multiple shafts, each equipped with Texsolv heddles, which are Swedish-made, crocheted polyester yarn loops. These heddles hold individual warp threads and are lifted or lowered by the shafts. The lams, connected to the shafts, are in turn linked to the treadles. When a weaver presses a treadle, it activates specific lams, which then pull down corresponding shafts, creating the desired shed pattern. The beater, which holds the reed, is then used to push the newly inserted weft thread tightly against the previously woven fabric, a process known as "beating up."
The loom includes a warp beam and a cloth beam. The warp beam holds the unwoven warp threads, which are gradually released as weaving progresses. The cloth beam collects the finished woven fabric. Both beams are equipped with ratchet wheels, allowing for precise tension control and advancement of the warp and cloth. A braking system, optionally available for the warp beam, provides additional control over warp tension, crucial for maintaining consistent weave quality.
The David loom's design emphasizes quiet operation, a key advantage of its Texsolv heddles compared to traditional metal heddles. The system of springs located at the top of the loom pulls the shafts upwards, ensuring smooth and responsive shed changes. A locking pin is integrated into the design to temporarily block the movement of springs, discs, shafts, lams, and treadles, which is particularly useful during setup or maintenance tasks like adding or removing heddles.
The assembly process of the David loom is designed to be user-friendly, with pre-assembled sections like the castle section to simplify initial setup. The use of barrel nuts for connecting parts is a notable feature, allowing for secure and adjustable connections. The barrel nuts have a visible slot indicating the direction of the threaded hole, and a flat screwdriver or coin can be used to turn them for proper alignment. This system ensures that parts are correctly positioned and securely fastened.
The loom's uprights are marked (A and B) to correspond with marked sides of the top side rails, preventing incorrect assembly of the main frame. This attention to detail in the instructions helps weavers avoid common mistakes during setup.
The Texsolv cord system, used for heddles and various tie-ups, offers significant adjustability. The cord can be shortened in 12 mm steps using its inherent loops. For finer adjustments, plastic pegs can be inserted into the loops, each peg shortening the cord by approximately 1.5 mm. This precise adjustability is vital for fine-tuning the loom's mechanics, such as the level of the shafts, which directly impacts shed formation. The instructions advise releasing cord tension when inserting pegs to ease the process.
The treadles are assembled onto a foot rail, with screw heads pointing towards the middle, ensuring correct orientation. Axle suspension blocks and large screws are used to secure pairs of treadles to the foot rail, creating a stable and responsive treadling system.
The loom's back part, comprising warp beam supports, the back beam, and the warp beam, is designed for easy connection using screws. A notable feature is the ability to fold the back part of the David loom to save space when not in use. This is achieved by unscrewing wing nuts from threaded ends, allowing the back part to fold. A warp or ties can keep it folded against the uprights.
The cloth beam is installed by first inserting the side with the ratchet wheel into a hole in the side rail, then pushing and turning the beam through. The other end is slipped into place by slightly pushing the side of the loom outwards. Ratchets are installed next to the ratchet wheels of both beams, secured with round head screws, and adjusted to turn freely.
Beam handles are inserted through holes in the beams and secured with rubber O-rings, with a spare O-ring provided. If a warp beam brake is installed, the handle is omitted from the warp beam.
Lease sticks can be attached to screw eyes on the warp beam supports. Weavers have the option to keep lease sticks in the warp during weaving, ensuring they do not pass the back beam to maintain effective shed depth, or to remove them entirely based on personal preference.
Cords are attached to the warp and cloth beams using small screws, starting from one side and connecting cord ends in sequence through the beam holes.
The beater is inserted into nylon bearings on the suspension bars, ensuring the curve in the beater supports faces the correct direction. The beater support needs to be bent slightly to snap into the bearing on the other side.
The breast beam is installed by fitting its metal dowels into holes on the front posts. The plastic foil protecting the reed must be removed. The reed can be taken out of the beater by pulling the top beater bar upwards and then pushing it down at one end. The lower beater bar can serve as an arm support during threading or can be turned to the backside of the loom after removing the breast beam.
A shelf, packed with the beater, is installed with a specific hole located at the right back side, designed to store the locking pin.
The Texsolv heddles are designed for durability and quiet operation. If heddles need to be cut apart, sharp scissors should be used between the loops. To prevent unravelling, the ends should be singed with a match or lighter. When cutting Texsolv cord, it's important to note that the loop remaining after cutting has no strength and should not be used.
Before removing heddles from a shaft, they should be tied into a bundle to prevent entanglement. The ties provided in hardware bag 3 can be reused for this purpose.
If wood screws are used, and disassembly and reassembly are required, it's crucial to ensure the screw turns into the same thread cut the first time. This can be achieved by turning the screw counter-clockwise while pushing it into the wood until it snaps into the existing thread, then turning clockwise. This practice helps preserve the integrity of the wood and prevents thread destruction over multiple assemblies.
For adding or removing heddles, the locking pin should be inserted to block the wooden discs, which removes tension from the springs and the entire system, making the process easier.
A practical tip for maintenance is to insert a knitting needle through all the cords connected to the upper shaft bars on the left side. This keeps the cords in place when an upper shaft bar is unhooked, preventing them from getting tangled or lost.
The loom's design, with its metric hardware parts, is supported by a provided set of metric wrenches and a Pozidrive 2 cross head screwdriver, ensuring that users have the correct tools for assembly and any subsequent adjustments or maintenance.
Louët products are backed by a guarantee against manufacturing defects, and the company encourages users to contact their dealer or Louët directly for any questions or issues, highlighting a commitment to customer support and product longevity.
| Type | Upright |
|---|---|
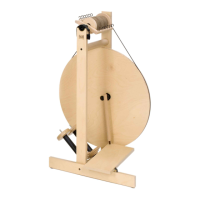
| Drive System | Scotch tension |
| Bobbin Size | Standard Louet bobbin |
| Ratios | 1:7.5, 1:10.5 |
| Material | Beech |
| Drive | Single |
| Bobbin Capacity | approx. 130 g (4.5 oz) |
| Treadle | Single |