08
09
max 57mm
Ø14mm
n
o
p
g
e
h
m
i
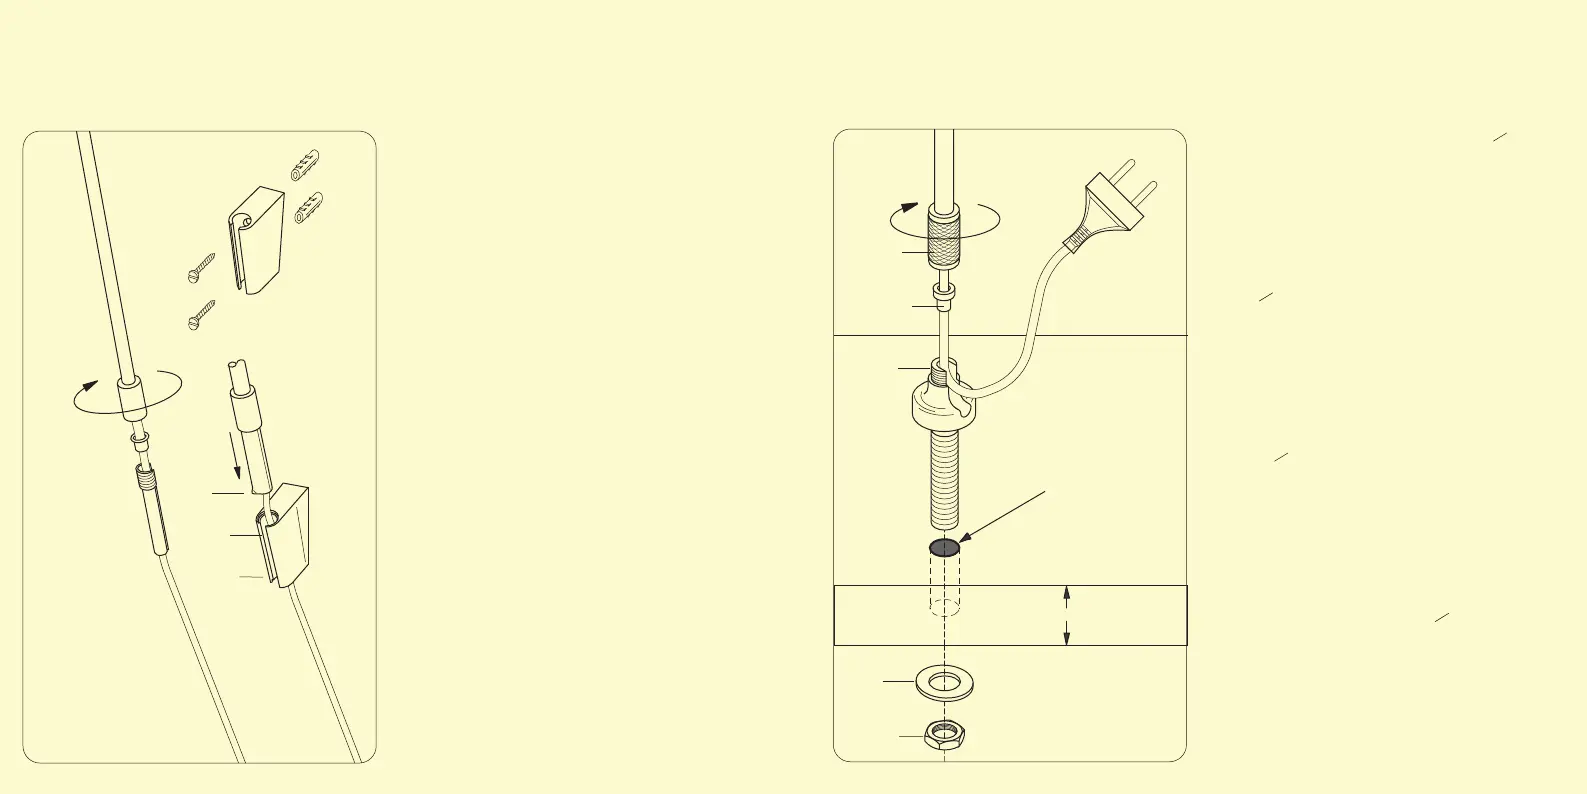
Inserimento in attacco a parete
Mounting on wall support
Einsetzen in die Halterung
Placement sur les supports au mur
Inserimento su perno tavolo
Mounting on table pin
Befestigung auf dem Stift
Introduction sur pivot pour table
Il supporto per il fissaggio a parete é corredato di
due tasselli che consentono il suo utilizzo su
qualsiasi parete.
Per infilare lo stelo nel supporto (h) far
corrispondere alla fessura (i) il fermo (m) e ruotare
poi lo stelo di 90° per impedirne l'estrazione
accidentale.
The wall mount is supplied with two expansion plugs
so that it can be applied to any wall.
To insert the stem into wall mount (h), make
correspond slot (i) to stop (m), and then rotate the
stem 90° to avoid casual extraction.
Der Halterung für die Wandbefestigung sind zwei
Dübel beigelegt, mit denen die Befestigung an jeder
beliebigen Wand möglich ist.
Um die Stange in die Halterung
(h) einzuführen, die
Feststellvorrichtung (m) in Entsprechung zum Spalt
(i) bringen.
Auschließend die Stange um 90° drehen, um das
ungewollte Herausziehen zu verhindern.
Le support pour fixer la lampe au mur est muni de
deux goujons qui permettent de l'utiliser sur tout
type de mur.
Pour enfiler la tige dans le support (h), faire
correspondre le butoir (i) avec la fissure (m), et
tourner ensuite la tige à 90° pour en empêcher
l’extraction accidentelle.
Praticare sul piano un foro passante da O 14 mm.
Inserire il perno tavolo e bloccarlo con la rondella
(n) e il dado (o).
Attenzione: il passacavo (g) deve essere a
contatto con lo stelo.
Bloccare lo stelo della lampada avvitando il
nottolino (e) sulla parte filettata (p) del perno.
Drill a O 14 mm clearance hole on the surface.
Insert the table pin and lock it with the washer (n)
and the nut (o).
Warning: the fairleads (g) must be in contact with
the stem.
Fix the lamp stem by screwing the latch (e) into
the threaded area (p) of the pin.
Ein Loch (O 14 mm) durch die Platte bohren. Den Stift
einsetzen und mit der Unterlegscheibe (n) und der
Mutter (o) befestigen.
Achtung: Die Kabeldurchführung (g) zwischen die
Stange und den Stift positionieren.
Die Leuchtenstange durch Festschrauben der
Nutmutter (e) auf dem Gewinde des Stifts (p) befestigen.
Réaliser un trou de passage de O 14 mm sur la
table.
Introduire le pivot pour table et le bloquer avec la
rondelle (n) et l’écrou (o).
Attention: le guide-câble (g) doit être en contact
avec la tige.
Bloquer la tige de la lampe en vissant le cliquet
(e) à la partie filetée (p) du pivot.