43
5. Release lever
6. Brush access cover
7. Motor vents
8. Rotation indicator
9. Spindle lock
10. Saw blade
11. Rotating blade guard
12. Blade channel
13. Throat plate
14. Throat plate screw
15. Mitre table locking knob
16. Click-stop lever
17. Bevel angle lock
18. Mitre angle indicator
19. Mitre angle indicator screw
20. Mitre angle gauge
21. Mitre table
22. Fence
23. Bench mounting hole
24. Workpiece support knob
25. Workpiece support
26. Workpiece support stop
27. Clamp base
28. Fixed table
29. Clamp knob
30. Clamp
31. Bevel angle stop bolt
32. Bevel angle stop locking nut
33. Dust bag
34. Sliding bar
35. Slide lock
36. Clamp arm knob
37. Small fence wing nut
38. Fence bolt
39. Clamp mounting knob
40. Bevel nut
41. Stabiliser mounting hole
42. Rear carrying handle
43. Rear stabiliser
44. Clamp mounting thread
45. Clamp mounting
46. Latching pin
47. Carrying handle
48. Carrying handle screw
49. On/off trigger switch
50. Blade label
51. Blade flange
52. Blade washer
53. Blade bolt
54. Blade direction indicator
55. Blade panel screw
56. Blade panel
57. Blade panel screw
58. 0° Bevel adjustment locking nut
59. 0° Bevel adjustment bolt
60. Bevel angle indicator screw
61. Bevel angle indicator
62. Bevel angle gauge
63. Depth adjustment locking nut
64. Depth adjustment bolt
65. Depth adjustment knob
66. Depth plate
67. Depth stop
68. Blade hex key
69. Worklight on/off switch
70. Laser on/off
s
witch
71. Fence hex key
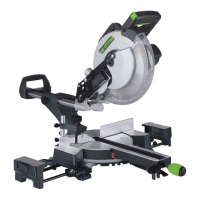
8. INTENDED USE
Mains-powered portable or bench-mounted power tool
for cutting through wood and other materials. Straight,
bevel, mitre and compound (mitre+bevel) cuts. The
included saw blade is suitable for natural wood and
man- made composite wood materials.
9. UNPACKING YOUR TOOL
• Carefully unpack and inspect your tool. Fully fami-
liarise yourself with all its features and functions.
• Ensure that all parts of the tool are present and in
good condition. If any parts are missing or dama-
ged, have such parts replaced before attempting to
use this tool.
10. BEFORE USE
WARNING: Ensure the tool is disconnected from the
power supply before attaching or changing any acces-
sories, or making any adjustments.
10.1 Bench mounting
IMPORTANT: It is recommended to mount the saw
to a bench or board. Although the saw can be used
without mounting to a bench or board there is a grea-
ter safety risk in use.
• Mount the saw to a level, horizontal bench or work
table using bolts, washers and locking nuts (not supp-
lied) through the bench mounting holes (23).
• Do not over-tighten or the base may be damaged, or
use bolts that are not a good fit for the Bench Moun-
ting Holes.
• Alternatively, mount the saw on 13 mm or thicker
board, and clamp the board to the work support; this
makes it easy to relocate the saw, clamping it to a
work support wherever needed.
• When using a board it may be necessary to counter-
sink the washers and nuts so the board is level on the
surface it is used on.
CAUTION: Make sure the mounting surface is not
warped as an uneven surface can cause binding and
inaccurate sawing.
 Loading...