STEP 11: Address GRX-4000 Control Units
Note: If using a 16 or 24 zone Control Unit, address these first.
Address Control Unit as follows:
A. Push and hold top and bottom scene buttons until scene LEDs
begin to cycle.
B. Push FADE 5 button until ‘A-’ is displayed in the FADE
window. If A(1-8) appears, then go to D since the Control Unit is
already addressed.
C. Push
MASTER 5 button once. The control will automatically
choose the next available address. Note the address of each (A1-
A8) on the Control Directory on Page 27.
If a Control or Circuit Directory already exists, push
MASTER
5 and 6 buttons to have the address match these directories.
D. Press and hold the top and bottom scene buttons until the scene
LEDs stop cycling.
Repeat Steps A-D on all GRX-4000 Series Control Units.
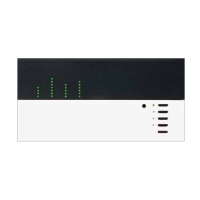
GRX-4000 Series Control Unit
Data OK LED will be Off before
addressing, then flash after
addressing (approximately
once per second)
* The Circuit Selector may take up to 1 minute to properly identify a
device on the link. During this time, a rapid flashing pattern may be
observed.
LED Status
1. Flashes once per second.
2. Blank.
3. Flashes rapidly*.
As soon as a GRX-4000 Series Control Unit is addressed, check
that the Data OK LED begins to flash on the Circuit Selector.
Flashing indicates that the panel recognizes the communication
from a GRX-4000 Series Control Unit.
Note: As soon as a GRX-4000 Series Control Unit is addressed,
Wallstations will no longer have any affect on the GRX-4000 Series
Control Units. The Wallstation communication will be reestablished
later.
A,D
B
C
For More Information . . .
16 and 24 zone GRX Control Units
........................28
Troubleshooting Guide. ....................................38,39

 Loading...