Step by Step instructions for GRAFIK Eye Dimming Panel
18
Set Up Non Dim Zones
STEP 15: Set Up Non Dim Zones (GRX-4000
Series only)
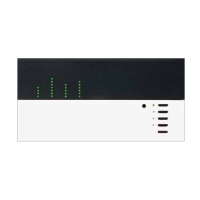
For each zone assigned to a circuit with a Non-Dim Load Type, the
LEDs on a Control Unit can be made to match the load intensity as
shown:
A. Press and hold the top and bottom scene buttons until scene
LEDs begin to sequence.
B. With ‘LS’ in the FADE window, press the zone button of the Non-
Dim zone until the top 4 or 5 LEDs are on.
Notes:
■ The Circuit Selector Load Type must be set for Non-Dim on
each circuit assigned to this zone.
■ With 4 LEDs, the load will operate on a Last On, First Off
basis. Load turns ON at the end of a fade to full and OFF at the
beginning of a fade from full.
■ With 5 LEDs, the load will operate on a First On, First Off
basis. Load turns ON at the beginning of a fade to full and
OFF at the beginning of a fade from full.
Repeat Step B for all zones controlling a Non-Dim Load Type.
C. Press and hold top and bottom scene buttons until scene LEDs
stop sequencing.
D. Repeat Steps A - C for all other GRX-4000 Series Control Units
with Non-Dim zones.
Lutron ships GRAFIK Eye Control Units with all zones set for
dimming. For each zone that controls a circuit with a dimmable load
type, the LEDs should match the load intensity as shipped.
Dimming
Load Type 1-1
Non-Dim
Load Type 4-1
with Last On,
First Off
Non-Dim
Load Type 4-1
with First On,
First Off

 Loading...