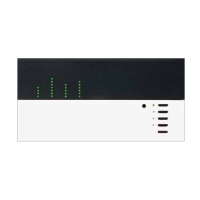
A. To view or assign the Link Hierarchy, press and hold buttons 2 and
5 until SELECT VALUE LED flashes twice repeatedly.
B. Press button 5 until the Circuit Level LED lights.
C. Use buttons 1 and 2 to choose circuit number.
D. Use buttons 3 and 4 to assign the Link Hierarchy (see Table for
options).
■ If Link Hierarchy A or b is selected, go to Step I.
■ If Link Hierarchy A2 or b2 is selected, go to Step E.
■ If Link Hierarchy A1, b1, Ab1, or Ab2 is selected, go to Step G.
E. Press button 5 until Load Type LED lights.
F. Select Zone X
4000 Series on Secondary Link: Press button 3 or 4 to select
both Control Unit and zone assignment. Example - If the control
desired is addressed to ‘A2’ and the zone desired is the 3rd from
the left, use buttons 3 and 4 to get ‘A23’ as a value for the
appropriate circuit.
6000 Series or DMX512: Press button 3 or 4 to select zone
assignment (1—512).
G. Press button 5 until the Zone Assignment w/Circuit Schedule
LED lights.
H. Select the Secondary zone assignment.
4000 Series on Secondary Link: Press button 3 or 4 to select
both Control Unit and zone assignment. Example - If the control
desired is addressed to ‘A2’ and the zone desired is the 3rd from
the left, use buttons 3 and 4 to get ‘A23’ as a value for the
appropriate circuit.
6000 Series or DMX512: Press button 3 or 4 to select zone
assignment (1—512).
Note - Primary Zone assignment is done in Step 14 of this guide.
I. Repeat steps C and D for each and every circuit to be changed.
J. Press and hold buttons 1 and 5 until VIEW VALUE LED lights.
Assign Link Hierarchy (continued)
A
B
C
D
Circuit Selector
Options

 Loading...