Ÿ NOTE - It is not critical that the display should read absolute zero (0.00). However, in this case, repeat the
above procedure by removing and restoring power to start the calibration again. If after the second
calibration the device still does not display 0.00 but is close (1 - 3mil), continue with your normal
measurements.
Advanced Calibration
a More advanced calibration sequence is advised for prolonged measurement sessions. Temperature variation
is the biggest enemy of electronic measurement. Even the heat generated by a human hand will heat the
probe enough to affect your measurements. However, the maximum effect this would probably have on
measurements is in the order of 0.1mm - 0.2mm (4mil - 8mil). If this is important to you, please read on.......
When preparing for a more serious prolonged measuring session, such as mapping a complete top or plate
with many measurements, a two-step calibration sequence is advised. The goal of this 2-step process is to
only perform a calibration sequence, when the probe has reached peak operating temperature.
Ÿ Power the device ON either with Computer USB power or USB Battery power.
Ÿ Hold the probe in your hand just as you would when doing measurements on your object. Your fingers will
transfer heat to the probe and after 3 - 5 minutes the probe internal temperature should be equal to your
finger temperature.
Ÿ Now perform the calibration sequence as before. This calibration should be performed with the probe
located above your instrument to be measured in order to closely approximate the final working condition.
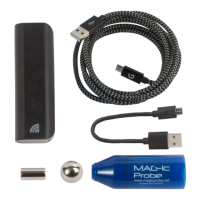
Ÿ Your MAG-ic Probe is ready for use.
Ÿ If temperature conditions change during the session or if you have to interrupt the session for a prolonged
period, repeat the above procedure.
Remove any metal from the work environment and within 3ft / 1m of your instrument. This includes
vices, bolts, tools. Look under your bench also.
Any ferro-magnetic material in the area can affect the magnetic field and therefore the
measurement.
9
 Loading...