Fig. 22
1
2
3
4
5
6
7
8
9
10
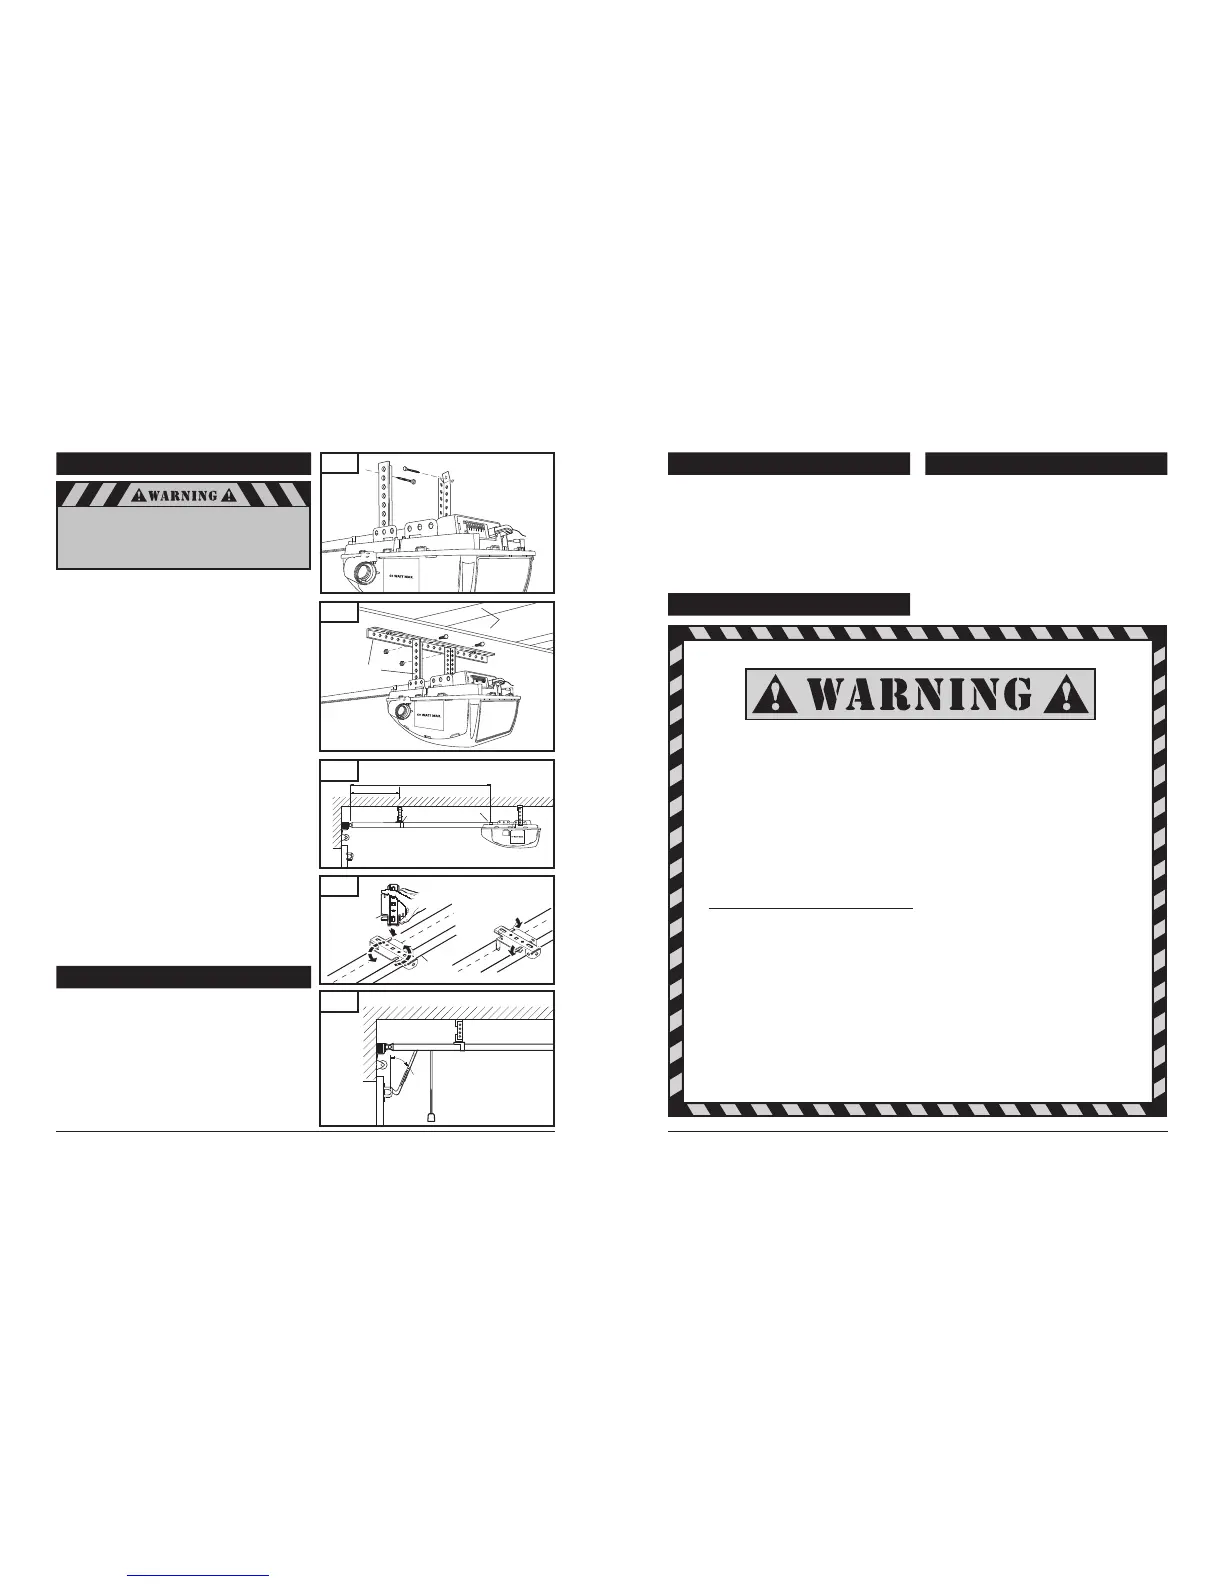
8-7. MOUNT OPERATOR TO CEILING
Position operator head so that rail is lined up with center line
of open door.
Line up hanger brackets (not provided) with ceiling joists or
framing to locate where brackets are to be fastened.
See Fig. 22.
Mark location for 5/16" lag screws (not provided), and drill
two 3/16" pilot holes.
Fasten hanger brackets to joists using lag screws.
If garage framing supports are not visible, attach a length of
perforated angle or a 2x4 to the ceiling, securing it to the
hidden joists with lag screws long enough to fasten firmly to
garage framing (extra hardware items not provided). Then,
attach one end of hanger brackets to the angle or 2x4
mounted to ceiling. Attach other end of hanger brackets to
operator’s perforated angles. See Fig. 23 for an alternate
mounting methods.
Once operator is securely fastened in position, remove wood
blocks and temporary supports and lower door. Check door
for proper operation and clearance by manually moving door
to full open and closed position. If door hits rail at any point,
raise operator head slightly higher and re-mount in position.
NOTE:
To provide additional support for 10 ft. Doors and
higher, use the optional support bracket. (Accessories p.32)
Measure the rail’s overall span. Bracket is located on 1/3rd of
the overall rail span from the door header bracket end.
See Fig. 24
Place support bracket over rail (close side) on a diagonal.
Make sure support securement clamps clear rail sides.
Secure bracket onto rail by twisting support bracket as
indicated in Fig. 24A.
Attach mounting strap (not provided) to support bracket and
secure by fastening it to the ceiling.
Fig. 24
Support Bracket
1/3 (S)
1st “C”
Rail Clip
Rail Span (S)
Fig. 24A
Fig. 25
Angle
If not properly secured, the operator
could fall and injure someone.
Secure opener to structural supports or
framing. Do not mount to drywall, plaster,
or other such material.
8-8. CONNECT ARM TO DOOR AND TROLLEY
25
Several important safety and instruction labels are included
with your operator package. These labels must be posted
inside your garage where they can be easily seen by all. We
recommend installing them in the location shown in Fig. 9
on page 7. To affix the labels, peel off the protective
backing, and stick onto smooth, clean surface. If labels don’t
adhere well to surface, use tacks (wood door only) or
additional adhesive to securely affix in place.
DO NOT PAINT OVER ANY LABELS.
8-20. APPLY LABELS TO INSIDE OF GARAGE
8-21. ATTACH OWNER’S MANUAL TO WALL
It is important that the manual be stored where it can be
referred to later in case adjustments need to be made, and /
or new controls or accessories added. Store the manual in
a safe, easily accessible location. We recommend you use an
envelope with an eyelet to store the manual in the garage on
a nail or hook on the wall near the wall control.
9. IMPORTANT SAFETY INSTRUCTIONS
IMPORTANT SAFETY
INSTRUCTIONS
TO REDUCE THE RISK OF SEVERE
INJURY OR DEATH:
1. READ AND FOLLOW ALL INSTRUCTIONS CAREFULLY.
2. Never let children operate or play with door controls. Keep the remote control away from children.
3. Always keep the moving door in sight and away from people and objects until it is completely closed. NO ONE SHOULD
CROSS THE PATH OF THE MOVING DOOR.
4. NEVER GO UNDER A STOPPED, PARTIALLY OPEN DOOR.
5. Test door operator monthly. The garage door MUST reverse on contact with a 1-1/2" high object (or a 2x4 laid flat) on
the floor. After adjusting either the force or the limit of travel, retest the door opener. Failure to adjust the operator
properly may cause severe injury or death.
6. If possible, use the emergency release only when the door is closed. Use caution when using this release with the door
open. Weak or broken springs may allow the door to fall rapidly, causing severe injury or death.
7. KEEP GARAGE DOORS PROPERLY BALANCED. See Garage Door Owner's Manual. An improperly balanced door could
cause severe injury or death. Have a qualified service person make repairs to cables, spring assemblies, and other
hardware.
8. Disconnect the electrical power to the garage door operator before making any repairs or removing the housing cover.
9. SAVE THESE INSTRUCTIONS for future safety, adjustment, and maintenance purposes.
12
Make sure door is fully closed.
Remove tape from rail holding straight door arm
(sectional door only) and allow door arm to hang freely.
Pull the manual release cord on the trolley to disconnect
trolley from chain or belt connector. Slide trolley to position it
about 4" away from the door.
Rail
Support Bracket
Fig. 23
Joists (may be hidden
behind drywall)
Perforated angle
1
2
3
4
5
6
7
8
9
10
 Loading...