INSTALLIXG YOUR
FIRESTOP
SPACERS:
DOUBLE-M'ALL
Firrslo~, spacers are requirr:d at each poin: where the cliininev
penerriltes a floor
or
ceiling joist space. Their purpose is twof:
CHIMNEY
SYSTEM
Each double-wall chimney section consists of
an
outer pipe, flue
plpe and sinple-piece wire spacer. The pipe sections are nor
unitized and must be assenrbled independently as the chinme?. is
installed.
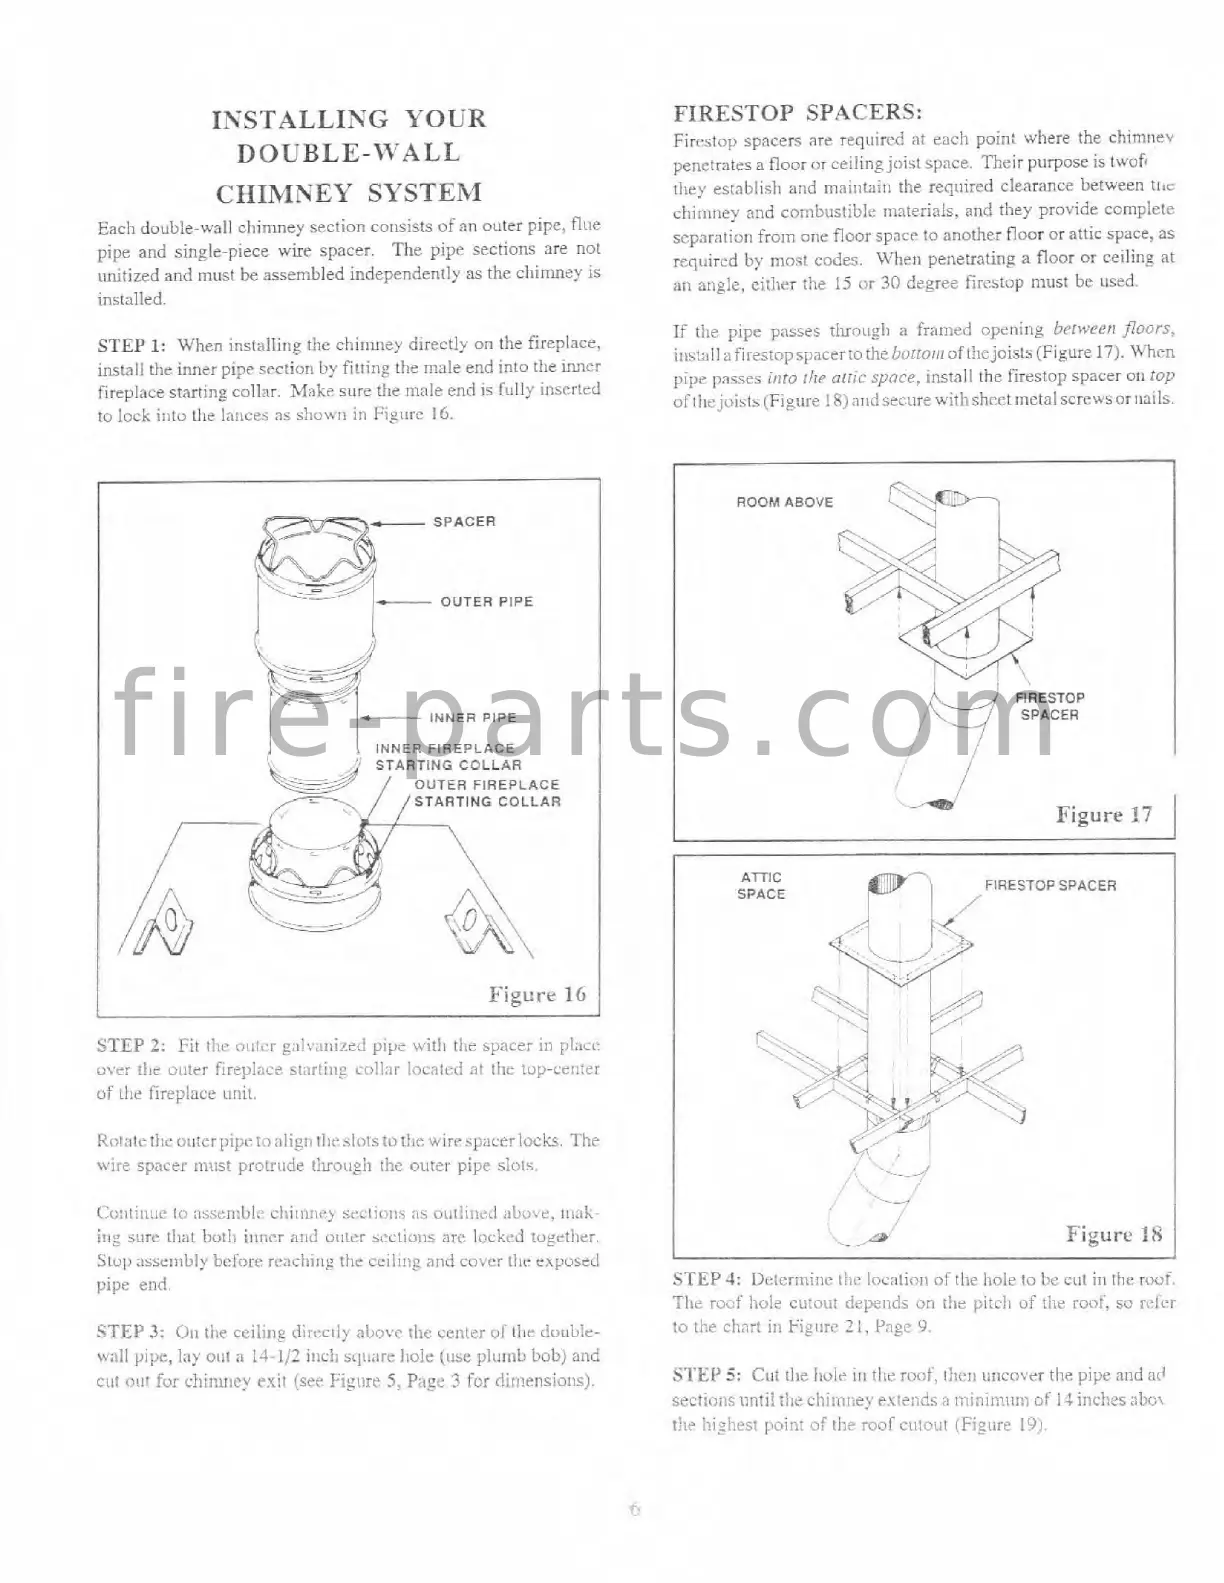
STEP
1:
When iristalli~ig tlic chirrmey directly on the fireplnce,
install the inner pip? srclioo iry fittin: the male end into tl!e inncr
firrpiace starting collar.
Make
sure
the male end
is
fully inst-rlcd
to lock iiito
tile
latlces
as
slmwn in Fieiirc
16.
rlley establisl~ and rnailltai~r the required clearance between tic
chirliriey and cor:ibustiblz materials, and they provide compiele
scp~mtion from
orrc
floor spacr: to another floor or attic space, as
required by lnost codes. When penetratin~
a
floor or ceiling at
an ariglr. citlier t!ie
15
or
30
degree fircstop must be used.
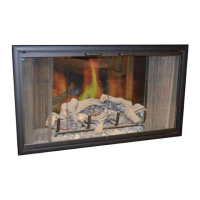
If
tlie pipc passes tlunugt,
;I
fralricd optnitig brhwen
floors,
ins!;rll
~firi.~rops~~;i~c~totli~iioiinr,~
of
il~ejoists (Figure
17).
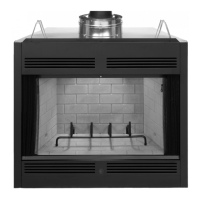
When
pipe
passes
itrro
rhr
niizr:
spoce,
install thc [irestop spacer o~i
roi,
oftliejoists (Figure
18)
ar~dseci~r;witIishnrttnetal
screwsor ~inils.
1
INNER
FIREPLACE
'
STARTING
COLLAR
OUTER
FIREPLACE
STARTING
COLLAR
Figure
10
/
STEP
2:
Pit tht- oilirr g;t~v.t~,ixe~l
pipe
wit11 tlie spacer
ill
place
cvcr
lllc outer firrplaci. srnrtii!: co1i:lr locnlcii
at
thi. lap-cc:;ter
uf
!lie fireplace uiiir.
Kolntc!li~o;i:crpi~jr !o;llirri 1l~rsiolslo:I~r win..~p;lcrrlocks,
lhz
wire spacer
nu st
protrude !lu.oi~gB t!ic outer pip? slois.
STEP
3:
Oii
111~~
criiiii~ dirrclly ai,ovc rlic center
o!
tllr double-
\vaIl
pi;^,
lay 0x11
2
!4-1/2 i!;c11 bq[mrc Itoic: (11s~ JIIIIII.~L Imb] atis
cut i?llt for cllitii~iey rui: (ser hgorr
5,
Pnyt
3
for
c~.i~iiensions).
ROOM ABOVE
-
k.
w
Figure
17
/
ATTtC
SPACE
,
,
FIRESTOP SPACER
..
@
Figure
18
I
STEP
4:
Di:lrr~iinc liir Inin!inri
of
tlre hoir to
l>i.
crll in
Itlit
roof,
71~ rocf liolz cutoit!
dcp;ndi.
oil rile pitch
of
ti12
mot,
so rakr
to the
char:
ill Fi$l;rc
71.
t'iigc
9.
SI'EP
3:
Cut
:]I?
l~uie
ill
tllc rw,f. th,.ri killcover the pipe atid
at'
sectioiis iititil
;!IC
clii~iio~y
CS!CII~.F
3
ii:iiiin?~rn!
D?
i
4
iili.!:zs
i11>0\
rlir iiigl>zsr poi!:! of
ti??
rooici~lo~it (Figl~re
I!)l~
f i r e - p a r t s . c o m