32
VERIFICACIÓN DEL SISTEMA DE ENCENDIDO
AJUSTE DE LA MECHA
If the automatic ignition system fails to operate properly,
perform the following checks:
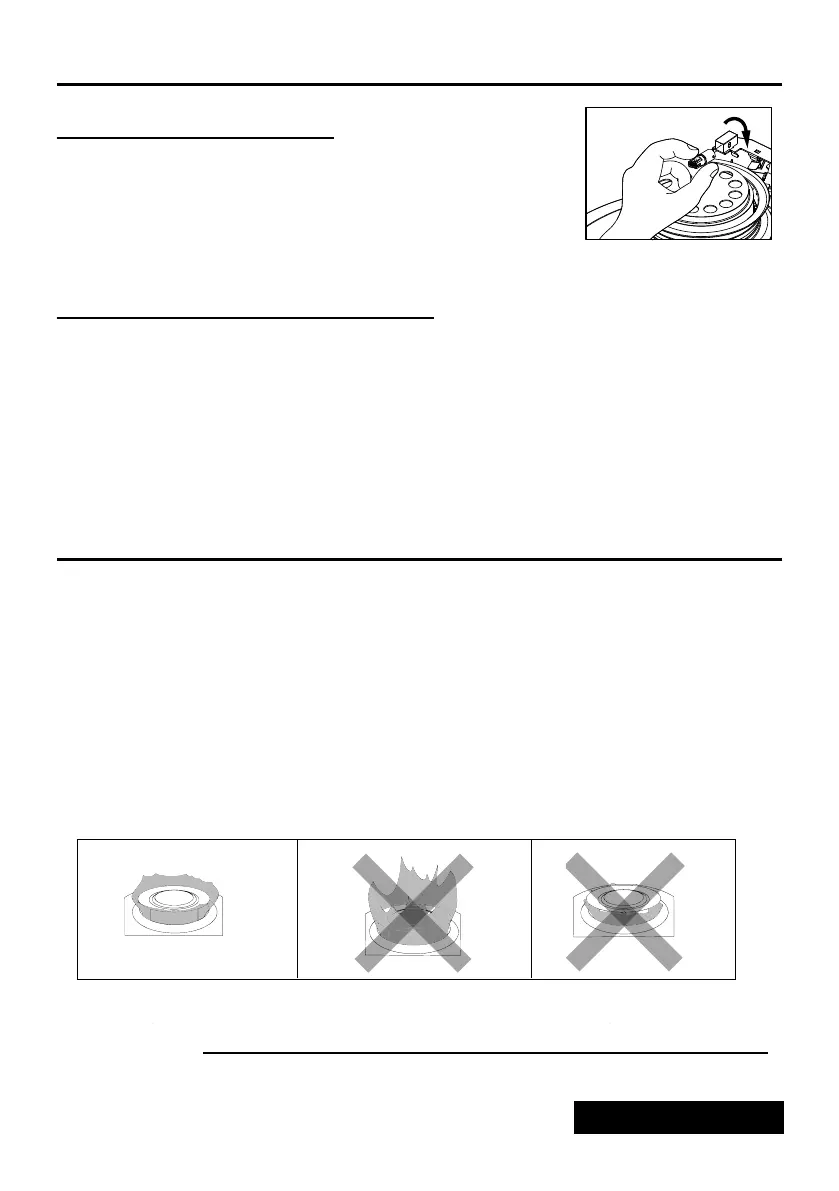
To replace the igniter plug (Fig.15);
Remove the batteries.
Remove the 2 cabinet screws and lift off the cabinet and grill assembly.
Push the igniter plug in and turn in a clockwise direction to remove.
Install a new igniter plug (Type "B", 2.5V DC, 1A only) by pushing it in and turning it in a
counter-clockwise direction.
Reassemble the heater and replace the batteries.
TEST IGNITION Using the wick adjuster knob, raise the wick to its maximum height.
Push the ignition lever.
The igniter plug should be within 1~2mm of the wick when the ignition lever is
fully engaged.
After lighting the heater, it is important to check the heater flame within the first 5-7 minutes of operation.
During the first 5 minutes after ignition, the burner chamber warms up and flames will become visible at the top
of burner. These flames will gradually build up. After 5-7 minutes of operation, you should use the wick
adjuster knob to obtain the proper flame height. The proper flame height is a 1/2" flame above the center flame
spreader disk, with even distribution of flame around the flame spreader disk visible through the clear window
of the heater. See pictures below for reference.
As you continue to operate the heater, the temperature of the heater and the temperature of the room will
continue to change. As the heater warms up, the kerosene in the tank will vaporize faster, and this could
require adjusting the wick adjuster down in order to maintain the desired 1/2" flame height. Therefore, it is
necessary to continue to monitor the flame height, and to make adjustments using the wick adjuster knob to
keep the proper flame height. It is recommended that the heater be checked every 30 minutes in order to keep
the proper adjustment because periodic adjustment is required.
CORRECT FLAME
Proper combustion
IMPORTANT NOTE : NEVER LEAVE THE HEATER UNATTENDED WHILE BURNING.
Always make sure to turn the heater off and inspect it to insure that it is completely
extinguished prior to going to bed.
FLAME TOO HIGH
Can Produce smoke
and soot
FLAME TOO LOW
Can produce odor
and carbon monoxide
BATTERIES -2 "C" cell batteries are located at the rear of the heater.
Replace with new batteries.
IGNITER PLUG - If the automatic ignition system still doesn't work
Fig.15
after replacing the batteries, check the igniter plug. If the glow coil
filament is broken, bent, or doesn't glow when engaged via the ignition lever, it must be replaced.
CAUTION: Be sure igniter plug is Type "B", 2.5V DC, 1A only.
Fig.16
If the automatic ignition system fails to operate properly,
perform the following checks:
To replace the igniter plug (Fig.15);
Remove the batteries.
Remove the 2 cabinet screws and lift off the cabinet and grill assembly.
Push the igniter plug in and turn in a clockwise direction to remove.
Install a new igniter plug (Type "B", 2.5V DC, 1A only) by pushing it in and turning it in a
counter-clockwise direction.
Reassemble the heater and replace the batteries.
TEST IGNITION Using the wick adjuster knob, raise the wick to its maximum height.
Push the ignition lever.
The igniter plug should be within 1~2mm of the wick when the ignition lever is
fully engaged.
After lighting the heater, it is important to check the heater flame within the first 5-7 minutes of operation.
During the first 5 minutes after ignition, the burner chamber warms up and flames will become visible at the top
of burner. These flames will gradually build up. After 5-7 minutes of operation, you should use the wick
adjuster knob to obtain the proper flame height. The proper flame height is a 1/2" flame above the center flame
spreader disk, with even distribution of flame around the flame spreader disk visible through the clear window
of the heater. See pictures below for reference.
As you continue to operate the heater, the temperature of the heater and the temperature of the room will
continue to change. As the heater warms up, the kerosene in the tank will vaporize faster, and this could
require adjusting the wick adjuster down in order to maintain the desired 1/2" flame height. Therefore, it is
necessary to continue to monitor the flame height, and to make adjustments using the wick adjuster knob to
keep the proper flame height. It is recommended that the heater be checked every 30 minutes in order to keep
the proper adjustment because periodic adjustment is required.
CORRECT FLAME
Proper combustion
IMPORTANT NOTE : NEVER LEAVE THE HEATER UNATTENDED WHILE BURNING.
Always make sure to turn the heater off and inspect it to insure that it is completely
extinguished prior to going to bed.
FLAME TOO HIGH
Can Produce smoke
and soot
FLAME TOO LOW
Can produce odor
and carbon monoxide
BATTERIES -2 "C" cell batteries are located at the rear of the heater.
Replace with new batteries.
IGNITER PLUG - If the automatic ignition system still doesn't work
Fig.15
after replacing the batteries, check the igniter plug. If the glow coil
filament is broken, bent, or doesn't glow when engaged via the ignition lever, it must be replaced.
CAUTION: Be sure igniter plug is Type "B", 2.5V DC, 1A only.
Fig.16
Después de encender el calentador, es importante vericar la llama del calentador dentro de los
primeros 5 a 7 minutos de funcionamiento. Durante los primeros 5 minutos después del encendido,
la cámara del quemador se calienta y las llamas se harán visibles en la parte superior del quemador.
Estas llamas se irán acumulando gradualmente. Después de 5 a 7 minutos de funcionamiento, debe
utilizar la perilla de ajuste de la mecha para obtener la altura adecuada de la llama. La altura de
ama adecuada es una ama de 1.27 cm (1/2”) sobre el centro del disco esparcidor de ama, con
una distribución uniforme de la ama alrededor del disco esparcidor de ama, visible a través de
la ventana transparente del calentador. Consulte las imágenes a continuación como referencia. A
medida que continúe haciendo funcionar el calentador, la temperatura del calentador y la temperatura
de la habitación seguirán cambiando. A medida que el calentador se calienta, el queroseno en el
tanque se vaporizará más rápido, y esto podría requerir ajustar el regulador de la mecha hacia abajo
para mantener la altura deseada de la llama de 1.27 cm (1/2”). Por lo tanto, es necesario continuar
monitoreando la altura de la llama y hacer ajustes con la perilla de ajuste de la mecha para mantener
la altura adecuada de la llama. Se recomienda revisar el calentador cada 30 minutos para mantener
el ajuste adecuado porque se requiere un ajuste periódico.
Si el sistema de encendido automático no funciona correctamente,
realice las siguientes vericaciones:
• BATERÍAS: hay 2 baterías de celda “C” ubicadas en la parte posterior
del calentador. Reemplace con baterías nuevas.
• BUJÍA DEL ENCENDEDOR: si el sistema de encendido
automático aún no funciona después de reemplazar las
baterías, verique la bujía del encendedor. Si el lamento de
a bobina de incandescencia está roto, doblado o no brilla
cuando se activa mediante la palanca de encendido, debe reemplazarse.
PRECAUCIÓN:
asegúrese de que la bujía del encendedor sea del tipo “B”, 2.5 V CC, 1 A únicamente.
Para reemplazar la bujía del encendedor (Fig. 15):
• Retire las baterías.
• Retire los 2 tornillos del gabinete y levante el ensamble del gabinete y la rejilla.
•
Empuje la bujía del encendedor hacia adentro y gírelo en dirección de las manecillas del reloj para retirarlo.
• IInstale una nueva bujía para el encendedor (tipo “B”, 2.5 V CC, 1 A solamente); empújela hacia
adentro y gírela en dirección contraria a las manecillas del reloj.
• Vuelva a ensamblar el calentador y reemplace las baterías.
PRUEBA DE ENCENDIDO:
con la perilla de ajuste de la mecha, levante la mecha a su altura máxima.
• Empuje la palanca de encendido.
• La bujía del encendedor debe estar dentro de 1-2 mm de la mecha cuando la palanca de
encendido está completamente activada.
NOTA IMPORTANTE: NUNCA DEJE EL CALENTADOR SIN SUPERVISIÓN MIENTRAS ESTÁ ENCENDIDO.
Asegúrese siempre de apagar el calentador e inspeccionarlo para asegurarse de que esté
completamente apagado antes de acostarse.
NUNCA DEJE EL CALENTADOR SIN
SUPERVISIÓN MIENTRAS ESTÉ ENCENDIDO.
LLAMA CORRECTA
Combustión adecuada
LLAMA DEMASIADO ALTA
Puede producir humo
LLAMA DEMASIADO BAJA
Puede producir olor
 Loading...