INSTALLATION SPECIFICATIONS
EN / WHISPER 3.5 / October 2009 / Copyright © 2009 Mastervolt 17
2 INSTALLATION SPECIFICATIONS
2.1 WHISPER 3.5 INSTALLATION TABLE
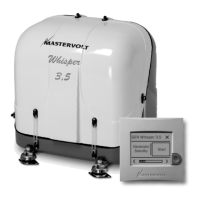
Figure 23
1 Install a steel foundation plate between ship’s hull and
generating set, with 4 shock mounts (ref. to figure.
23).
2 Mount the generating set directly to the foundation
plate.
3 Connect the (sea) water inlet to the strainer.
4 Connect exhaust system.
5 Connect a siphon breaker or ‘air vent’ into the cooling
circuit, if necessary.
6 Connect ‘fuel supply line’ to the water separator/ fuel
filter.
7 Connect ‘fuel return line’ to the fuel tank.
8 Connect the MasterView Easy remote panel
9 Connect the AC cable from the AC box to the power
source selector or Mass SystemSwitch.
10 Connect plus and minus from the 12V starter battery
to the battery cables.
11 Install a Mastervolt battery charger. (optional)
2.2 COMMISSIONING TABLE
1 Check if a siphon breaker (air vent) is necessary and
has been installed and that the drain is without bents
and air can flow in freely.
2 Open the seawater inlet valve and check all water
connections. Check if the strainer is installed above
the seawater level.
3 Check if the exhaust system is properly installed. Also
check the minimum required height of 60 cm above
sea level of the exhaust loop (goose neck). Check
length of exhaust hose, diameter of exhaust hose,
position of the waterlock, maximum lift.
4 Open the seawater outlet valve and check all water
connections.
5 Check the AC cables and the grounding.
6 Check if an AC breaker is installed before or after the
power source selector. When there is only a circuit
breaker, use it to disconnect the generating set from
the grid.
7 Check all DC connections, check if the battery switch/
circuit breaker is closed.
8 Open the fuel valve and bleed the fuel system.
Ensure there is sufficient fuel. The Whisper 3.5 is self
bleeding. To check the well functioning release the
bleed screw on the high pressure fuel pump. Push the
start button activating the electric system and
activating the fuel pump. When more time is needed
to bleed, push “start” and hold on the local control
panel (so not on the MasterView Easy remote panel).
Hold as long as necessary to bleed the system.
Retighten the bleed screw when no further air bubbles
are expelled.
Check if there are no air leaks in the fuel supply line
and check if the lift of the fuel is less than 1 meter.
Check if there is no air in the water fuel separator.
9 Check if the air intake in the canopy is not blocked.
10 Check the oil level and color of the oil.
11 Start the engine by pushing the start button.
Foundation
plate
Shock mounts
Generating set