Do you have a question about the McIntosh C500 and is the answer not in the manual?
Comprehensive safety guidelines and warnings for operating the equipment.
Instructions to prevent electrical shock and fire hazards, including proper grounding.
Advice on proper placement, cleaning, and avoiding moisture or heat.
Guidance on when to refer servicing to qualified personnel and parts.
Details on how to contact McIntosh for product support and inquiries.
Information on how to return the product for service or repair.
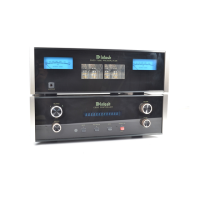
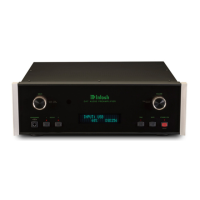
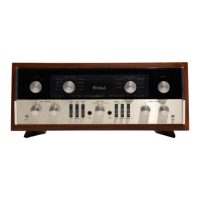
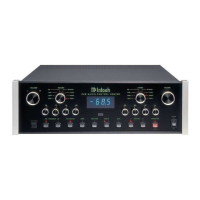
Defines the C500 Controller, C500P, and C500T chassis and their interactions.
Details the pin configuration for XLR balanced audio connectors.
Explains the 1/8 inch stereo mini phone plug for power control.
Describes connections for trigger signals, providing +5 or +12 volt output.
Details on ports for remote control signals and data transfer.
Explains the benefits of separate chassis for noise isolation and dual mono operation.
Describes balanced/unbalanced I/O, phono stages, and processor loops.
Details on volume, balance, display, and parts used for accuracy.
Covers Passthru Mode, Remote Control, and Power Control Output features.
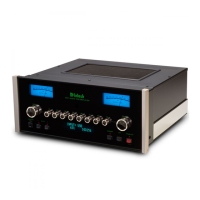
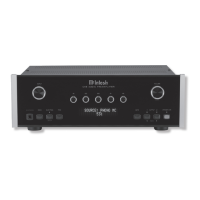
Front, rear, and side views with measurements for the C500 Controller.
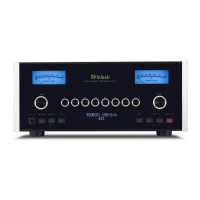
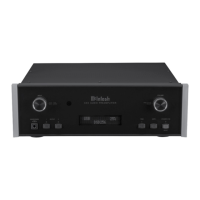
Front, rear, and side views with measurements for the C500 Preamplifier.
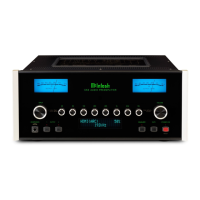
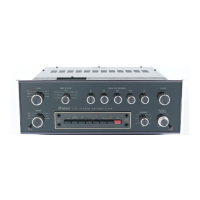
Front, rear, and side views with measurements for the C500 Tube Preamplifier.
Guidance on upright placement, foot removal, and custom cabinet installation.
Recommendations for adequate airflow and clearance for optimal operation.
Details on the rear panel interface for the C500 Controller unit.
Details on the rear panel interface for the C500 Preamplifier unit.
Details on the rear panel interface for the C500 Tube Preamplifier.
Instructions for connecting power control and trigger signals between components.
Guidance on connecting data ports for remote control and system integration.
Instructions for connecting various audio sources and outputs.
Details on setting up multichannel passthru and main AC power.
Description of all buttons, knobs, and the display on the C500 Controller.
Detailed functions of Balance, Volume, Record, and Listen controls.
Explanation of Setup, Rec Monitor, Mute, and Standby/On push-buttons.
Explanation of the meters indicating left and right channel output levels.
Description of the headphone jack for private listening.
Steps to enter and navigate the Controller and Preamp setup menus.
Details on default settings and how to check firmware version.
Procedure to adjust the front panel display's brightness.
Setting the C500 to work with different remote controls.
Turning the front panel meter illumination on or off.
Choosing between percentage or decibel display for volume.
Configuring the voltage output for Trigger A for power control.
Configuring the voltage output for Trigger B for power control.
Setting Triamp outputs for different amplifier configurations.
Enabling special functions for D/A converters like MDA1000.
Customizing input names displayed on the front panel.
Assigning data ports to control specific source components.
Matching volume levels between different input sources.
Assigning specific inputs to activate Trigger A or B.
Configuring which trigger can be controlled remotely.
Enabling and assigning inputs for the external listen processor.
Enabling and assigning inputs for the external record processor.
Adjusting capacitance loading for MM phono cartridges.
Adjusting resistance loading for MC phono cartridges.
Setting up the passthru mode for multichannel audio systems.
Buttons for powering the unit on/off and controlling system functions.
Buttons to select audio sources and navigate inputs.
Buttons to control listening volume and fine-tune settings.
Buttons for accessing display functions, modes, and special features.
Controlling audio muting, mono mode, and trim adjustments remotely.
Selecting sources, operating disc players, servers, and tuners.
Managing amplifier output selection and accessory power.
Using the pause button and navigating menus remotely.
Starting the unit and understanding its standby mode indicator.
Fine-tuning left and right channel balance for optimal listening.
Choosing listening sources and setting record outputs.
Adjusting volume and understanding display options (percentage/dB).
Using listen/record processors and monitoring signals.
Accessing setup menus and muting audio output.
Steps for making audio recordings using the C500.
Understanding the dB output level indicators on the front panel.
Switching between stereo and mono playback.
Using the remote's trim button for quick adjustments.
Operating the C500 in passthru mode for multichannel systems.
Steps to reset the C500's internal microprocessors if controls become unresponsive.
Procedure for reconfiguring the system after changing the preamplifier type.
Overview of the C500's advanced design and high-fidelity engineering.
Explanation of the electro-magnetic switching used for signal routing.
Details on the digital optical encoder volume control for precise adjustment.
Explanation of the C500's internal logic and microprocessor control.
Description of the specialized MC phono stage and its impedance matching.
Discussion on the meter's accuracy and electronic time-stretching capabilities.
Details on the dual, regulated power supplies and R-Core transformers.
How the C500 controls other components via power control signals.
Detailed electrical and performance specifications for the C500 Preamplifier.
Detailed electrical and performance specifications for the C500 Tube Preamplifier.
Electrical power input specifications for the C500 Controller.
Physical dimensions and weight for C500C, C500P, and C500T units.
Instructions for safely repacking the unit for shipment or storage.
| Number of Channels | 2 |
|---|---|
| Total Harmonic Distortion | 0.005% |
| Balanced Inputs | 2 |
| Type | Preamplifier |
| Frequency Response | 20Hz - 20kHz (+0, -0.5dB) |
| Phono Inputs | 1 |
| Digital Inputs | 1 |
| Digital Input Type | USB |
| Maximum Output Voltage | 16V (Balanced), 8V (Unbalanced) |
| Inputs | Phono, Digital |
| Signal-to-Noise Ratio | 100dB (High Level) |
| Gain | 40dB (MM Phono), 60dB (MC Phono) |
| High Level Inputs | 6 |