800-797-4632 . mecoutdoors.com
7
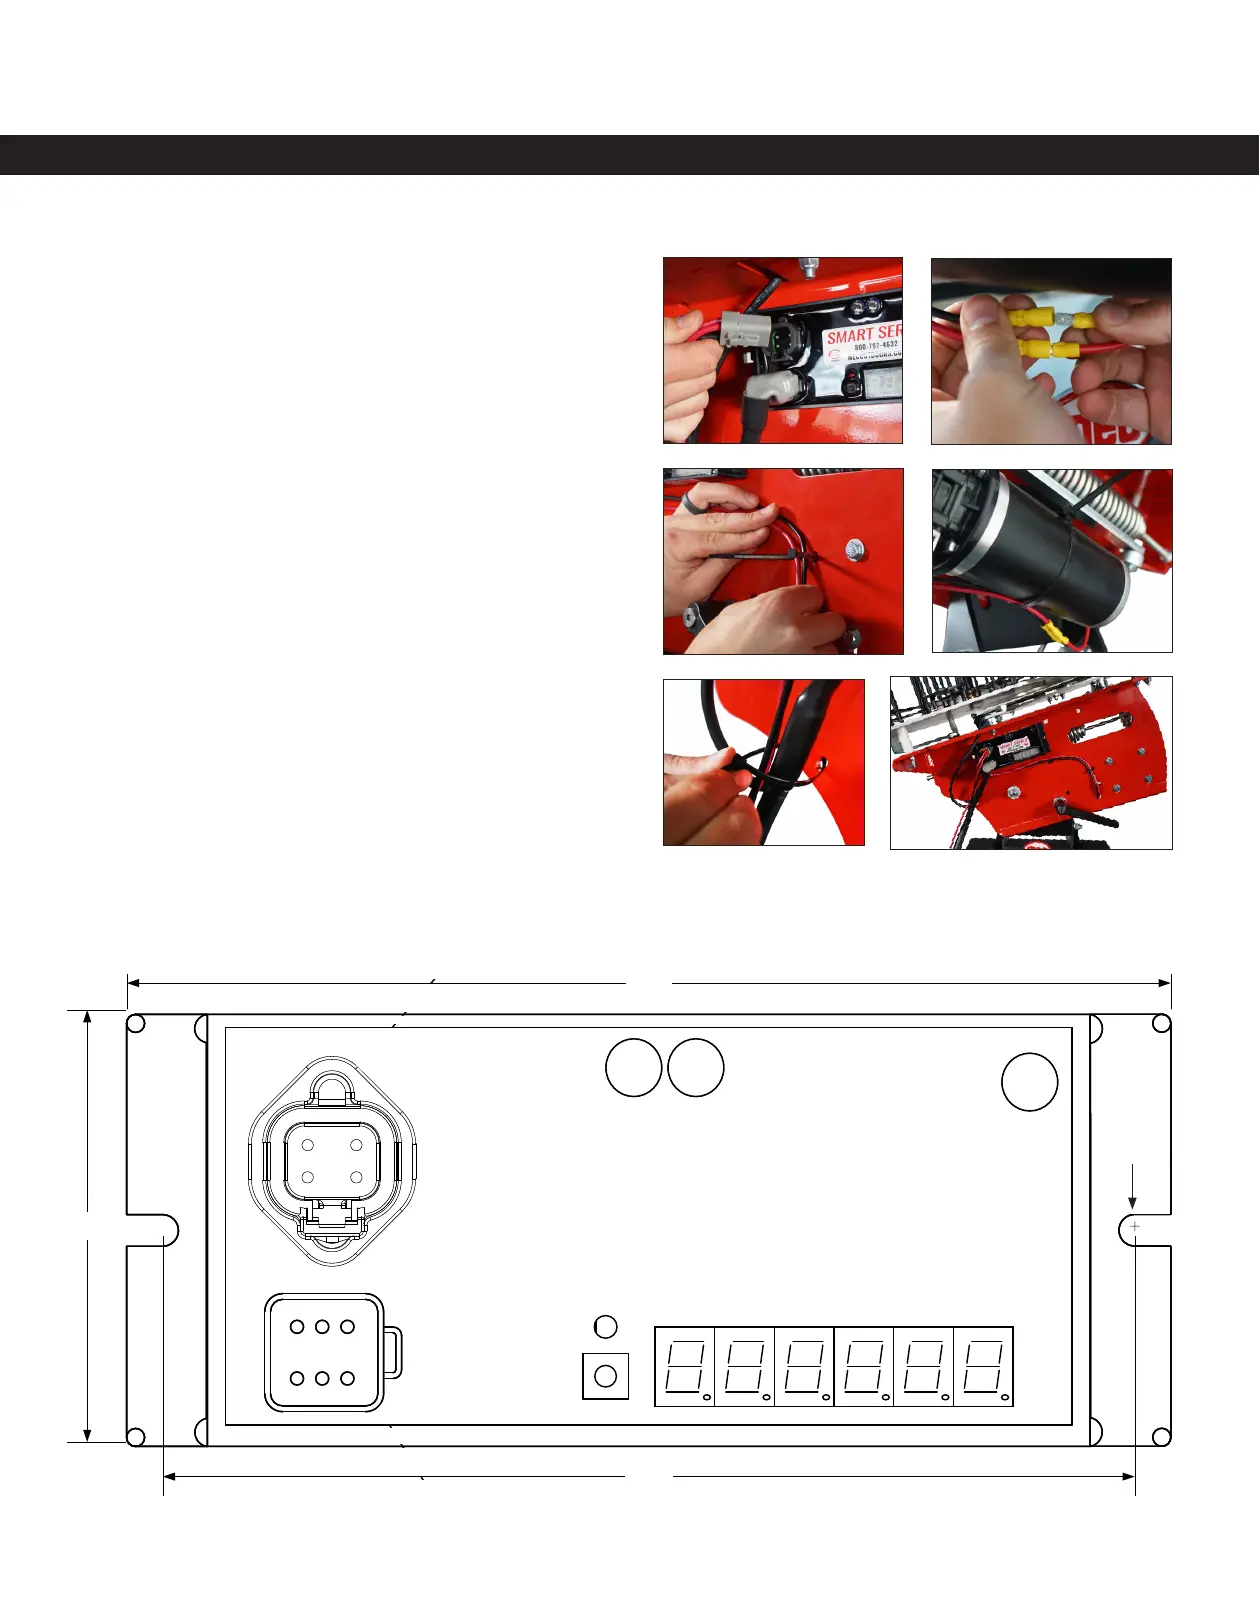
Step 4 - Connect the J2 Plug into the SMART
Series Pod (refer to Fig. 9 & Fig. 15). Once that
plug is connected, run the motor wires through
the mainframe hole cutout and reattach to the
motor. (Fig. 10) *You will receive two types of
male connectors that will attach to positive and
negative wires. Check what style connectors
your motor has in order to determine what
style connectors you need to use.
Step 5 - Use the included zip ties to secure the
wiring to the mainframe and motor. (Fig. 11 &
Fig. 13) The large zip tie is to be used on the
motor. (Fig. 12)
Step 6 - Hook the machine up to power to verify
the machine is working properly. (Fig. 14)
REVISIONS
REV DATE ECN DESCRIPTION
A
03/20/19
13121E
RELEASE TO PRODUCTION
APVD
DRAWN M. SCHELL DATE 2/25/21 SHEET 1 OF 2
013123
OUTLINE, 501710
B O A
MARLIN TECHNOLOGIES INC.
TITLE
SIZE DRAWING NUMBER TYPE REV
CHECKED S. JOHNSON
APPROVED S. JOHNSON
DATE 03/29/21
DC MOTOR CONTROLLER
DATE 03/30/21
DO NOT SCALE DRAWING
UNLESS OTHERWISE SPECIFIED, DIMENSIONS
ARE IN INCHES AND TOLERANCES ARE
TWO PLACE
DECIMAL
+/- 0.05
THREE PLACE
DECIMAL
+/- 0.020
ANGLES
+/-
THE INFORMATION CONTAINED ON THIS
DRAWING IS PROPRIETARY AND CONFIDENTIAL
TO MARLIN TECHNOLOGIES INC. UNAUTHORIZED
USE OR DISTRIBUTION WITHOUT CONSENT IS
PROHIBITED.
SMJ
7.25"
3.00"
6.75"
uP
P
J2-4
9-16 VDC
+5V
J2-2
GND
J2-1
J2-3
501710
OPERATING VOLTAGE: 9-16 VDC (12VDC NOMINAL)
OUTPUTS
30A MAX LOAD
@12VDC
1 2 3
6 5 4
1 2 3
6 5 4
J1
J2
GND
J1-6
J1-2
J1-1
J1-4
J1-3
J1-5
MOTOR
GRN
WHT
BLK
SHACK
PENDANT
ON/OFF
GRN
WHT
BLK
REMOTE
PENDANT
FIRE
LIMIT
SWITCH
L1
SWI
LED6 LED5 LED4 LED3 LED2 LED1
PRODUCT LABEL
REV=BOM REVISION
LABEL DATE CODE:
YY=YEAR OF MANUFACTURE
WW=WEEK OF MANUFACTURE
CUST #
CUSTOMER
CUST PN
MTI 501710
REV A
DATE YYWW
SOFTWARE
13129$-
1.03”
0.13
1.85” MAX
J2
DEUTSCH PN DT15-6P (OR EQUIVALENT)
MATES WITH DEUSTCH PN DT06-6S
J1
DEUTSCH
PN DTP10-4P
1
3
4
2
.22"
FIG.15
Actual Size and Measurements of the Smart Series Control Panel
Fig. 11
Fig. 9
Fig. 10
Fig. 12
Fig. 13
Fig. 14