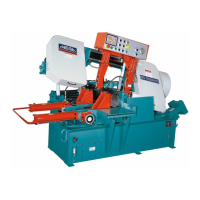
This document describes the MEGA BS-250HAS Automatic Bandsaw, an industrial machine designed for cutting various materials.
Function Description
The MEGA BS-250HAS is an automatic bandsaw primarily used for cutting workpieces. It features a saw frame that descends to cut material and then ascends, with an automatic feeding system for continuous operation. The machine is designed for fast and accurate cutting, suitable for heavy-duty use.
Key functions include:
- Cutting Piece Counter: Presets the number of cuts for automatic operation. The machine stops automatically once the preset number is reached. A "Clear" key is available to reset the counter.
- Multiple Stroke Feed Counter: Allows for multiplying index cycles, useful for cutting off-cut pieces longer than 500mm, with a maximum setting of 9 strokes.
- Blade Speed LED-Display: Shows the saw blade's running speed in meters per minute.
- Digital Cut Length Counter: Calculates the required cut length based on the formula: S = (L (length req.) + K (blade thickness)) / N (multiple feed times) - K.
- Hydraulic System: Controls the saw frame's movement, blade tension, and vise clamping.
- Coolant System: Injects cutting fluid during operation to remove saw chips and cool the blade.
- Chip Conveyor: Automatically removes chips from the cutting area.
Important Technical Specifications
Model: BS-250HAS
Cutting Capacity:
- (Mm): Ø 260, 300W180H, 280W250H
- (In): Ø 10, 127, 1110
Bundle Cutting:
- (Mm): 200W*140H
- (In): 8"*5 1/2"
Blade Size:
- (Mm): 341.13660
- (In): 1 1/40.042144
Blade Speed:
- (M/Min): 25, 32, 42, 55, 70, 80 (Fixed Speeds)
- (M/Min): Variable Speed 20-80 (Optional)
- (F/Min): 82, 105, 138, 180, 230, 260 (Fixed Speeds)
- (F/Min): Variable Speed 65-260 (Optional)
Motor Output:
- Blade Motor: 2.25 KW (3 HP)
- Hydraulic Motor: 0.75 KW (1 HP)
- Coolant Motor: 0.1 KW (1/8 HP)
Shipping Volume:
- (Mm): 204020121500
- (Ft): 6.7L6.6w5.0H
Weight Net/Gross:
- 1380 KG / 1610 lb.
- 3036 KG / 3542 lb. (Likely for a different configuration or model, as the manual lists two sets of weights)
Standard Accessories:
- Tools with tool box (1 set)
- 7 ft.(2M) long roller table (1 set)
- Band-cleaning wire brush (1 piece)
- Band saw blade (1 piece)
- Vertical guide rollers (1 set)
- Instruction manual (1 copy)
Hydraulic Pressure (for 250HAS/300HAS models):
Usage Features
The bandsaw offers both manual and automatic operation modes, with a comprehensive control panel for precise adjustments.
Installation:
- The machine can be moved and lifted using a crane or forklift.
- Requires a level and flat reinforced concrete foundation.
- Anchor bolts are used to secure the machine.
- Proper leveling is crucial for accuracy, with specific fore-and-aft (10mm higher at rear) and left-and-right (3mm higher at left) adjustments for fluid return and car feeding.
- Thorough cleaning and oiling are required before initial operation, removing rust preventive coating and applying machine oil.
- Power source connection requires a 3HP main motor, 1HP hydraulic motor, and 1/8HP coolant motor. Earth connection is mandatory.
- A starting procedure checks the hydraulic pump motor rotation direction; if incorrect, phase connections must be interchanged.
Operating Preparation:
- Saw Blade Selection: Choose the appropriate blade based on workpiece size, shape, and material type, referring to the reference chart in chapter 7.
- Saw Blade Unpacking and Installation: Unpack the blade carefully, ensuring teeth point to the right. Install the blade onto the drive and driven wheels, ensuring it touches the back-up roller of each guide and the flange of the wheels. Tension the blade using the hydraulic tension handle and tighten the insert adjusting screw.
- Workpiece Clamping: Raise the saw frame, open the vise, place the workpiece on the roller table, gently push it into the roller-feed vise, and then clamp it.
- Blade Guide Arm Adjustment: Position the blade guide arms according to the workpiece diameter/width, then tighten the lock lever and insert adjusting screw.
- Wire Brush Position Adjustment: Move the wire brush case to just contact the cutting edge of the saw blade, then tighten the lock lever.
- Feed Rate Adjustment: Select a suitable feed rate based on workpiece material (harder materials, wider workpieces, structural sections, and tubing require slower rates). High-speed steel blades allow for faster rates than carbon steel, and bi-metal alloy is faster than high-speed steel.
- Cutting Length Preset: Use the precise cutting piece counter to set the desired length, then tighten the lock screw.
- Saw Blade Speed Selection: Choose from 6 fixed speeds (25, 32, 42, 55, 70, 80 M/min) or an optional variable speed drive (20-80 M/min).
Manual Operation:
- Lift the saw frame to clear the workpiece (1/2 to 3/4 inch).
- Set the AUTO-MANUAL selector to "manual."
- Clamp the workpiece.
- Adjust blade guide arms spacing.
- Preset the cutting length.
- Depress "BAR FEED FORWARD" until the workpiece touches the bar stop feeler.
- Adjust the feed rate.
- Depress "BLADE DRIVE" to start the blade motor, coolant pump, and begin saw frame descent.
- Saw blade stops at the lower limit after the cut.
- Depress "RAISE" to cut the next piece.
- Pre-cut inspection checklist includes workpiece clamping, blade suitability, feed rate, blade speed, tightened screws and levers, blade tension, wire brush position, and sufficient cutting fluid.
Automatic Operation:
- Set the AUTO-MANUAL selector to "auto."
- Depress "QUICK APPROACH" to quickly descend the saw frame to the lower limit, then it rises to the freight preset.
- Adjust "HEIGHT SELECTOR" if needed to ensure blade clearance (1/2 to 3/4 inch).
- Depress "BAR FEED FORWARD" until the workpiece touches the bar stop feeler.
- Preset the number of cuts.
- Depress "BLADE DRIVE" to start the blade motor, coolant pump, and begin saw frame descent.
- Machine stops automatically after the required cuts or when the workpiece is too short to feed.
Special Operation:
- If the saw blade jams, immediately depress the "FRAME RAISE" button.
- Blade jamming can be caused by insufficient blade tension, worn drive belt, broken/blunt blade teeth, incorrect tooth spacing, or excessive feed rate.
Break-In Operation (for new blades):
- Reduce blade speed to half of its normal setting.
- Increase cutting time to 2-3 times normal.
- Continue until unusual noises or metallic sounds are eliminated (e.g., five complete cuts of a 200mm (8 ins) diameter workpiece).
- Return blade speed and feed rate to normal settings after break-in.
Control Panel (Type 1 & Type 2):
- PILOT LAMP (2): Indicates power supply is on.
- EMERGENCY STOP (3): Stops all machine operations when pressed. Turn clockwise to power on.
- HYDRAULIC "ON" BUTTON (4/6): Operates the hydraulic pump motor.
- POWER SWITCH OFF (5): Turns off power.
- FRONT INCHING OPEN SWITCH (6/9): Inches open the front vise jaw.
- AUTO - MANUAL SELECTOR (7/11): Selects continuous (AUTO) or individual function (MANUAL) operation.
- FRONT VISE SWITCH (8): Controls front vise jaws (open/clamp) in manual mode.
- BLADE DRIVE BUTTON (9/7): Starts saw blade motor, coolant pump, and saw head descent.
- REAR VISE SWITCH (10): Controls rear vise jaws (open/clamp) in manual mode.
- MANUAL FEED FORWARD BUTTON (11/12): Moves workpiece forward.
- MANUAL FEED BACKWARD BUTTON (12/13): Moves workpiece backward.
- QUICK APPROACH BUTTON (13/14): Causes saw head to descend quickly until it contacts the workpiece.
- SAW FRAME RAISE BUTTON (14/15): Stops blade motor and raises saw head.
- WORK BEAM LIGHT SWITCH (15/16): Illuminates the work area.
- AUTO CHIP CONVEYOR & COOLANT SWITCH (16/17): Operates coolant pump and chip conveyor without blade running, for chip removal.
- INVERTER CONTROL KNOB (17): Adjusts blade speed (left for slow, right for fast).
- FEED RATE CONTROL KNOB (18/19): Adjusts cutting feed rate (clockwise increases, counter-clockwise decreases).
- CUTTING PRESSURE CONTROL KNOB (19/18): Adjusts cutting pressure (clockwise increases, counter-clockwise decreases).
Maintenance Features
Regular maintenance, including proper oiling and lubrication, is essential for the machine's longevity and optimal performance.
Hydraulic Circuit:
Oiling and Lubrication Chart:
| NO. |
Lubricating Point |
Lubricant |
Quantity |
Oiling Frequency |
| 1 |
Blade Tension Device |
DAPHNE FLUID 32T |
few |
Twice a year |
| 2 |
Driving Wheel Bearing |
Grease |
few |
Thrice a year |
| 3 |
Guide Slides |
DAPHNE FLUID 32T |
few |
Oil daily |
| 4 |
Transmission Gear Box |
DAPHNE GEAR LUBE 320 |
3 Litres |
Twice a year |
| 5 |
Pivot Shaft |
Grease |
few |
Twice a year |
| 6 |
Adjusting Slide |
DAPHNE FLUID 32T |
few |
Oil daily |
| 7 |
Hydraulic Oil Tank |
DAPHNE FLUID 32T |
40 Litres |
Twice a year |
| 8 |
Vise Slides |
DAPHNE FLUID 32T |
few |
Oil daily |
| 9 |
Cutting Fluid Tank |
Cutting Oil Mixture |
30 Litres |
Daily |
Belt Size:
| NO. |
Belt Name |
Belt Size |
Qty. |
| 10 |
Motor Belt |
50HZ use 3V475 & 60HZ use 3V450, Inverter use 3V450 |
1 |
| 11 |
Wire Brush Belt |
M43 |
1 |
General Maintenance:
- Check the sight gauge for cutting fluid level daily.
- Top up transmission gear box, bar feed gear box, and hydraulic oil tank monthly.
- Regularly observe oil levels for proper operation and long machine life.
- The ratio of cutting fluid to water should be 1:30 - 1:50.
The manual also includes a "Trouble Shooting Guide" and "Reference Charts" (not detailed here) to assist with problem resolution and optimal cutting conditions.