EasyManua.ls Logo

Metra Electronics DP-3021B User Manual

Metra Electronics DP-3021B
5 pages
To Next Page IconTo Next Page
Page #1 background imageLoading...
Page #1 background image
INSTALLATION INSTRUCTIONS FOR PART DP-3021B
METRA – The World’s best kits.
®
CAUTION!
All accessories, switches, climate controls panels,
and especially air bag indicator lights must be connected before
cycling the ignition. Also, do not remove the factory radio with
the key in the on position, or while the vehicle is running.
• ISO DDIN radio provision
Painted black to match the factory dash
A) Radio dash panel • B) Radio brackets • C) Drill template • D) (4) #8 x 1/2” Phillips truss-head screws
KIT FEATURES
KIT COMPONENTS
• Panel removal tool • Phillips screwdriver
• Metal cutting tool • 10mm socket wrench
• 9/32” socket wrench • T-15 Torx screwdriver
• 1/8” drill bit
TOOLS REQUIRED
Chevrolet Corvette 1997-2004
DP-3021B
Table of Contents
A B C D
Dash Disassembly ..............................................2-3
Kit Preparation ....................................................... 4
Kit Assembly .......................................................... 5
WIRING & ANTENNA CONNECTIONS (sold separately)
Wiring Harness: • XSVI-2004-NAV Antenna Adapter: 40-GM10
Question and Answer IconNeed help?

Do you have a question about the Metra Electronics DP-3021B and is the answer not in the manual?

Metra Electronics DP-3021B Specifications

General IconGeneral
BrandMetra Electronics
ModelDP-3021B
CategoryCar Receiver
LanguageEnglish

Summary

Dash Disassembly

Open Console, Remove Nuts, Release Panel

Remove nut covers, 10mm nuts, and release the traction/ride control switch panel.

Remove Ashtray and Associated Screws

Open ashtray, remove Phillips screws, then remove ashtray and 9/32" screw.

Unclip Grille and Remove Ignition Screw

Unclip grille left of ignition, remove the 9/32" screw.

Release and Unplug Radio Dash Panel

Unclip radio dash panel from console, unplug cigarette lighter and remove.

Remove Radio Mounting Screws

Remove the two 9/32" screws securing the radio and unplug it.

Convertible Seat Divider Screw Removal

For convertibles, remove T-15 Torx screws from the center seat divider.

Kit Preparation

Prepare Climate Control Panel Mounting

Remove climate control panel screws and temporarily move it aside.

Position and Secure Drill Template

Temporarily secure the drill template to the sub-dash using factory hardware.

Drill Holes and Remove Template

Drill 1/8" holes in the template-indicated locations and remove the template.

Modify Metal Support Brackets

Cut and remove metal climate control and radio support brackets for clearance.

Re-secure Climate Control Panel

Secure the climate control panel to the sub-dash using new holes and provided screws.

Kit Assembly

Attach Radio Mounting Brackets

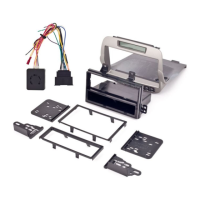
Attach the provided radio brackets to the aftermarket radio using supplied screws.

Connect Wiring Harness and Antenna

Connect the factory wiring harness and antenna connector to the new radio.

Secure Assembly to Dash

Secure the assembly to the dash using the upper brackets and factory screws.

Drill and Secure Lower Brackets

Drill 1/8" holes in lower bracket locations and secure with provided screws.

Reassemble Dash Panel

Reassemble the dash in reverse order, installing the radio dash panel.

Related product manuals