EasyManua.ls Logo

Miller Blue Star 6000 - User Manual

Miller Blue Star 6000
54 pages
Print Icon
To Next Page IconTo Next Page
Loading...
Blue Star 6000
(Honda-Powered)
Processes
Description
Stick (SMAW) Welding
Engine Driven Welding Generator
OM-488 495 371B
January 2000
Visit our website at
www.MillerWelds.com

Table of Contents

Questions and Answers

  • A
    Anna RobertsAug 17, 2025
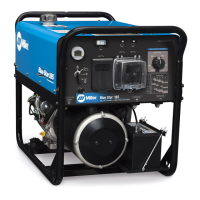
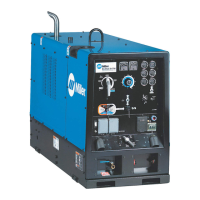
    What to do if my Miller Welding System has no weld output?
    • C
      Chase FloresAug 17, 2025
      If your Miller Welding System has no weld output, you can take the following steps: * Check the amperage control setting. * Check the weld connections. * Reduce the load and allow the generator Over-Temp switch TP1 to reset if the generator overheats. * Check and adjust the engine speed if necessary, as output stops if the engine speed is too low. * Ensure all equipment is disconnected from receptacles when starting the unit. If the issue persists, have a Factory Authorized Service Agent inspect the brushes, slip rings, circuit board PC1, capacitor C1, and integrated rectifiers SR1 and SR2.
  • T
    Tonya MeyersAug 20, 2025
    What to do if my Miller Welding System has no output at auxiliary power receptacles?
    • S
      smithkristaAug 20, 2025
      If there is no output at the auxiliary power receptacles of your Miller Welding System, try the following: * Reset the circuit breakers. * Reduce the load and allow the generator Over-Temp switch TP1 to reset, as it opens if the generator overheats. * Check the receptacle wiring and connections. * Check the engine speed and adjust if necessary, because the output stops if the engine speed is too low. If the problem continues, it is recommended to have a Factory Authorized Service Agent check the brushes, slip rings, circuit board PC1, capacitor C1, and integrated rectifiers SR1 and SR2.
  • V
    vanessaevansAug 22, 2025
    Why does my Miller Blue Star 6000 Welding System engine will not start?
    • G
      george65Aug 22, 2025
      If your Miller Welding System engine will not start, consider the following: * Check the fuel level. * Open the fuel valve, but remember to close it before moving the unit to prevent carburetor flooding. * For electric-start models, check the battery voltage and connections, tightening if necessary. * Check the oil level, as the engine stops if the oil level is too low; refill with the proper viscosity oil for the operating temperature. If the issue persists, have a Factory Authorized Service Agent check the low oil level shutdown switch.
  • D
    danielmurphyAug 26, 2025
    What to do if the Miller Blue Star 6000 Welding System engine stopped during normal operation?
    • A
      ashleymcdowellAug 26, 2025
      If the Miller Welding System engine stopped during normal operation, check the following: * Check the fuel level. * Ensure the fuel valve is open, and remember to close it before moving the unit. * Check the oil level, as the engine stops if it's too low. * Also, check the unit's operating angle, because the low oil level shutdown switch may stop the engine if the unit is tilted. If these steps don't resolve the issue, have a Factory Authorized Service Agent check the low oil level shutdown switch.
  • B
    Brian JonesAug 27, 2025
    What to do if my Miller Blue Star 6000 has erratic weld output?
    • M
      Michael WallsAug 27, 2025
      If your Miller Welding System has erratic weld output, consider these steps: * Check the amperage control setting. * Tighten and clean the connections to the electrode and workpiece. * Use dry, properly-stored electrodes for Stick welding. * Remove excessive coils from the weld cables. * Clean and tighten connections both inside and outside the welding generator. * Check and adjust the engine speed if necessary. * Check the throttle/governor linkage for smooth, non-binding operation. If the problem persists, have a Factory Authorized Service Agent check the brushes, slip rings, circuit board PC1, capacitor C1, and integrated rectifiers SR1 and SR2.
  • K
    Katherine WelchAug 30, 2025
    Why is the power output high on my Miller Blue Star 6000 Welding System?
    • E
      Elijah RiveraAug 30, 2025
      If your Miller Welding System has high power output, you should: * Check the engine speed and adjust it if necessary. * Move the throttle lever to the 50 Hz position for 50 Hz equipment. If the issue continues, have a Factory Authorized Service Agent check the brushes, slip rings, circuit board PC1, capacitor C1, integrated rectifiers SR1 and SR2, and suppressor VR1/R2.
  • J
    jessica94Sep 1, 2025
    Why is the weld output low on my Miller Blue Star 6000?
    • J
      Jorge SmithSep 2, 2025
      If your Miller Welding System's weld output is low, you can try the following: * Check the Amperage control and throttle lever settings. * Check the engine speed and adjust if necessary. * Service the air cleaner according to the engine manual. * Check the weld cable size and length. If the issue persists, have a Factory Authorized Service Agent check the brushes, slip rings, circuit board PC1, capacitor C1, and integrated rectifiers SR1 and SR2.
  • J
    Jordan BaileySep 4, 2025
    Why is the power output low on my Miller Blue Star 6000?
    • A
      Ashley FisherSep 4, 2025
      If the power output is low on your Miller Welding System, you can check the following: * Check the Amperage control setting. * Check the engine speed and adjust if necessary, because output stops if the engine speed is too low. * Move the throttle lever to the 60 Hz position for 60 Hz equipment.
  • S
    Stephen ThompsonSep 6, 2025
    What causes unstable engine speeds in a Miller Welding System?
    • S
      Shelby MillerSep 7, 2025
      If you're experiencing unstable or sluggish engine speeds with your Miller Welding System, try these steps: * Check the engine speed and adjust if necessary. * Check the throttle/governor linkage for smooth, non-binding operation. For further assistance, tune-up the engine according to the engine manual.
  • B
    Beth RobinsonSep 9, 2025
    What causes erratic power output in my Miller Blue Star 6000 Welding System?
    • C
      Christina AndrewsSep 9, 2025
      If you observe erratic power output from your Miller Welding System, consider the following: * Check the fuel level. * Check the receptacle wiring and connections. * Check the throttle/governor linkage for smooth, non-binding operation. * Service the air cleaner according to the engine manual. * Check the engine speed, and adjust if necessary, because the output stops if the engine speed is too low. If the issue persists, have a Factory Authorized Service Agent check the brushes, slip rings, and circuit board PC1.

Summary

Safety Precautions and Hazards

Symbol Usage

Explains the meaning of safety symbols used throughout the manual.

Arc Welding Hazards

Details potential dangers and precautions associated with arc welding.

Engine Hazards

Outlines potential hazards related to the engine operation and maintenance.

Additional Symbols for Installation, Operation, and Maintenance

Covers symbols for installation, operation, and maintenance safety.

Principal Safety Standards

Lists key safety standards and codes applicable to welding equipment.

EMF Information

Discusses electromagnetic fields and their potential effects on health and equipment.

Definitions and Specifications

Symbol Definitions

Defines various symbols used in the manual for clarity and operation.

Weld, Power, and Engine Specifications

Provides technical specifications for welding output, power, and engine details.

Dimensions, Weights, and Operating Angles

Details the physical dimensions, weight, and safe operating angles of the unit.

Fuel Consumption

Presents data on the fuel consumption rates under various operating conditions.

Duty Cycle

Explains the duty cycle and its impact on unit performance and warranty.

Auxiliary Power Curves

Illustrates the available auxiliary power output at different load conditions.

Volt-Ampere Curves

Displays volt-ampere characteristics showing output capabilities at various settings.

Installation Procedures

Installing Welding Generator

Provides instructions for the proper installation and placement of the welding generator.

Grounding Generator To Truck Or Trailer Frame

Details the safety procedure for grounding the generator to a vehicle frame.

Grounding Generator When Supplying Building Systems

Outlines the grounding process for supplying power to building systems.

Engine Prestart Checks

Lists essential checks to perform on the engine before starting operation.

Connecting the Battery (Electric-Start Models Only)

Guides on how to connect the battery for electric-start models.

Connecting to Weld Output Terminals

Explains the procedure for connecting cables to the weld output terminals.

Selecting Weld Cable Sizes

Provides a chart for selecting appropriate weld cable sizes based on current and length.

Operating the Welding Generator

Controls Overview

Identifies and locates the main controls of the welding generator.

Description Of Controls

Explains the function and operation of each control on the generator.

Operating Auxiliary Equipment

Optional Receptacle Panels

Shows different configurations of auxiliary power receptacle panels available.

Optional Receptacle Panel Ratings

Details the power ratings and limitations for various receptacle panels.

Maintenance Schedule and Procedures

Routine Maintenance

Outlines the regular maintenance tasks and their recommended intervals.

Maintenance Label Information

Describes the information provided on the maintenance schedule label.

Overload Protection

Explains the overload protection mechanisms and how they function.

Adjusting Engine Speed

Guides on how to adjust engine speed for optimal performance.

Troubleshooting Guide

Troubleshooting Common Issues

Provides a systematic guide to diagnose and resolve common operational issues.

Electrical Diagrams

Circuit Diagram For Welding Generator

Presents the main circuit diagram for the welding generator.

Wiring Diagram For Welding Generator (1 Of 3)

Shows the first part of the detailed wiring diagram for the generator.

Wiring Diagram For Welding Generator (2 Of 3)

Displays the second part of the detailed wiring diagram for the generator.

Wiring Diagram For Welding Generator (3 Of 3)

Presents the third and final part of the detailed wiring diagram.

Auxiliary Power Guidelines

Selecting Equipment for Auxiliary Power

Guidance on choosing appropriate equipment to connect to auxiliary power.

Grounding Generator To Truck Or Trailer Frame

Details the safety procedure for grounding the generator to a vehicle frame.

Grounding When Supplying Building Systems

Outlines the grounding process for supplying power to building systems.

Calculating Equipment Power Requirements

Explains how to calculate power requirements for connected equipment.

Power Requirements For Industrial Motors

Provides power estimates for various industrial motors.

Power Requirements For Farm;Home Equipment

Lists power needs for common farm and home equipment.

Power Requirements For Contractor Equipment

Details power requirements for contractor-specific equipment.

Power Required To Start Motor

Explains motor starting power demands and how to calculate them.

Generator Power Supply Capacity

Discusses the generator's power supply capacity and load management.

Connections For Standby Power

Illustrates how to connect the generator for standby power applications.

Selecting Extension Cord

Provides guidance on selecting appropriate extension cords based on load and length.

Stick Welding (SMAW) Guidelines

Stick Welding Procedure

Details the step-by-step process for performing stick welding.

Electrode and Amperage Selection Chart

A chart to help select electrodes and corresponding amperage settings.

Striking an Arc - Scratch Start Technique

Explains the scratch start method for initiating a welding arc.

Striking an Arc - Tapping Technique

Describes the tapping technique for starting a welding arc.

Positioning Electrode Holder

Illustrates correct positioning of the electrode holder for welding.

Poor Weld Bead Characteristics

Identifies common issues and characteristics of poor weld beads.

Good Weld Bead Characteristics

Describes the characteristics of a properly formed weld bead.

Conditions That Affect Weld Bead Shape

Discusses factors influencing weld bead appearance and quality.

Electrode Movement During Welding

Explains proper electrode movement techniques for various weld types.

Butt Joints Welding

Details welding procedures for different types of butt joints.

Lap Joint Welding

Covers techniques for creating lap joints using welding.

Tee Joint Welding

Explains the process for welding tee joints effectively.

Weld Test Procedures

Describes a test to evaluate the quality of a weld joint.

Troubleshooting - Porosity

Identifies causes and solutions for porosity defects in welds.

Troubleshooting - Excessive Spatter

Addresses causes and corrective actions for excessive spatter during welding.

Troubleshooting - Incomplete Fusion

Explains how to diagnose and fix incomplete fusion in welds.

Troubleshooting - Lack Of Penetration

Covers issues related to insufficient weld penetration and their remedies.

Troubleshooting - Excessive Penetration

Details causes and solutions for welds with excessive penetration.

Troubleshooting - Burn-Through

Addresses weld burn-through issues and their solutions.

Troubleshooting - Waviness Of Bead

Discusses causes and techniques to correct wavy weld beads.

Troubleshooting - Distortion

Explains how to manage and correct weld distortion.

Parts List

Main Assembly Parts

Provides an exploded view and list of parts for the main assembly.

Auxiliary Power Panel Parts

Shows diagrams and lists parts for various auxiliary power panels.

Warranty Information

Miller Blue Star 6000 Specifications

General IconGeneral
Power SourceEngine Driven
Input Frequency60 Hz
Welding ProcessesStick (SMAW), TIG (GTAW)
Dimensions22.5 x 10.5 x 16.5 in (57.2 x 26.7 x 41.9 cm)
Duty Cycle60% at 300A
Output Current Range (AC/DC)40-225A AC, 40-200A DC
Rated Output (AC/DC)225A AC, 200A DC at 30V
Open Circuit Voltage (AC/DC)80V AC, 50V DC
Engine TypeKohler
Weight (Engine)125 lbs (56.7 kg)
Dimensions (Engine)22.5 x 10.5 x 16.5 in (57.2 x 26.7 x 41.9 cm)

Related product manuals