EasyManua.ls Logo

MINOURA DS-2200 - User Manual

MINOURA DS-2200
6 pages
Print Icon
To Next Page IconTo Next Page
Loading...
Bicycle Storage Stand
DS-2200
instructions manual
Important Notes
Contact
If you have any questions or need help, you should contact the
dealer
where you purchased or the Minoura
distributor
in your country rst. Only when you cannot get enough service, you can contact us;
MINOURA JAPAN
(for ALL customers)
MINOURA North America
(for U.S. residents ONLY)
134-1 Shimomiya, Godo, Anpachi, Gifu 503-2312 Japan Hayward, Caliornia, U.S.A.
Fax: +81-584-27-7505 Phone: 1-510-538-8599 / Fax: 1-510-538-5899
Email: minoura@minoura.jp / Web: www.minoura.jp Email: support@minourausa.com
Made in Japan
(ver.1.0 201
9
/5)
DS-2200 is meant to be used with a standard
bicycle only. Never attempt to get on your bike
when it is in the stand.
Place DS-2200 on at and level oor.
Balance the bike to prevent it from falling down,
especially when using DS-2200 in vertical position.
DS-2200 uses two swingable holders for your
bike. They move on their own to accommodate any
bicycle DS-2200 is designed to hold.
To get maximum stability
,
set the tire holder
distance as far apart as possible without the bike
touching the oor. If the bike touches the oor, it
will cause instability in the stand.
To set the bike vertical, you must place the rear
wheel on the tire holders. Do NOT place the bike
upside down.
When placing the bike horizontal, we recommend
to set the rear wheel on the tire holders, not the
front wheel.
If you need to set the front wheel in the holders,
make sure the wheel is straight.
You can set the pillar on either right or left side.
Depending on the room condition, choose the
appropriate side.
Be sure you adjust the pillar length correctly to
place the front wheel hook at the 4 o'clock posiition
of the front wheel. If it's too low, the stability will get
worse, and if it's too high, it will become difcult to
mount the bike on DS-2200.
Warranty
Minoura offers 1-year limited warranty for the first user of this product who purchased it
at brand-new condition. Any other users who get at used condition through shops, auction
site or personal trading cannot recieve this warranty service from Minoura.
For more information, please refer the attached "Minoura Limited Warranty Policy" card.
[Vertical Display Position]
Question and Answer IconNeed help?

Do you have a question about the MINOURA DS-2200 and is the answer not in the manual?

Summary

Important Notes

How To Assemble

Step 1: Attach Step-Bar

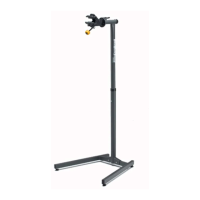
Install the Step-Bar to the Main Frame using M6x16 Bolt and M6 Flange Nut.

Step 2: Install Lower Pillar

Attach the Lower Pillar to the Main Frame with M6x35 Bolt and M6 Flange Nut.

Step 3: Insert Upper Pillar

Secure the Upper Pillar into the Lower Pillar using M6x30 Bolt and M6 Flange Nut.

How To Mount Bike On DS-2200

Vertical Style Bike Mounting

Step 1 & 2: Position Bike

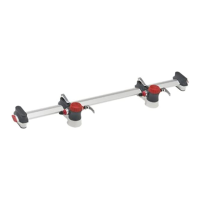
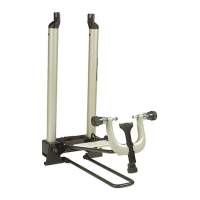
Flip and push the bike forward; the rear wheel will naturally step over the tire holder.

Step 3: Secure Rear Wheel

Continue pushing the bike forward until the rear wheel is stored between the tire holders.

Front Wheel Hook Position

Overview

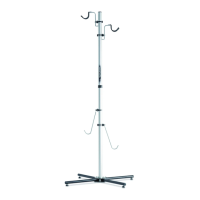
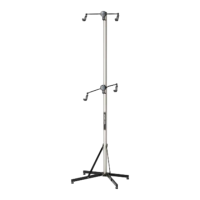
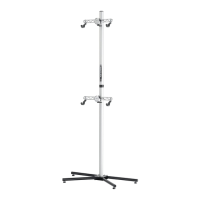
The Minoura DS-2200 is a bicycle storage stand designed to hold a standard bicycle both vertically and horizontally, offering flexibility in space-saving and accessibility. This manual provides instructions for assembly, usage, and maintenance, ensuring optimal stability and longevity of the product.

Function Description:

The DS-2200 serves as a stable and versatile stand for storing bicycles. It utilizes two swingable tire holders that automatically adjust to accommodate various bicycle sizes. The stand allows for two primary storage orientations: horizontal, which is convenient for daily use, and vertical, which maximizes space-saving. A key feature is the adjustable pillar with a front wheel hook, designed to secure the bicycle in the vertical position. The stand is constructed with durability in mind, using bolts and nuts for secure assembly.

Important Technical Specifications:

  • Bolt Sizes: The manual specifies various bolt sizes used in assembly, including M6x16, M6x35, M6x30, and M6x14. These are typically accompanied by M6 flat washers and M6 flange nuts or M6 nylon nuts.
  • Pillar Height Adjustment: The lower pillar offers 3 levels of height adjustment, catering to different wheel sizes:
    • Top hole: For small wheels up to 24-inch.
    • 2nd hole: For 26-inch & 700c wheels.
    • 3rd hole: For 29-inch wheels. The upper pillar also has 4 levels of position adjustment, with each hole distance being 50mm.
  • Tire Holder Positions: Both front and rear tire holders are position-changeable to fit various wheel sizes. The rear tire holder can be set for over 26-inch, 20-24-inch, 26-inch/700c, and 29-inch wheels. The front tire holder offers similar adjustability.
  • Tools Required for Assembly/Maintenance:
    • 4mm Hex Wrench (for assembly and changing tire holder position)
    • 10mm Spanner (for switching the pillar and changing tire holder position)

Usage Features:

  • Vertical Display Position: This is the primary space-saving mode. To set the bike vertically, the rear wheel must be placed on the tire holders, not upside down. The front wheel hook should be positioned at the 4 o'clock position (when viewed from the right side) for maximum stability and ease of mounting. The process involves flipping and standing the bike, pushing it forward so the rear wheel steps over and is stored between the tire holders, and then twisting the front wheel to catch the rim with the front wheel hook.
  • Horizontal Style: This mode is recommended for daily bike use. Users can choose to mount either the front or rear wheel in the holders. For better stability, it is recommended to hold the rear wheel rather than the front. In horizontal mode, the pillar can be removed if desired.
  • Pillar Orientation: The pillar can be set on either the right or left side of the main frame, depending on room conditions and user preference. Switching the pillar involves removing and reinstalling the front wheel hook and small hook on the opposite side.
  • Tire Holder Adjustment: Tire holders are adjustable to ensure the tire does not touch the floor, which is crucial for stability. The rear tire holder should be installed first, from the bottom side of the main frame, followed by the front holder. An Anti-Overspin Pin prevents the tire holder from rotating backward.
  • Small Hook: A small hook is provided for hanging items like a helmet or wear.
  • Stability Considerations:
    • Always place the DS-2200 on a flat and level floor.
    • Balance the bike carefully to prevent falling, especially in the vertical position.
    • For maximum stability, set the tire holder distance as far apart as possible without the bike touching the floor.
    • When mounting the bike by the front wheel, align the front wheel with the bike frame, not the handlebars, to prevent tilting and instability.
    • Never attempt to get on the bike when it is in the stand.

Maintenance Features:

  • Bolt Tightening: The manual provides specific instructions on tightening bolts. Flange nuts are self-tightening and should simply be screwed down. For the lower pillar, bolts should not be overtightened to avoid deforming the tube. Nylon nuts have a softer washer inside and should not be tightened repeatedly, as this could strip the washer. A spanner is required to adequately tighten nylon nuts.
  • Warranty: Minoura offers a 1-year limited warranty for the first user who purchased the product in brand-new condition. This warranty does not extend to users who acquire the product in used condition. For warranty claims or support, users should first contact the dealer or Minoura distributor in their country. If sufficient service cannot be obtained, direct contact with Minoura Japan or Minoura North America (for U.S. residents) is advised.
    • Minoura Japan Contact:
      • Address: 134-1 Shimomiya, Godo, Anpachi, Gifu 503-2312 Japan
      • Fax: +81-584-27-7505
      • Email: minoura@minoura.jp
      • Web: www.minoura.jp
    • Minoura North America Contact (for U.S. residents ONLY):
      • Address: Hayward, California, U.S.A.
      • Phone: 1-510-538-8599
      • Fax: 1-510-538-5899
      • Email: support@minourausa.com

The product is made in Japan.

MINOURA DS-2200 Specifications

General IconGeneral
BrandMINOURA
ModelDS-2200
CategoryRacks & Stands
LanguageEnglish

Related product manuals