EasyManua.ls Logo

MINOURA P-600AL - User Manual

MINOURA P-600AL
2 pages
Print Icon
To Next Page IconTo Next Page
Loading...
Type-A: plain type bolt
Type-B: with Spring Washer
1
2
3
5
P-600AL "Closet Cyclist 2" instructions manual
Upper Hook
Main Pillar
Lower Hook
Reinforcement Bar
Rear Leg
Right Side Front Leg
Height Adjuster
Leg Base Plate
Stainless Band Clip
• For use of normal human-powered 2-wheel bicycles only. Heavy and long bikes
such as tandem, electric assisted and downhill / freeride bikes don't t P-600AL.
• P-600AL may lose balance when hanging bike on just one side only depends on
the bike weight. Be careful about the stability when taking off the bike.
• You should setup P-600AL along a wall to prevent falling backward problem. Do
not install the bike on the backside of P-600AL.
Required Tools for Assembling
Bolt Type Recognition
Install both right and left Front Legs to the
Leg Base Plate with the supplied M6x35
bolt (type-A), Flat washer, Collar and M6
Nylon nut. (see Fig. A)
M6 Nylon Nut
Collar
M6 Flat
Washer
Left Side
Front Leg
Place the Rear Leg on the Leg Base
Plate, and put the Pillar Base Plate
onto the assembled legs.
Put the M6x40 bolt (type-A) with
M6 Flat Washer into the front side
hole, then tighten to M6 Nylon Nut
temporarily. (see Fig. B)
Pillar Base
Plate
M6x40 Bolt (type-A)
Rear Leg
Put the M6x40 bolt (type-A)
with M6 Flat washer into the
backside hole and tighten to M6
Nylon Nut rmly.
After that, tighten the front side
bolt rmly too. (see Fig. C)
M6x40 Bolt
(type-A)
Attach the Backside Leg on the back
of the Main Pillar, then tighten with
the supplied two M6x18 bolts (type-B)
temporarily.
Please note that you will tighten
these bolts rmly after installing the
Reinforcement Bars. (see Fig. E)
Backside Leg
M6x18 Bolt
Main Pillar
1 x M5 Hex Wrench
1 x 10mm Spanner
1 x 13mm Spanner
M6x35 Bolt (type-A)
Leg Base Plate
MADE IN JAPAN
IMPORTANT NOTICES
Be sure the Legs are different
for right side and left side.
Each Reinforcement Bar must
be located inward.
!
M6 Nylon Nut
!
Be sure the collar insertion
direction is different on right
and left side. Follow as
shown in Fig. A.
(Fig. A)
(Fig. B)
(Fig. C)
(Fig. D)
(Fig. E)
M6 Nylon Nut
4
Insert the Main Pillar onto the Pillar
Base Plate.
Make sure the Main Pillar must cover
on the bracket, not placing beside the
bracket. (see Fig. D)
M6 Flat
Washer
M6 Flat
Washer
Stainless Band Clip
(2009/07)
Question and Answer IconNeed help?

Do you have a question about the MINOURA P-600AL and is the answer not in the manual?

Summary

Important Safety Notices

Bicycle Compatibility

Specifies use for normal human-powered 2-wheel bicycles only; heavy or electric bikes are not compatible.

Stability and Wall Support

Warns about potential balance loss when hanging bike on one side and recommends setup along a wall.

Assembly Instructions

Attach Front Legs

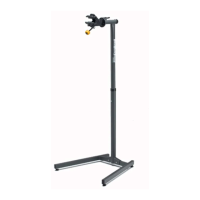
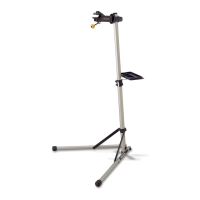
Install right and left Front Legs to Leg Base Plate using M6x35 bolt (type-A), washer, collar, and nylon nut.

Place Rear Leg and Pillar Base Plate

Place Rear Leg on Leg Base Plate, then Pillar Base Plate onto assembled legs; temporarily tighten M6x40 bolt.

Secure Rear Leg

Firmly tighten the M6x40 bolt on the backside hole and then the front side bolt for the Rear Leg.

Insert Main Pillar

Insert Main Pillar onto Pillar Base Plate, ensuring it covers the bracket properly.

Attach Backside Leg

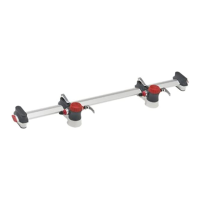
Attach Backside Leg to Main Pillar with M6x18 bolts (type-B), to be tightened after Reinforcement Bars.

Attach Reinforcement Bars

Raise Reinforcement Bars and attach to Main Pillar with M6x70 bolt (type-A), shim, washer, and nylon nut.

Adjust Backside Leg Height

Adjust Backside Leg height for floor contact, then firmly tighten M6x18 bolts.

Install Hooks

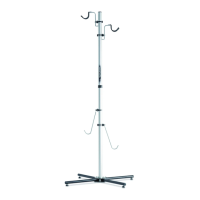
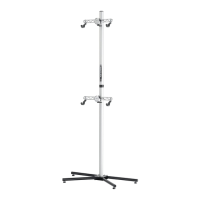
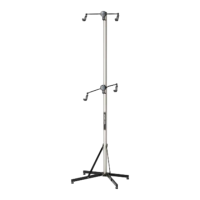
Install Upper and Lower Hooks to Main Pillar, adjusting position for optimal bike hanging.

Install Stainless Band Clip

Assemble and attach the Stainless Band Clip to the Main Pillar, ensuring correct alignment.

Final Stability Adjustment

Adjust Height Adjusters on legs to keep Main Pillar vertical and stable, then tighten Lock Nut.

For More Information

Contact Information

Provides contact details for MINOURA JAPAN and MINOURA NORTH AMERICA for questions or assistance.

MINOURA P-600AL Specifications

General IconGeneral
BrandMINOURA
ModelP-600AL
CategoryRacks & Stands
LanguageEnglish

Related product manuals