EasyManua.ls Logo

MINOURA RS-4000 - User Manual

MINOURA RS-4000
8 pages
Print Icon
To Next Page IconTo Next Page
Loading...
- 1 -
Loosen the Lower Quick Release Skewer and raise up the
Upper Frame to open the Leg with sliding down the Lower
Bracket until it touches the Frame Stopper. (see Fig. A)
RS-4000 Instruction Manual
Please read this instruction manual carefully before use.
Thank you for purchasing the Minoura RS-4000 bicycle repair stand.
The RS-4000 holds your bike by clamping the seat post or frame to make repairs and maintenance much
easier.
In addition, the RS-4000 is made of lightweight aluminum alloy tubing and foldable design with quick
release skewers, so you can transport this stand anywhere you need then it becomes your work space.
The clamp jaws rotate a full 360 degrees so you can work on specific areas of your bicycle.
We recommned you to maintain your bike everytime before you ride with using this stand for your
safety.
HOW TO SET-UP YOUR RS-4000
The RS-4000 is already fully assembled so you can start using this
stand within a minute.
To set-up your RS-4000, follow these steps.
1
Lower Quick
Release Skewer
Upper Quick Release
Skewer
Clamp Lever
Clamp Jaws
Clutch Release Lever
Clamp Knob
Clutch
Upper Frame
Lower Frame
Leg
Reinforcement Bar
(Fig. A)
Lower Bracket
Frame Stopper
Question and Answer IconNeed help?

Do you have a question about the MINOURA RS-4000 and is the answer not in the manual?

Summary

How to Set Up Your RS-4000

Open Stand Legs

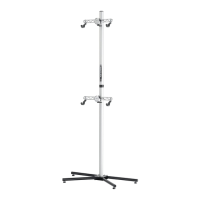
Loosen the lower quick release skewer and raise the upper frame to open the legs.

Secure Lower Quick Release Skewer

Tighten the lower quick release skewer firmly to fix the stand's open position.

Perfectly Tighten Quick Release Skewer

Detailed steps for perfectly tightening the quick release skewer for safe operation.

Extend and Secure Upper Frame

Loosen, extend, and then tighten the upper quick release skewer to set frame height.

Proper Quick Release Lever Positioning

Recommends correct quick release lever placement to prevent collapse and ensure safety.

Insert and Secure Clamp Jaws

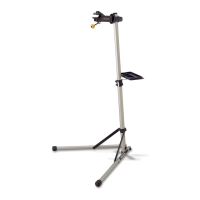
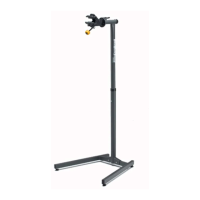
Loosen clamp knob, insert jaws into bracket, then tighten knob to hold position.

How to Clamp Your Bike on the RS-4000

Place Stand on Stable Surface

Position the stand on a flat, horizontal floor and ensure lower bracket reaches stopper.

Adjust Clamp Jaws Angle

Loosen knob, push clutch lever, rotate jaws to desired angle, then release lever.

Operate Clamp Lever

Push down the clamp lever to open jaws and pull up to shut jaws.

Adjust Clamp Jaws Width

Use the small knob on the lever to widen or narrow the clamp jaws.

Clamp Top Tube

Set jaws horizontally, place top tube on lower jaw, pull lever to shut.

Ensure Proper Jaw Resistance

Adjust knob for resistance before fully clamping; avoid no-resistance or over-tightening.

Adjust Jaws Before Clamping

Emphasizes adjusting clamp jaws before fully securing the bike to prevent damage or accidents.

Avoid Upside-Down Bike Positioning

Warning against positioning the bike upside down, which compromises secure clamping.

Clamp Seat Post or Seat Tube

Adjust jaw angle before placing bike; clamp seat post firmly referencing previous steps.

Troubleshooting: Clamp Lever Unthreaded

Identify Unthreaded Clamp Lever Issue

Describes the problem of a clamp lever becoming unthreaded due to improper adjustment.

Fix Unthreaded Clamp Lever

Steps to fix by removing bolt, re-engaging threads with roll nut, and stopping at few threads.

How to Replace Rubber Pad of Clamp Jaws

Remove E-rings

Use pliers to remove both right and left E-rings from the clamp jaws.

Replace Rubber Pad

Pull out the old rubber pad and install the new one.

Set E-rings

Reinstall the removed E-rings to secure the new rubber pad.

MINOURA RS-4000 Specifications

General IconGeneral
TypeRepair Stand
Clamp HeightAdjustable
Height AdjustmentYes
FoldableYes
PortableYes
MaterialSteel
Weight Capacity30 kg
Clamp TypeQuick Release

Related product manuals