14
Reversed Inlet Supplies
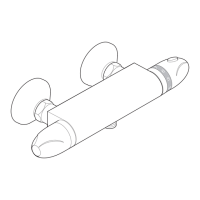
It is essential the inlet supplies correspond with the red and blue markings on the
thermostatic cartridge for the Mira Form to operate correctly. The shower control is
supplied with the inlet connections configured hot-left, cold-right. If the existing hot
and cold pipework makes this configuration inconvenient the cartridge inlets can be
reversed.
The connections can be altered by rotating the thermostatic cartridge through 180°,
before or after installation is complete.
1. If the mixing valve body has already been installed, turn off the supplies to the
mixing valve, and open the flow control. This will release the trapped water pressure
and assist in draining residual water.
2. Remove the knob and cover assemblies. Refer to section: ‘Maintenance,
Removing/Fitting Knob and Concealing Plate Assemblies’.
3. With the removal clip still in place, unscrew the head nut using a 35 mm A/F
wrench; this will begin to draw the thermostatic cartridge out of the body.
Note! Some residual water may be released. Pull the thermostatic cartridge free
of the valve body.
4. Rotate the thermostatic cartridge through 180
o
and carefully push the cartridge
back into the valve body, checking that the 2 cartridge inlet port seals remain in
place, and locate the cartridge lugs into the body slots.
Note! The red and blue markings on the cartridge will now not correspond with
the body markings, to avoid future confusion remove the red and blue stickers
from the valve body.
5. Carefully align and then tighten the head nut, do not overtighten.
6. Complete the Installation, if appropriate.
7. If the mixing valve body has already been installed, restore hot and cold supplies
and check for any leaks.
8. Refit the knob and cover assemblies; refer to section: ‘Maintenance,
Removing/Fitting Knob and Concealing Plate Assemblies’.
9. The maximum temperature may now need resetting, check the outlet water
temperature, and if necessary refer to section ‘Commissioning’.
 Loading...