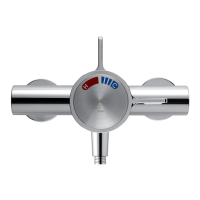
Backplate
Flow Control
Lever
Temperature
Control Knob
Concealing Plate
Bearing
Cutout
4. Unscrew the two shroud screws and remove
the backplate from the mixer.
Filter
Filter Assembly
5. Unscrew the lter assembly.
6. The lter assembly can be cleaned or replaced
as necessary.
7. Reassemble the lter assembly and screw into
the mixer body.
8. Turn on the hot and cold water supplies and
check for leaks.
9. Ret the controls in reverse order.
Note! When retting the bearing, make sure
that the cutouts are aligned with the control
assembly.
Inlet Filters
The inlet lters should be checked and cleaned
as necessary every 12 months.
Note! The inlet lters must not be removed except
for cleaning. If the thermostatic mixer is operated
without the inlet lters tted the warranty on the
product will be void.
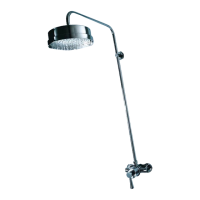
Exposed Models:
1.
Isolate the hot and cold water supplies and
operate the ow control lever to drain any
residual water.
2.
Carefully remove the concealing caps and
unscrew the lter plugs with a 5 mm hexagonal
wrench. Remove the lters.
Concealing Cap
Filter Plug
Filter
‘O’ Seal
3. Clean the lters under a jet of water to remove
any lodged particles.
4.
Ret the lters and tighten the lter plugs.
Note! Make sure that the ‘O’ seal is tted
correctly and undamaged.
5.
Turn on the hot and cold water supplies and
check for leaks.
6.
Ret the concealing caps.
Built-in Models
1.
Isolate the hot and cold water supplies and
operate the ow control lever to drain any
residual water.
2.
Loosen the grubscrew to remove the
temperature control knob. Then remove the
ow control lever.
3. Carefully unclip the concealing plate from the
backplate.
Note! Use a suitable screwdriver in the cutout
to assist separation.