8
InstructionsForUse
Oncethepressurecookerisassembledproperly,
youarereadytobeginpressurecooking.
Cleancover,internalsurfaceofexternallidand
rimofcookingpotbeforerstuseandaftereach
cookingsessiontomaintainpropersealingatall
timeswithlidlockedinposition.
1. Toremovelid,grasplidhandle,turnitin
clockwisedirection,the‘Unlock’markon
thelidtopointtothe‘Arrow’markonthe
appliancehousingabovethecontrolpanel,
thenliftthelid.(Fig.3&4)
g.3
g.4
2. Atthesametime,cleanthelidandthe
rubbersealringthenretthesealringonto
thelid.Ensuretherubbersealringisproperly
seatedintothesealregisterofthelid.(Fig.5)
Fig.5
3.Addfoodandliquidsastherecipe
directs,andthenplacecookingpotintothe
pressurecooker.
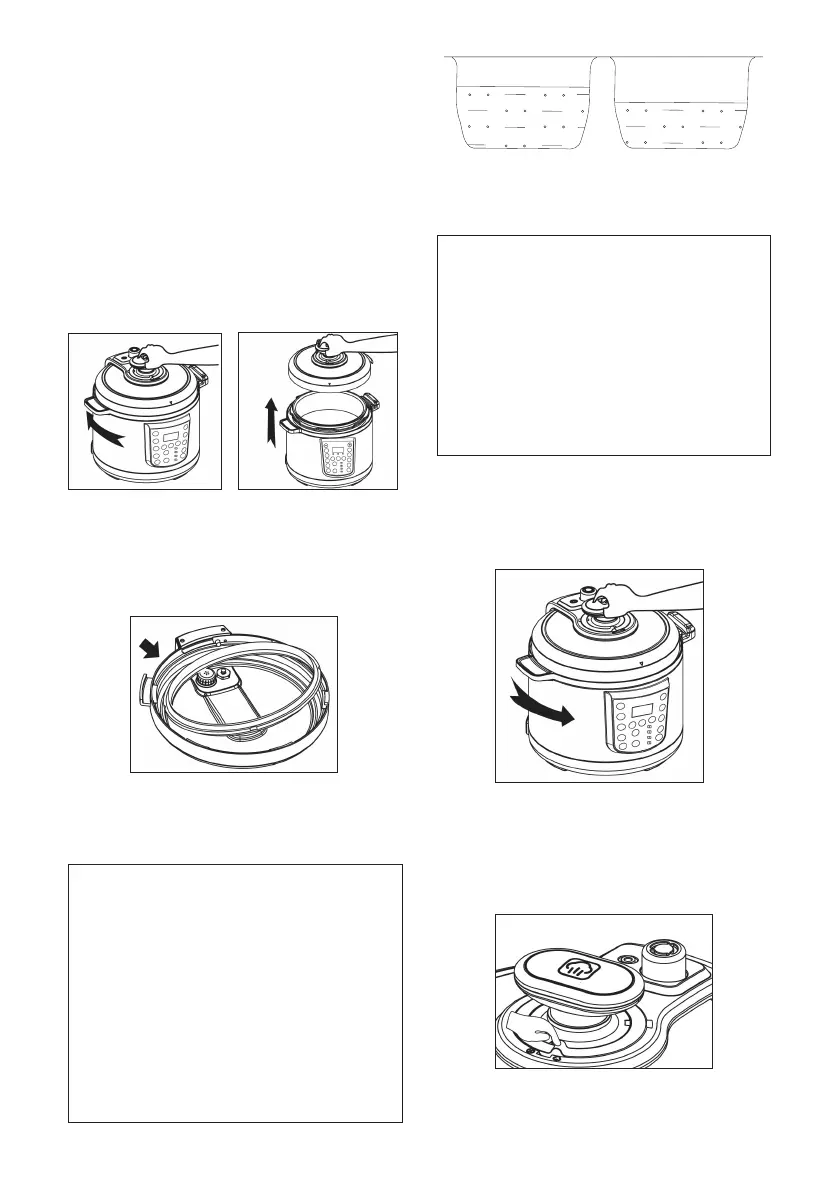
Note: the maximum volume of both food
and liquid must not exceed 4/5 capacity
of the cooking pot, indicated by level
mark inside the cooking pot as 4/5 and
Full (Fig.6).
for foods such as dried vegetables,
beans, rice or grains (These ingredients
expand a lot with absorption of liquid),
the maximum volume of ingredients
and liquid must not exceed 50% of the
cooking pot capacity, In the middle
of 2/5 and 3/5 Level marking of the
cooking pot or 9 Cup Level (Fig.7).
4/5
Middleof2/5and
3/5markingor9cup
Figure6Figure7
Note: The cup supplied with the pressure
cooker is NOT Standard Australian 250
ml, but actually 160 ml full to the rim. The
corresponding level marking inside the
cooking pot reects 160 ml cups, e.g.
4 cups is 640ml, 10 cups is 1600 ml etc.
of ingredients and then ll with liquid to
the corresponding cup level marking of
the cooking pot and that gives you the
correct amount of liquid for the food you
are cooking.
4.Lockthelidbyturningthelidinanti-clockwise
direction,byaligningthe‘Arrow/Lockedicon
‘markedonthelidwiththe‘Arrow”markon
theunithousing.(Fig.8)
Fig.8
5.EnsurethePressureLimitValveisproperly
seatedinthesteamventnozzle,thenturnthe
Pressurereleasecontrolringtabtothe“Seal”
position.(Fig.9)
Fig.9