Chapter 1 Tune-up and routine maintenance
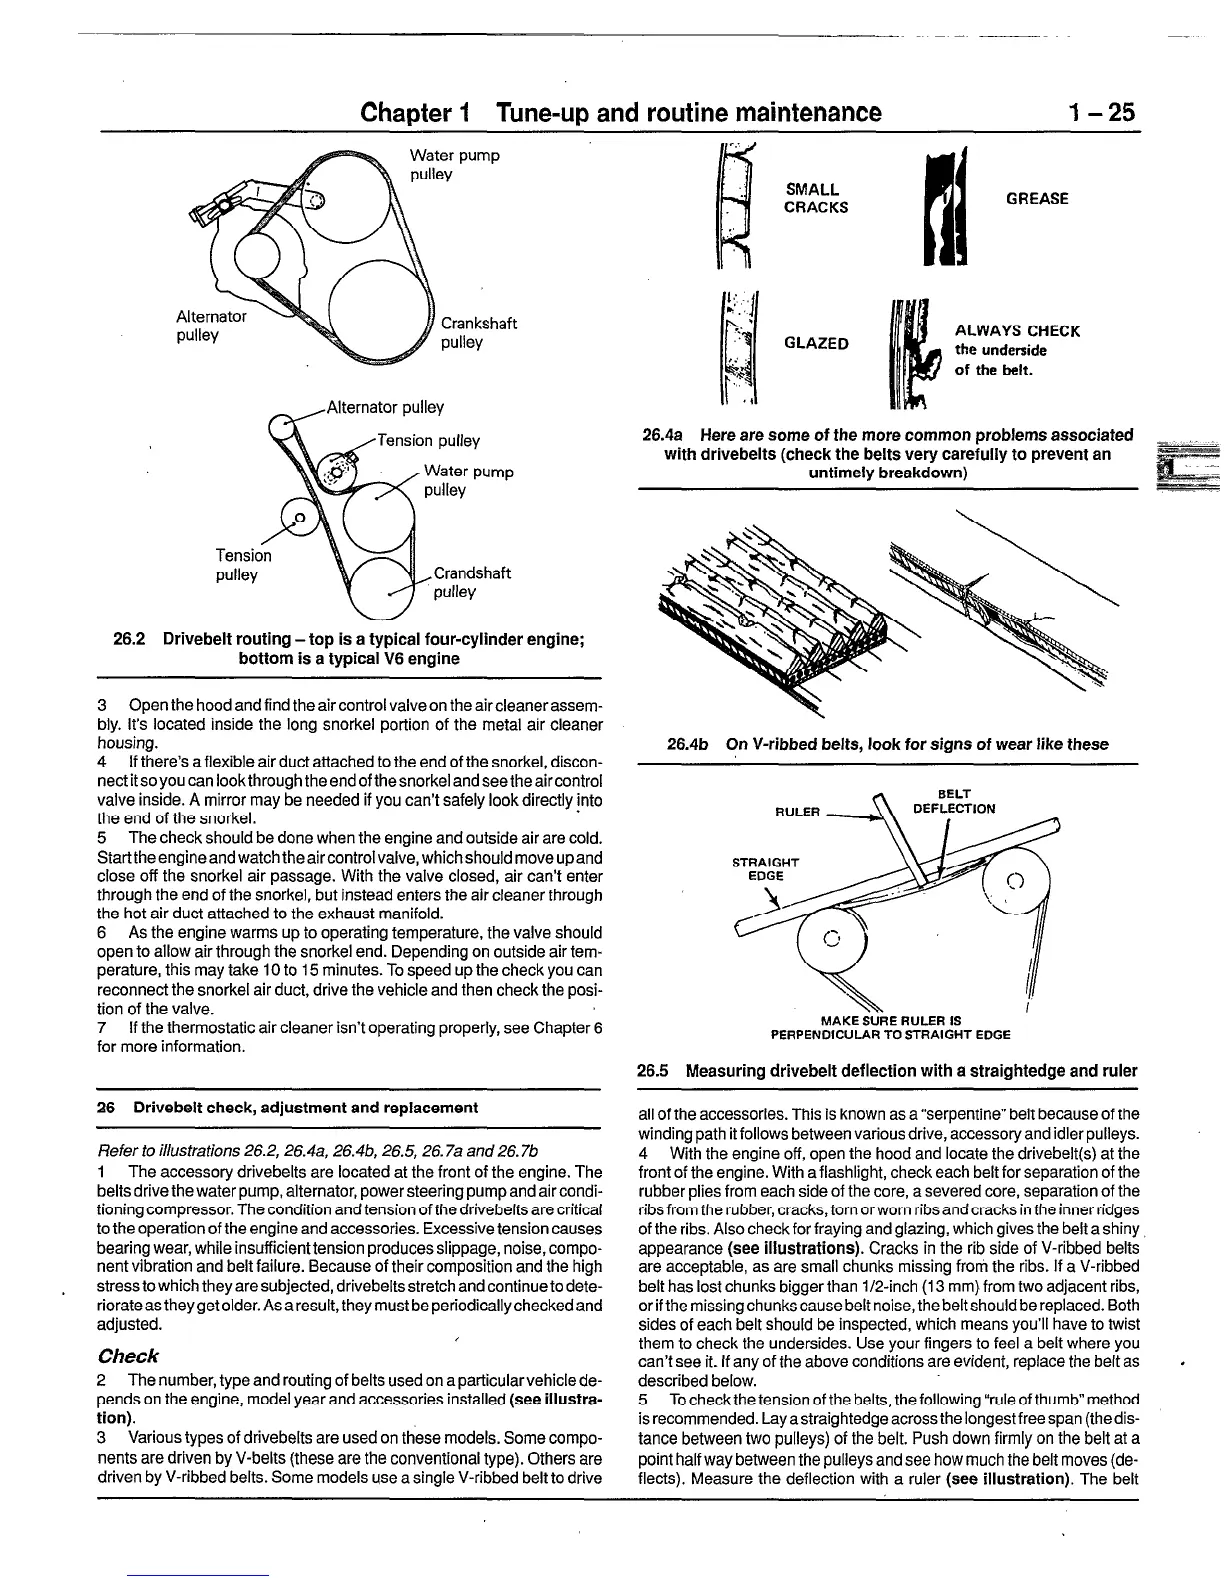
26.2
-Alternator pulley
Crandshaft
pulley
Drivebelt routing -top is a typical four-cylinder
bottom is a typical V6 engine
engine;
3 Open the hood and find the air control valve on the air cleaner assem-
bly. It’s located inside the long snorkel portion of the metal air cleaner
housing.
4 If there’s a flexible air duct attached to the end of the snorkel, discon-
nectitsoyoucanlookthroughtheendofthesnorkelandseetheaircontrol
valve inside. A mirror may be needed if you can’t safely look directly into
the end of the snorkel.
5 The check should be done when the engine and outside air are cold.
Starttheengineandwatchtheaircontrolvalve, whichshould moveupand
close off the snorkel air passage. With the valve closed, air can’t enter
through the end of the snorkel, but instead enters the air cleaner through
the hot air duct attached to the exhaust manifold.
6 As the engine warms up to operating temperature, the valve should
open to allow air through the snorkel end. Depending on outside air tem-
perature, this may take 10 to 15 minutes. To speed up the check you can
reconnect the snorkel air duct, drive the vehicle and then check the posi-
tion of the valve.
7 If the thermostatic air cleaner isn’t operating properly, see Chapter 6
for more information.
26 Drivebelt check, adjustment and replacement
,
Refer to illustrations 26.2,26.4a, 26.4b, 26.5,26.7a and 26.7b
1 The accessory drivebelts are located at the front of the engine. The
belts drive the water pump, alternator, power steering pump and air condi-
tioning compressor. The condition and tension of the drivebelts are critical
to the operation of the engine and accessories. Excessive tension causes
bearing wear, while insufficient tension produces slippage, noise, compo-
nent vibration and belt failure. Because of their composition and the high
stress to which they are subjected, drivebelts stretch and continue to dete-
riorateastheyget older. Asaresult, they must beperiodicailycheckedand
adjusted.
,
Check
2 The number, type and routing of belts used on aparticuiarvehicle de-
pends on the engine, model year and accessories installed
(see iiiustra-
tion).
3 Various types of drivebelts are used on these models. Some compo-
nents are driven by V-belts (these are the conventional type). Others are
driven by V-ribbed belts. Some models use a single V-ribbed belt to drive
GREASE
GLAZED
ALWAYS CHECK
the
underside
of the belt.
26.4a Here are some of the more common problems associated _
with drivebelts (check the belts very carefully to prevent an -*
untimely breakdown)
26.4b On V-ribbed belts, look for signs of wear like these
DEFLECTION
, . .
MAKE SURE RULER IS
PERPENDICULAR TO STRAIGHT EDGE
26.5 Measuring drivebelt deflection with a straightedge and ruler
all of the accessories. This is known as a “serpentine” belt because of the
winding path it follows between various drive, accessory and idler pulleys.
4 With the engine off, open the hood and locate the drivebelt at the
front of the engine. With a flashlight, check each belt for separation of the
rubber plies from each side of the core, a severed core, separation of the
ribs from the rubber, cracks, torn or worn ribs and cracks in the inner ridges
of the ribs. Also check for fraying and glazing, which gives the belt a shiny
appearance
(see illustrations).
Cracks in the rib side of V-ribbed belts
are acceptable, as are small chunks missing from the ribs. If a V-ribbed
belt has lost chunks biggerthan l/2-inch (13 mm} from two adjacent ribs,
orifthemissingchunkscausebeltnoise, thebeltshould bereplaced. Both
sides of each belt should be inspected, which means you’ll have to twist
them to check the undersides. Use your fingers to feel a belt where you
can’t see it. If any of the above conditions are evident, replace the belt as
described below.
5 To check the tension of the belts, the following “rule of thumb” method
is recommended. Lay astraightedge across the longest free span (the dis-
tance between two pulleys) of the belt. Push down firmly on the belt at a
point half way between the pulleys and see how much the belt moves (de-
flects). Measure the deflection with a ruler (see
illustration).
The belt
 Loading...


