118
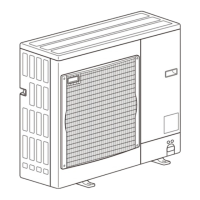
Photo 13
Photo 14
Compressor
(MC)
Valvebed
Separator
Separator
fixingscrew
Compressor
fixingnuts
Accumulator
Accumulator
Outlet
Inlet
12. Removing the compressor (MC)
(1)Removetheservicepanel.(SeePhoto1)
(2)Removethetoppanel.(SeePhoto1)
(3)Removethefrontpanel.(SeePhoto1)
(4)Removetheconduitcoverandcordcover.
(SeePhoto2)
(5)Removethebackpanel.(SeePhoto1)
(6)Removetheelectricalpartsbox.(SeePhoto5)
(7)Remove3separatorfixingscrews(4×10)andremove
theseparator.
(8)Removethethermistor<Comp.surface>(TH32).(Refer
toprocedure6)
(9)Recoverrefrigerant.
(10)Remove3compressorfixingnutsbyusingspanneror
adjustablewrench.
(11)Removetheweldedpipeofmotorforcompressorinlet
andoutlet.
Note: Recover refrigerant without spreading it in the air.
Accumulatorleg
fixingscrew
Accumulatorleg
13. Removing the accumulator
(1)Removetheservicepanel.(SeePhoto1)
(2)Removethetoppanel.(SeePhoto1)
(3)Removethefrontpanel.(SeePhoto1)
(4)Removetheconduitcoverandcordcover.(SeePhoto2)
(5)Removethebackpanel.(SeePhoto1)
(6)Removetheelectricalpartsbox.(SeePhoto5)
(7)Recoverrefrigerant.
(8)Remove2weldedpipesofaccumulatorinletandoutlet.
(9)Remove2accumulatorlegfixingscrews(4×10).
(10)Removetheaccumulatortogetherwiththereceiverleg.
Note: Recover refrigerant without spreading it in the air.
OPERATING PROCEDURE PHOTOS
 Loading...