119
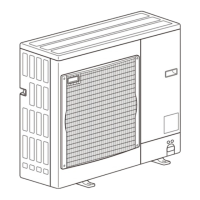
1. Removing the service panel and top panel
(1)Remove3servicepanelfixingscrews(5×12)andslide
thehookontherightdownwardtoremovetheservice
panel.
(2)Removescrews(3forfront,3forrear/5×12)ofthetop
panelandremoveit.
Figure 1
Toppanelfixingscrews
Toppanel
Servicepanel
fixingscrews
Servicepanel
Grillefixingscrews
Fangrille
2. Removing the fan motor (MF1)
(1)Removetheservicepanel.(SeeFigure1)
(2)Removethetoppanel.(SeeFigure1)
(3)Remove5fangrillefixingscrews(5×12)todetachthefan
grille.(SeeFigure1)
(4)Removeanut(forrighthandedscrewofM6)todetachthe
propeller.(SeePhoto1)
(5)DisconnecttheconnectorCNF1oncontrollercircuitboard
inelectricalpartsbox.
(6)Remove4fanmotorfixingscrews(5×25)todetachthe
fanmotor.(SeePhoto2)
Photo 3
Photo 1
Propeller
Frontpanel
Frontpanelfixingscrews
Nut
Photo 2
Slide
3. Removing the electrical parts box
(1)Removetheservicepanel.(SeeFigure1)
(2)Removethetoppanel.(SeeFigure1)
(3)Disconnecttheindoor/outdoorconnectingwirefrom
terminalblock.
(4)
Removeallthefollowingconnectorsfromcontrollercircuit
board,fanmotor,linearexpansionvalve,thermistor<Liquid>,
thermistor<Comp.surface>,thermistor<2-phasepipe>,
thermistor<Ambient>,highpressureswitch,4-wayvalveand
bypassvalve.
Pulloutthedisconnectedwirefromtheelectricalpartsbox.
<Diagramsymbolintheconnectorhousing>
•Fanmotor(CNF1)
•Linearexpansionvalve(LEV-A)
•Thermistor<Liquid>(TH3)
•Thermistor<Comp.surface>(TH32)
•Thermistor<2-phasepipe,Ambient>(TH6/7)
•Highpressureswitch(63H)
•4-wayvalvecoil(21S4)
•Bypassvalvecoil(SV2)
(5)Removetheterminalcoveranddisconnectthecompressor
leadwire.
(6)Removeanelectricalpartsboxfixingscrew(4×10)and
detachtheelectricalpartsboxbypullingitupward.The
electricalpartsboxisfixedwith2hooksontheleftand
1hookontheright.
Coverpanel
Electricalpartsbox
Controllercircuitboard
(C.B.)
Electricalparts
boxfixingscrew
Terminalblock
(TB1)
Fanmotorfixingscrews
Fan
motor
Fanmotorfixingscrews
PUZ-A24/30/36NHA6(-BS) PUY-A24/30/36NHA6(-BS)
OPERATING PROCEDURE
PHOTOS & ILLUSTRATION
 Loading...