Do you have a question about the modway EEI-2540 and is the answer not in the manual?
Secures the top board (1) using hardware A (x6) and V (x1).
Connects side boards (3, 4, 5, 6) using hardware D (x16), F (x1), G (x4), and V (x1).
Attaches legs (15) and support boards (16, 17, 18) using hardware A (x4), D (x28), and V (x1).
Joins side boards (5, 6) to the main structure (8).
Fastens side panels (3, 4) and center boards (5, 6) to the bottom board (2) using hardware J (x6), K (x1), and B (x6).
Attaches back panel (19) and support boards (T, U) using hardware B (x6), T (x4), U (x2), V (x1).
Attaches support boards (17, 18) to the frame (15) using hardware B (x2) and V (x1).
Secures the main frame components (15) with hardware B (x2) and V (x1).
Attaches base supports (15) to the frame using hardware D (x8).
Mounts drawer slides (L, P) onto the main unit (2) using hardware L (x8), P (x4), and V (x1).
Connects drawer fronts (9) to drawer slides (10, 11) using hardware A (x2) and E (x2).
Constructs the drawer box (9, 13) using hardware C (x2), I (x4), and V (x1).
Attaches the drawer (9) to the unit using hardware F (x1) and H (x4).
Slides the assembled drawer (9) into the main unit.
Places adjustable shelves (7) into the unit using hardware M (x8).
Mounts doors (14) to the unit using hardware Q (x4) and R (x4).
Attaches door handles (S) to doors (14) using hardware S (x3).
Secures the back panel (19) using hardware N (x10) and O (x10).
Confirms the assembly of the TV Stand is complete.
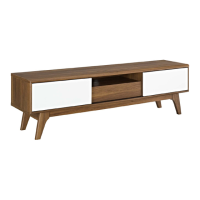
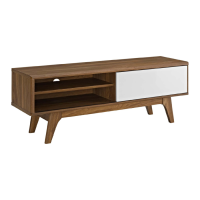
The Modway EEI-2540 TV Stand is a contemporary furniture piece designed to support a television and provide storage for media components and other items. This TV stand is intended for indoor use and requires assembly.
The primary function of the EEI-2540 TV Stand is to serve as a stable and aesthetically pleasing platform for a television. It incorporates multiple storage compartments, including drawers and shelves, to help organize media devices, remote controls, DVDs, books, or other household items, contributing to a tidy living space. The design aims to blend functionality with modern aesthetics, making it suitable for various interior decor styles.
The assembly relies on a comprehensive set of hardware, indicating a robust construction:
The variety and quantity of hardware suggest a multi-panel construction, typical for flat-pack furniture, designed for stability and durability once assembled.
In summary, the Modway EEI-2540 TV Stand is a functional and stylish piece of furniture designed for media storage and display. Its construction involves a variety of panels and hardware, requiring careful assembly, ideally by two adults. The design emphasizes both aesthetic appeal and practical storage solutions, with considerations for long-term stability through recommended maintenance practices.
| Brand | modway |
|---|---|
| Model | EEI-2540 |
| Category | Indoor Furnishing |
| Language | English |