EasyManua.ls Logo

Moen MOSAIC TS1322 User Manual

Moen MOSAIC TS1322
8 pages
To Next Page IconTo Next Page
Page #1 background imageLoading...
Page #1 background image
Installation Guide
Guía de Instalación
Guide d’installation
HELPFUL TOOLS
For safety and ease of faucet replacement, Moen recommends the use of these
helpful tools.
HERRAMIENTAS ÚTILES
Para que el cambio de la llave sea fácil y seguro, Moen le recomienda usar estas
útiles herramientas.
OUTILS UTILES
Par mesure de sécurité et pour faciliter l’installation, Moen suggère l’utilisation des
outils suivants.
Please Contact Moen First
For Installation Help, Missing or Replacement Parts
(USA)
1-800-BUY-MOEN (1-800-289-6636)
Mon - Fri 8:00 AM to 7:00 PM, Eastern
Sat. 9:00 AM to 3:00 PM Eastern
WWW.MOEN.COM
(Canada)
1-800-465-6130
Mon - Fri 7:30 AM to 7:00 PM, Eastern
WWW.MOEN.CA
Shower heads:
Standard 9.5 L/min (2.5 gpm) max. and High Eciency 7.6 L/min (2.0
gpm) max. or less
For use with automatic compensating valves rated at 4.2 L/min (1.1
gpm) or less
Por favor, contáctese primero con Moen
Para obtener ayuda de instalación, piezas faltantes o de recambio
01-800-718-4345
Lunes a viernes de 8:00 a 20:00 hs.
(Costa Este)
S
áb. 8:00 a 18:30 hs. (Costa Este)
WWW.MOEN.COM.MX
Roseta:
Estándar 9.5 L/min (2.5 gpm) máx. y alta eciencia 7.6 L/min (2.0
gpm) máx. o menos
Para usarse con válvulas de compensación automática de 4.2 L/min
(1.1 gpm) o menos
Veuillez d’abord contacter Moen
en cas de problèmes avec l’installation, ou pour obtenir toute pièce
manquante ou de rechange
1-800-465-6130
Du lundi au vendredi :
de 7 h 30 à 19 h, HE
WWW.MOEN.CA
Pommes de douche :
Standards 2,5 gpm (9,5 L/min) max. ou à haute ecacité 2,0 gpm
max. (7,6 L/min) ou moins
À utiliser avec des soupapes de compensation automatiques dont le
débit nominal est de 4,2 L/min (1,1 gpm) ou moins
INS2067C - 12/14
MOSAIC™ FLUSH MOUNT BODY SPRAY
TRIM AND ROUGHIN
Note: Style varies by model
MOSAIC™ MONTAJE PRELIMINAR Y DE
ACABADO DE UNIDAD DE DUCHA
Nota: El estilo varía por el modelo.
MOSAIC PLOMBERIE BRUTE ET
GARNITURE DE JET CORPOREL ENCASTRÉ
Note: Le modèle varie par le modèle.
S1300
TS1320TS1322
CAUTION — TIPS FOR REMOVAL OF OLD FAUCET:
Always turn water supply OFF before removing existing faucet or disassembling the valve. Open
faucet handle to relieve water pressure and ensure that complete water shut-o has been
accomplished.
PRECAUCIÓN — CONSEJOS PARA CAMBIAR LA LLAVE MEZCLADORA:
Siempre CIERRE la toma de agua antes de quitar la llave existente o desmontar la válvula. Abra la
llave para liberar la presión, y asegúrese de que esté bien cerrada el agua.
ATTENTION  SUGGESTIONS POUR ENLEVER LANCIEN ROBINET:
Toujours couper l’alimentation en eau avant d’enlever ou de démonter le robinet. Ouvrir le robinet
pour libérer la pression d’eau et pour s’assurer que l’alimentation en eau a bien été coupée.
MC
Question and Answer IconNeed help?

Do you have a question about the Moen MOSAIC TS1322 and is the answer not in the manual?

Moen MOSAIC TS1322 Specifications

General IconGeneral
Model NumberTS1322
BrandMoen
CollectionMosaic
StyleModern
FinishChrome
Handle TypeLever
Number of Handles1
Valve TypePosi-Temp
Water Flow Rate2.5 GPM
Valve IncludedNo
ADA CompliantYes
WaterSense CertifiedNo
Lifetime Limited WarrantyYes
Product TypeFaucet
Compatible ValveMoen
Installation TypeWall Mount

Summary

MOSAICTM Flush Mount Body Spray Installation

Contact Moen for Support

Reach Moen for installation help, missing or replacement parts.

Essential Tools for Installation

Moen suggests specific tools for safe and easy faucet replacement.

Safety Precautions for Old Faucet Removal

Important safety tips including turning off water supply before removal.

Parts Identification

Detailed Component Parts List

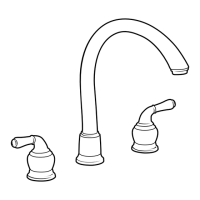
Detailed list of all parts included in the faucet installation kit.

Rough-In Installation - Bracket and Water Lines

Mounting the Rough-In Bracket

Steps 1-4: Securely attach the bracket to the wall structure.

Connecting Water Supply Lines

Steps 5-6: Plumb the connector to the hot and cold water supply lines.

Rough-In Installation - Securing Components

Securing Rough-In Components

Steps 7-8: Ensure rough-in parts are tight and secure.

Trim Installation - Main Assembly

Attaching Main Trim Pieces

Steps 9-11: Attach the main trim pieces to the rough-in unit.

Trim Installation - Depth Adjustments and Flushing

Adjusting for Wall Depth

Step 12: Follow instructions based on wall depth and extension kit needs.

Securing the Housing Nut

Step 13: Tighten the housing nut until the housing is secure.

System Flushing and Component Disposal

Steps 14-15: Flush the system and discard specific components.

Trim Installation - Finishing Touches

Installing Trim Rings and Plates

Steps 17A-18: Install trim rings and plates for finished look.

Understanding Reduced Flow Functionality

Instructions for operating the faucet with reduced flow settings.

Re-installation Procedure

Reversing Installation Steps

Reverse installation steps A through C and turn on water supply.

Moen Limited Lifetime Warranty

Warranty Coverage and Claim Process

Details on lifetime warranty for homeowners and 5-year for others.

Related product manuals