Installation Instructions
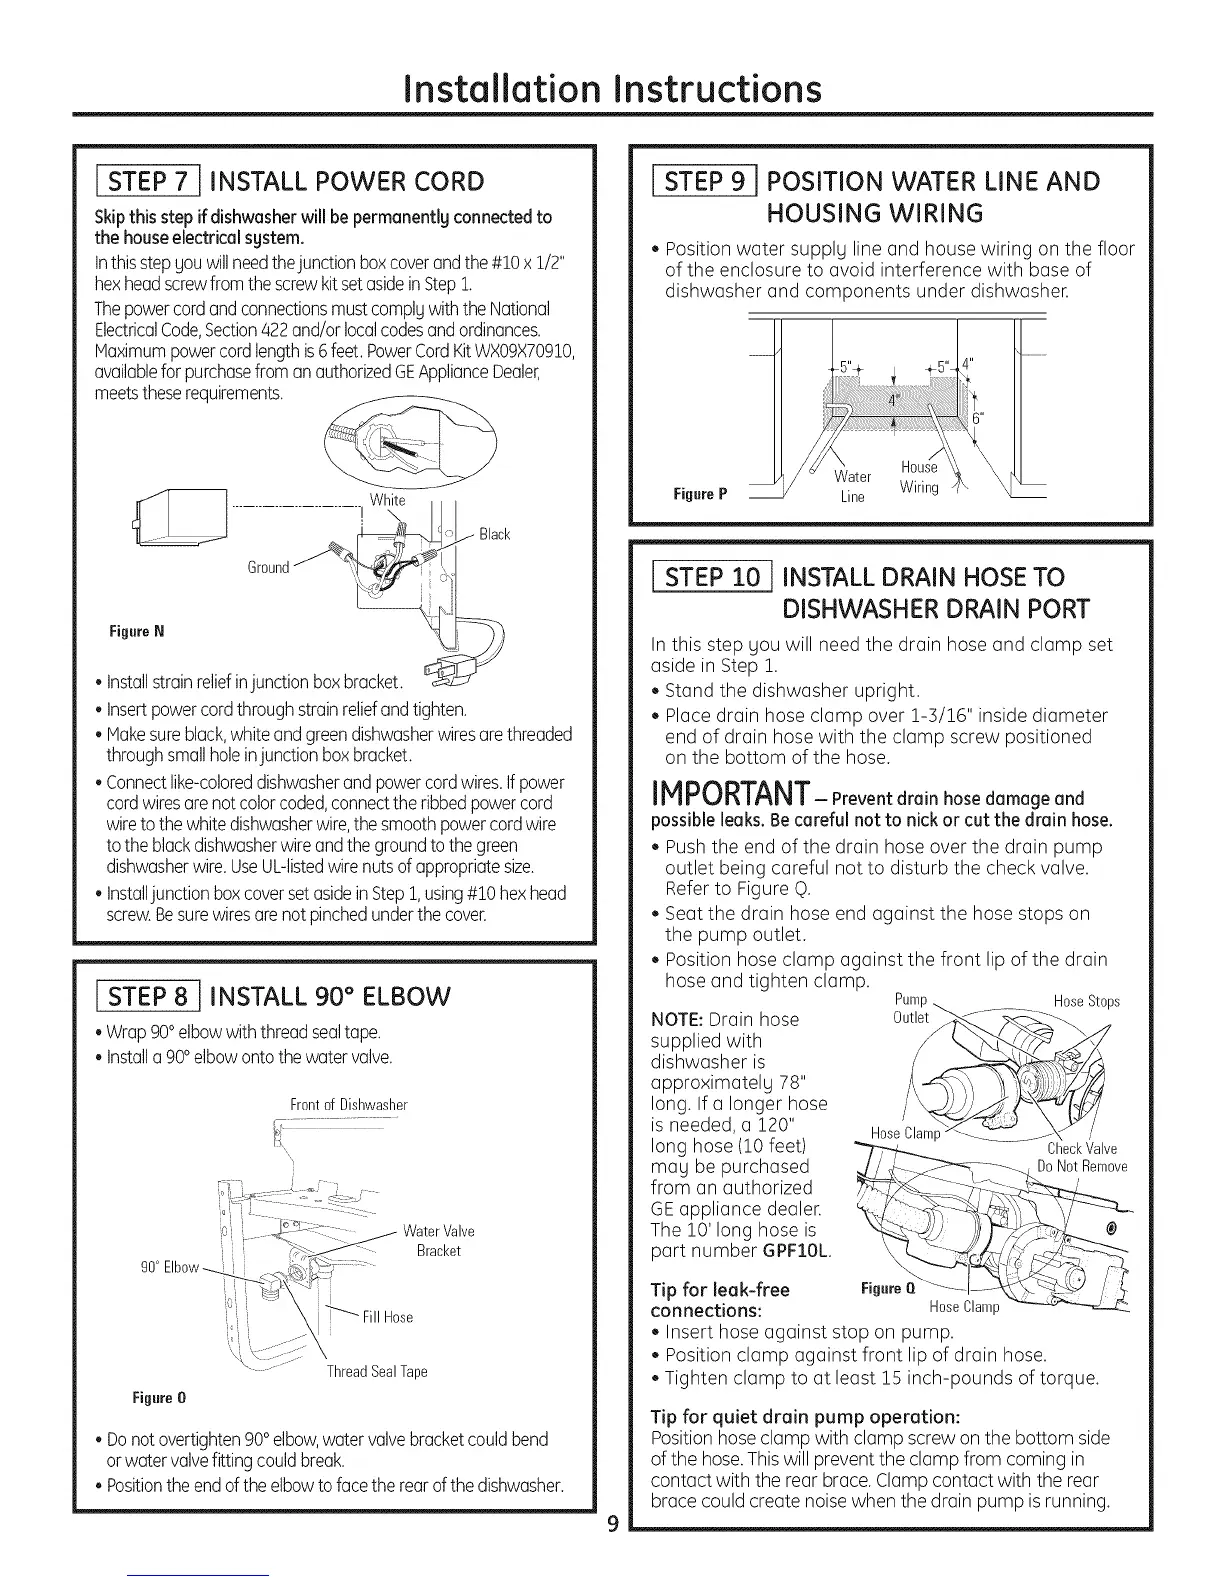
STEP 7 INSTALL POWER CORD
Skipthis step ifdishwasherwill bepermanentlgconnectedto
thehouseelectricalsgstem.
Inthisstepyouwillneedthejunctionboxcoverandthe#10x 1/2"
hexheadscrewfromthe screwkitsetasideinStep1.
ThepowercordandconnectionsmustcomplUwiththe National
ElectricalCode,Section/422and/or localcodesandordinances.
Maximumpowercordlengthis6feet.PowerCordKitWXO9X70910,
availablefor purchasefromanauthorizedGEApplianceDealer,
meetstheserequirements.
White
..................... J \
i \
Figure N FZ_
• Installstrainreliefinjunctionbox b .
• Insertpowercordthroughstrainreliefandtighten.
• Makesureblack,whiteandgreendishwasherwiresarethreaded
throughsmallholeinjunctionboxbracket.
• Connectlike-coloreddishwasherandpowercordwires.Ifpower
cordwiresarenotcolorcoded connectthe ribbedpowercord
wireto the whitedishwasherwire,the smoothpowercordwire
totheblackdishwasherwireandthegroundto the green
dishwasherwire.UseUL-listedwire nutsof appropriatesize.
• InstalljunctionboxcoversetasideinStep1,using#10hexhead
screw.Besurewiresarenot pinchedunderthecover.
STEP 8 INSTALL 90 ° ELBOW
• Wrap%0elbowwiththreadsealtape.
o
• Installa 90 elbowontothe watervalve.
Frontof Dishwasher
Bracket
90° Elbow-__
l
I
?_-" Fill Hose
ThreadSealTape
Figure0
• Donotovertighten900elbow,watervalvebracketcouldbend
orwatervalvefitting couldbreak.
• Positiontheendofthe elbowto facethe rearofthe dishwasher.
STEP 9 JPOSITION WATER LINE AND
HOUSING WIRING
* Position water supplg line and house wiring on the floor
of the enclosure to avoid interference with base of
dishwasher and components under dishwasher.
Figure P
[ STEP 10 1INSTALL DRAIN HOSE TO
DISHWASHER DRAIN PORT
In this step gou will need the drain hose and clamp set
aside in Step !.
• Stand the dishwasher upright.
• Place drain hose clamp over !-3/!6" inside diameter
end of drain hose with the clamp screw positioned
on the bottom of the hose.
IMPORTANT-Preventdrain hose damage and
possible leaks.Becareful not to nick or cut the drain hose.
• Push the end of the drain hose over the drain pump
outlet being careful not to disturb the check valve.
Refer to Figure O.
• Seat the drain hose end against the hose stops on
the pump outlet.
• Position hose clamp against the front lip of the drain
hose and tighten clamp.
NOTE:Drain hose
supplied with
dishwasher is
approximately 78"
long. If a longer hose
is needed, a 120"
long hose (10 feet)
Hag be purchased
from an authorized
GEappliance dealer.
The 10' long hose is
part number GPFIOL.
Tip for leak-free
connections:
HoseStops
• Insert hose against stop on pump.
• Position clamp against front lip of drain hose.
• Tighten clamp to at least 15 inch-pounds of torque.
Tip for quiet drain pump operation:
Position hoseclamp with clamp screw on the bottom side
of the hose.Thiswill prevent the clamp from coming in
contact with the rear brace. Clamp contact with the rear
brace could create noisewhen the drain pump isrunning.