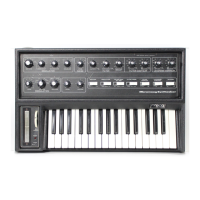
1 ) Turn on the POWER switch (P). The instrument should generally
be given about ten minutes to warm up before tuning and playing.
Once warmed up, there is practically no limit to the length of
time it may be kept on and in use.
2 ) Turn on switches (B) and (C) and the MAIN OUTPUT switch (M).
Adjust the volume control on your amplifier so that, as you
play the keyboard, fairly loud tones are heard. Further adjust-
ments in the overall volume may be made with the MAIN OUTPUT
VOLUME control (26)
3 ) Briefly turn on the A-440 switch (Q). This signal will be used
for tuning the instrument, and is not used during actual per-
formance. Tuning procedure will be described in Section G.
step 11.
4 ) A separate output is available for headphones, in addition to
the MAIN OUTPUT. For quiet practice, or for tuning up prior
to performance, the MAIN OUTPUT switch may be turned off, so
that the audio signal is not fed into the amplifier. A pair of
low impedance headphones with a "stereo" plug may be plugged into
the jack labelled PHONES (N). The HEADPHONE VOLUME control (27)
is then used to regulate the volume of the headphone signal.
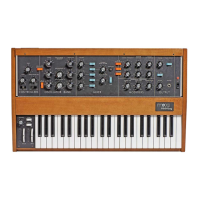
F. OSCILLATOR BANK
This group of circuits contains three separate and independent
oscillators. Each oscillator produces a waveform which repeats
regularly, thereby giving rise to a tone of definite pitch. The audio
signal outputs of the three oscillators are activated by turning on
mixer switches (C), (E), and (G). Since switch (C) is now on, we are
hearing the output of oscillator 1, which is the top row of controls
(4, 5, and 12).
1 ) The RANGE switch (4) determines the pitch range in which the
oscillator functions. Press down a key in the middle of the
keyboard, and turn the RANGE switch through its 6 positions.
You will hear that all positions except the lowest are separated
by one octave. The LO position produces sub-audio clicks which
may be used for rhythmic effect. Return the switch to its 8’
p o s i t i o n .
2 ) The WAVEFORM switch (5) selects one of six waveforms, each of
which has a different overtone spectrum, and therefore produces
a different basic tone quality. From left to right, the available
waveforms are: triangular, sawtooth-triangular, sawtooth, square,
wide rectangular, and narrow rectangular.
(Oscillator 3 substitutes a reverse sawtooth for the sawtooth-
triangular.) Hold a key down and run the WAVEFORM switch
through its positions, noticing how the tone quality changes.
4