5.4. Site requirements
The dehumidifier is only intended for indoor installation.
Avoid installing the dehumidifier in a damp environment where there is a risk of water entering the unit
or in a very dusty environment. If in doubt, contact Munters.
NOTE
It is important that the intended installation site meets the location and space require-
ments for the equipment in order to achieve the best possible performance and trou-
ble-free operation.
For space requirements, see section Dimensions and service space.
If the dehumidifier is to be placed on the wall we recommend the specially designed wall bracket.
Always leave minimum 10 cm space between the unit and the wall.
5.5. Installation of the unit
ComDry M160L is designed to be mounted on a wall using the wall bracket included in the delivery of
the unit. See the separate wall bracket leaflet.
1. Assemble the three main parts of the wall bracket. Use the four screws included.
2. Mark four wall holes using the enclosed drill pattern. Make sure to get at least 25 cm space be-
tween the dehumidifier and the floor.
3. Use four screws with a maximum diameter of 7 mm (not included) to mount the bracket on the wall.
4. Screw the wall bracket on to the wall.
5. Lay the dehumidifier down.
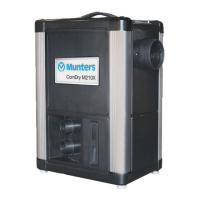
6. Insert the O-ring (1) in to the drain pipe sleeve (2). Press the O-ring so it is properly seated in the
groove.
7. Push the drain pipe on to the drain connection of the tray.
8. Fasten the drain pipe with the two enclosed screws.
9. There are two slots in the shelf enabling a lashing strap to be mounted if the dehumidifier is to be
fixed by a strap.
10. Alternatively the four feet can be locked simply by changing the screw in each foot to a longer (not
included) and use the four pre-drilled holes in the bracket. Four new washers will also be needed.
ComDry M160L Dehumidifier
13