www.SteamPoweredRadio.Com
there
is
no significant high-frequency stereo information
in
the signal (especially during the quiet moments and pauses
in
the music, when any background noise would be most
obtrusive). Wide stereo separation is restored instantly
in
the
tuner whenever significant stereo separation occurs
in
the
broadcast signal, and whenever the music is loud enough to
"mask" the unwanted background hiss.
The dynamic separation circuit operates only on those
weak stereo
FM
signals that would be noisy without it. It
does not affect the reception of strong signals.
If you wish to turn off the dynamic separation circuit,
depress the DYN SEP DEFEAT button. Normally you
will
not hear an obvious difference when this button is pressed,
since most broadcast signals are strong enough to disen-
gage the circuit automatically.
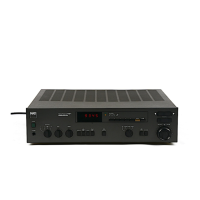
10. TAPE MONITOR
When this button is pressed it lets you hear the
playback signal from your tape recorder (or any other device
connected to the TAPE
IN
(PLAY) jacks on the rear panel). If
you have a signal-processing accessory (such as a graphic
equalizer
or
dynamic expander) connected to the TAPE
jacks, pressing TAPE MONITOR allows you to hear the
processed signal.
The TAPE monitor button affects only what you hear,
not what
is
being recorded. The program source chosen by
the INPUT SELECTOR is always fed to the REC jacks for
recording or processing, regardless of any other controls.
CAUTION:
If
you have nothing connected to the TAPE
REC/PLAY jacks, or have a tape deck connected but not
running, then when you press TAPE MONITOR you will hear
nothing but
silence-regardless
of what other buttons you
may press!
To
disengage the TAPE MONITOR circuit and
restore the normal signal path, press the TAPE MONITOR
button again and release it.
The standard purpose of the TAPE MONITOR
is
to allow
you to listen to recorded tapes, and also to check on tape
recordings as they are being made.
If
you have a three-head
tape deck that allows off-the-tape monitoring during record-
ing, engaging the TAPE MONITOR switches on both the
receiver and the tape deck will let you hear the playback
signal from the tape immediately after it
is
recorded, so that
you can check on its quality.
To
make tape recordings on a recorder attached to the
TAPE REC/PLAY jacks, simply use the INPUT SELECTOR
switch to select the program source that you want to record
from (CD, PHONO, TUNER, etc.). The recording will not
be
affected by any control but the INPUT SELECTOR; thus you
may vary the volume and tone controls, the TAPE MONITOR
switch, etc., without altering the recordi
ng
that
is
bei
ng
made.
COPYING TAPES: If you want to copy a recording from
one tape deck to another, connect the playback cable from
the "source" deck (the machine containing the tape to be
copied) to the AUXiliary inputs, and connect the "copying"
or "dubbing" recorder to the TAPE REC/PLAY jacks. Select
AUX on the INPUT SELECTOR to hear the source tape and
feed its signal to the copying recorder. If you then press the
TAPE MONITOR button, you will hear the signal after it has
passed through the copying recorder's electronics.
If you need greater flexibility
in
connecting and copy-
ing among multiple tape decks, purchase an inexpensive
switch-box, and connect it to the TAPE REC/PLAY jacks,
and connect the tape decks to the switch-box. (Example:
the Radio Shack #42-2105 switch-box contains switches
for monitoring and copying among three tape decks.)
8
11.
INPUT SELECTOR
This switch selects the input signal for the receiver.
The selected input signal will be heard through the loud-
speakers or headphones as long as the TAPE MONITOR
button
is
disengaged. The selected input signal will also
be
fed out through the TAPE OUT (REC) jacks for tape record-
ing or signal processing.
12.
LOW
LEVEL
This button reduces the volume of the amplified sound
by
approximately 20 decibels.
It
has no effect on the signal
fed to the TAPE OUT (REC) jacks for taping or processing.
The LOW LEVEL switch has several practical uses:
□
It
extends the useful range of the Volume control.
With high-output signal sources, with efficient loudspeakers,
or with sensitive headphones, you may find that the sound
is
too loud over most of the range of the Volume control, so that
you are restricted to using only settings near the lower end
of the control range.
In
this case, engaging the Low Level
switch to reduce the output level will allow you to use the full
range of the Volume control for normal listening.
□
It
provides optimum signal-to-noise ratio for low-level
listening
in
quiet environments. For example, if you are
listening to soft music late at night when the surroundings
are quiet, the Low Level switch minimizes the already-low
residual noise of the preamplifier and tone-control circuits,
ensuring noise-free listening.
□
It
provides a convenient temporary cut in volume, to
be
used while answering the telephone for instance. When
the button
is
pressed again and released,
it
restores the
volume precisely to the pre-set level.
13.
LOUDNESS COMPENSATION
This button engages a "loudness compensation" circuit
which, at low-to-medium settings of the Volume control,
boosts the bass response of the amplifier in order to com-
pensate for the human ear's diminished sensitivity to low-
frequency sounds at low loudness levels. The circuit also
provides a slight treble boost to overcome the "masking"
of subtle high-frequency details by background noise.
Instead of using this button, you may prefer to use the
tone controls and BASS
EQ
to obtain the tonal balance that
sounds most natural to you, at any volume leve
l.
14. VOLUME/BALANCE
The knurled outer ring of this two-secti
on
knob
is
the
Volume control, which adjusts the overall loudness of the
sound. The control is designed for accurate tracking of the
two channels, so that the stereo balance will not shift
noticeably as the Volume control setting
is
varied.
The center section of the dual knob is the Balance
control, which adjusts the relative levels of the left and right
channels. A detent at the
12
o'clock position marks t
he
poi
nt
of equal balance. Rotation of the knob to the right (clock-
wise) decreases the level of the left channel so that only the
right channel
is
heard, thus shifting the sonic image to the
right. Rotation of the knob to the left shifts the sonic image
toward the left speaker.
Adjust the Balance control to produce a natural spread
of sound across the space between the speakers, with any
monophonic sound (such as a radio announcer's voice)
appearing as a phantom image centered midway between
the speakers.
Ideally the detented center position of the Balance
control would be its normal setting. But several common
circumstances may cause an unequal balance between the
channels, requiring a compensatory off-center setting of the

 Loading...