NA
D
17
GB
position, the tone control is “flat”, no bass or cut for
Bass or Treble.
To adjust Bass and Treble, activate the tone con-
trols as indicated above and press the Tone Controls
button. Upon the first press, the Bass can be adjust-
ed, the display area indicates “BASS” and the relative
bass level. Within the default time (5 seconds) press
again to adjust Treble.
Using the Volume (Set up) control (No.10) the rela-
tive level for Bass and Treble can be adjusted by +10
or —10dB in 2dB steps.
These controls affect the Left and Right Front
speakers. The Tone controls do not affect recordings
made using the Tape or Video line outputs but will
affect the signal going to the Pre-amp outputs (Audio
Pre Out).
STORING AND RECALLING PRESETS
To store a Preset:
• Tune to the radio station you wish to enter into a
Preset (refer to chapter “Front Panel Controls”; sec-
tions 7 and 8). If the station is transmitting RDS infor-
mation, the RDS indicator will light up and station ini-
tials will be shown in the Display Panel. If a non-RDS
station is found, then just the frequency will be
shown.
• To store that station as a Preset, press MEMORY
(No. 6). “MEMORY” and the preset section in the dis-
play panel will start to flash. If no other button is
pressed within 10 seconds, “MEMORY” will stop to
flash and the receiver will default to its previous state.
• Press either the “ 1 ” (down) or “ 2 ” (up) button
(No.8) to select which Preset number you wish to
assign to the station (from 1 to 30 on FM and 1 to 10
on AM), shown as a flashing number in the Display
Panel, and then press MEMORY (No. 6) again. The
Memory light in the Display Panel will go out and the
station is now stored in your NAD T 761’s memory.
To exit the Memory mode without storing a station,
leave all the tuner controls untouched; the Memory
mode will automatically cancel itself after 10 seconds.
The Memory Presets have a memory back-up, so
they will remain stored for several weeks even if the
Receiver is switched off or unplugged from the mains
supply.
NOTE:
You can enter a new station into an unused Preset
or over-write an existing programmed Memory
Preset. By doing this you will replace the radio station
previously held on that Preset number.
Recalling a Preset station:
• To select a Preset station, select the Preset mode
by pressing the PRESET/TUNE button (No. 7) until
“PRESET” lights up in the display.
• Press either the “ 1 ” (down) or “ 2 ” (up) button
(No. 8) until the right Preset is found and shown in
the Display Panel.
NOTE:
Any unused Presets will be skipped.
Deleting a stored Preset:
You can empty a Preset by deleting the stored
information:
• Select the Preset to be emptied.
• Press the MEMORY button (No. 6), followed by
the FM MUTE/MONO button (No. 5). The Preset will
then be deleted and ‘--’ appears as the Preset num-
ber.
You can also store a new station into a used
Preset, by simply going through the Preset storing
process and placing a new station over the existing
one.
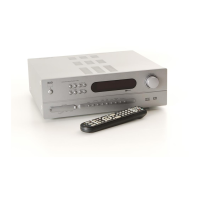
REMOTE CONTROL
Apart from all the key functions, the T 761’s
Remote Control handset also gives access to func-
tions not available on the front panel. It also has addi-
tional controls to remotely operate NAD Cassette and
CD machines. It will operate up to a distance of 16ft
(5m).
Alkaline batteries are recommended for maximum
operating life. Two AAA (R 03) (depending on ver-
sion) batteries should be fitted in the battery compart-
ment at the rear of the Remote Control handset.
When replacing batteries, check that they have been
put in the right way round, as indicated on the base of
the battery compartment.
There are a few differences and extra functions
with the remote control handset however:
• STAND-BY
Press this green button to switch the unit from
operating to the Stand-by mode and vice versa:
Press this button again to switch the unit on from
Stand-by; the last selected source will be indicated in
the display.
• SLEEP
Press SLEEP to make the T 761 automatically
switch off after a preset number of minutes. Pressing
the SLEEP button once will set the sleep time to 90
minutes, after which the T 761 will automatically
switch off into Standby mode. Sleep mode is shown
on the Display Panel. To adjust the Sleep Delay,
press the SLEEP button, each consecutive press will
reduce the sleep time in 30-minute increments, as
shown in the Display Panel. To cancel the Sleep
mode, continue pressing the SLEEP button until the