32 33
BLENDER BLENDER
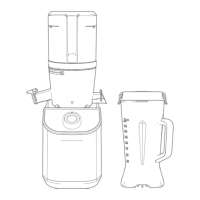
Control
Knob
Center
Position
Back of
Base
Power
Cord
STEP 1
PREPARE THE
BASE
STEP 2
ASSEMBLY OF
LID AND JUG
Turn the control knob so the indicator
is in the top center position.
Connect the base to power by rst
inserting the power cord into the back
of the base and then plug the power
cord into outlet.
Insert dosing cap into the center hole on
the lid and turn clockwise to lock it.
Place the lid onto the jug with the
corners aligned with the top of the
jug and press down rmly to secure
lid clips.
Dosing
Cap
Lid
Clip
Lid
STEP 3
FITTING JUG ASSEMBLY
ON BASE
STEP 4
BLENDER READY
FOR OPERATION
Note: The blender jug can be installed
in two dierent positions for user
preference, with the handle in front
right corner or front left corner.
Ensure the control knob indicator is in
the center position. When installed
correctly the display will be in blender
standby mode and show auto preset
icons on the left of control knob and
“BLEND” will be solid illumination left
side of LED display.
Arrow
on Base
Install the blender jug with each of the
four corner surfaces so that bottom of
jug aligns with the corners on top of
base and the middle notch on bottom
of jug is aligned inside the arrow on
top of the base.
Middle
Notch
ASSEMBLY