ESPAÑOL
DEUTSCH
ITALIANO
ESPAÑOL
DEUTSCH
ITALIANO
User's Manual
Manuel de l'utilisateur
Manual del Usuario
Bedienungsanleitung
Manuale d'uso
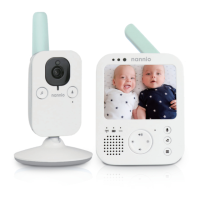
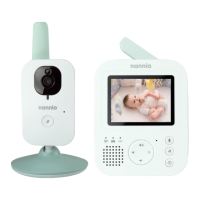
4.3 '' Touch Screen
Wireless Video Baby Monitor
Please read carefully before using this equipment.
ESPAÑOL
DEUTSCH
ITALIANO
User's Manual
Manuel de l'utilisateur
Manual del Usuario
Bedienungsanleitung
Manuale d'uso
4.3 '' Touch Screen
Wireless Video Baby Monitor
Please read carefully before using this equipment.
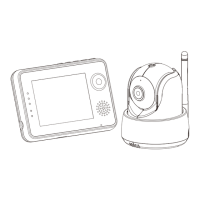
Product Layout / Description du produit / Esquema del producto
/ Produktübersicht / Struttura del prodotto
Figures and Quick Guide / Figures et Guide d'utilisation rapide
/ Figuras y guía rápida / Abbildungen und Schnellanleitung
/ Figure e Guida rapida
Camera / Caméra / Cámara / Kamera / Telecamera
Fig. 1
i
Monitor / Moniteur
Fig. 2
1
2
3
4
5
13
5
8 9
2
3
4
1
6
7
10 11
12
10
6
7
8 9
Setup / Installation / Configuración / Einrichtung / Installazione
1
Fig. 3
ii
Camera Setup / Installation de la caméra / Configuración de la cámara
/ Kameraeinrichtung / Installazione della telecamera
1.1
Power Supply - Using AC Power
Alimentation - Avec alimentation secteur
Fuente de alimentación - Utilizar la alimentación de CA
Stromversorgung – über Netzstrom
Alimentazione - Uso dell'alimentazione CA
iii
2
Monitor Setup / Installation du moniteur / Configuración del monitor
/ Monitoreinrichtung / Installazione del monitor
Power Supply - Using AC Power
Alimentation - Avec alimentation secteur
Fuente de alimentación - Utilizar la alimentación de CA
Stromversorgung – über Netzstrom
Alimentazione - Uso dell'alimentazione CA
2.1
Fig. 4
3
2.2
Talkback Function / Fonction de réponse
/ Función de intercomunicador
/ Gegensprechfunktion / Funzione interfono
Fig. 5
1
2
iv
Fig. 7
3
Hot Key Options / Options de raccourci / Opciones de botones de acceso directo
/ Schnellfunktionen / Opzioni di scelta rapida
3.1
Audio Mode
Fig. 8
2.3
Volume Setting / Réglage du volume
/ Configuración del volumen
/ Lautstärkeeinstellung / Impostazione del volume
Fig. 6
Fig. 10
v
Zoom in Function / Fonction de zoom
/ Función de zoom de ampliación / Vergrößern-Funktion
/ Funzione ingrandimento
3.2
Fig. 9
3.3
Music Function / Fonction de musique / Función de música
/ Musikfunktion / Funzione musica
Pan
Tilt
Fig. 11
3.4
Monitor Remote Control Function
Fonction télécommande du moniteur
Función del mando a distancia del monitor
Monitorfernbedienungsfunktion
Funzioni del telecomando del monitor
vi
4
Menu Options / Options du menu / Opciones del menú
/ Menüoptionen / Opzioni del menu
Fig. 14
4.1
Temperature Setting / Réglage de la température
Fig. 13
Fig. 12
Brightness Setting / Réglage de la luminosité / Configuración del brillo
4.2
vii
4.3
VOX Sensitivity / Sensibilité VOX / Sensibilidad de VOX
Fig. 15
Fig. 16
5
Status Information / Informations de statut
/ Información de estado / Statusinformationen
/ Informazioni di stato
6 71 32 4 8 95
1
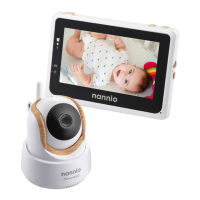
Package Contents
One Camera
One Monitor
Two Power Adapters
Two Cable Clips
One Screw and One Wall Anchor
This User's Manual
Product Layout
Camera (Fig. 1)
1. Light sensor
2. Microphone
3. Lens
4. Infrared LEDs
5. Speaker
6. Power adapter plug
7. Pairing button (connect camera to router)
8. Antenna
9. Temperature sensor
10. Power indicator LED
Monitor (Fig. 2)
1. LCD screen
2. Volume indicator LEDs
3. VOX indicator LED
4. Power indicator LED
5. Volume up button
6. Volume down button
7. Microphone
8. Power ON/OFF switch
9. Antenna
10. Menu button
11. Talkback button
12. Speaker
13. Power adapter plug
ENGLISH
2
Setup
Camera Setup
Power Supply - Using AC Power
Plug one end of the provided power adapter into a wall outlet and the other end
into the back of the camera. Camera automatically turns on when plugged in.
See Fig. 3.
Note : Use the adapter labeled OUTPUT: 5V DC 2.0A for the camera.
Fine Tuning
Place the camera in a convenient location, point the lens toward the observation
area.
1
Monitor Setup
Power Supply - Using AC Power
The monitor has built in 3.7V 2600mAh (Li-ion) battery and uses household AC
power current.
1. Plug one end of the provided power adapter into a wall outlet and the other end
into the monitor. See Fig. 4.
Note : Use the adapter labeled OUTPUT: 5V DC 1.0A for the monitor.
2. Slide the Power switch to "ON". See Fig. 4.
Note 1: When power on the monitor, "Power" LED will light up (green light).
When battery is low, the red LED light will start blinking.
When thebattery is charging, the red LED will light up.
If charging is finished (fully charged), the "Power" LED will turn
off (when power off ).
Note 2: "Out of Range" will be displayed on the LCD screen if the monitor
exceeds the range (unlink)
Talkback Function
Press the talkback button to speak through the camera unit, and the icon
will then be displayed on the screen. See Fig. 5.
2.1
2
2.2
1.1
1.2
1.3
1.4
3
Volume Setting
Press volume up or volume down buttons to adjust volume level.
See Fig. 6.
2.3
Hot Key Options
1. Tap the screen and the HotKey will display on the right side of the screen.
See Fig. 7.
2. Hot Key settings need to be completed within 5 sec. If over 5 sec, the system
will return to the live view automatically.
Audio Olny Mode
Tap icon to enable audio mode.This will turn off video in 10 seconds
and audio is still playing. You can touch screen to wake it up for 10 seconds.
See Fig 8.
Zoom in Function
Tap the Zoom in icon on monitor once for a 2X zoom of image and tap
again to change back to normal view. See Fig. 9.
Music Function
3
3.1
3.3
3.2
3.4
Menu Options
1. Press the menu button on the monitor unit to display the main menu on
the screen. See Fig. 12.
2. The main menu contains 3 submenus.
Temperature Setting ( Temp. Setting )
1. In this submenu you can choose the temperature unit between degrees
Celsius or degrees Fahrenheit. See Fig. 13.
2. You can set the temperature range of the temperature alert. If you select"Alert
On" to enable the temperature alert and the temperature is outside
the range, a warning sound will be emitted from the monitor unit. See Fig. 13.
4
4.1
4
Brightness Setting ( Brightness )
In this submenu you can adjust brightness of the screen. See Fig. 14.
VOX Sensitivity ( VOX Sensitivity )
This submenu lets you choose the VOX (voice activation) sensitivity level.
When the level set to high, the screen will turn on by lower sounds.
See Fig. 15.
4.3
4.2
5
2.3
Internet Viewing
6
6.1
iPhone, iPad,
Android smartphone
or Android tablet
Wi-Fi RouteriCareViewer
iCareViewer
Monitor
Wi-Fi Router
Internet
Smartphone,Tablet
Before you start you need
6.2
5
Download and run the APP
Android: Go to Google Play Store to search “iCareViewer”and install.
iOS: Go to App Store to search“iCareViewer”and install.
Add and connect camera wirelessly with your router
1. Tap icon to add camera. Tap connecting camera to the internet icon.
(See A1)
2. Plug one end of the provided power adapter into a wall outlet and the other
end into the camera.
3. The camera will be ready in 30 seconds.
4. Tap to next step. (See A2)
Press and hold PAIR button over 5 seconds until the LED indicator starts
green blinking on the camera.
5. Tap to next step. (See A3)
Note 1: If your monitor is on, the monitor will disconnect and reconnect in 5
seconds.
Note 2: If camera was paired previously, pair the camera again will overwrite
the preriously registration.
6.3
Android iOS
6.4
iCareViewer
A1 A2 A3
6
6. Android: The APP will automatically search for camera.
iOS: a. Press “Home” key go to “Setting” b. Turn on Wi-Fi
c. Tap the name of camera “iCareViewer-XXXXXX” and join > back
to APP.(See A4)
A4
A5 A6
7
Camera List
1. Camera’s name
2. Connecting status
3. Setting
4. Refresh
5. Quit
6. Add camera
7. APP information
6.5
6.6
6
7
1
5
2
3
4
8
Camera setting
Tap icon on the page. (See A9)
6.7
6
4
1
2
3
5
7
A7
A8
A9
Function of the APP (See A8)
1. Back: Tap icon and go back to last page.
2. Temperature measure: It will display
below the liveview.
3. Photo: Tap icon to save a photo on your
Smartphone or tablet.
4. Video: Tap icon to start/stop recording. (3
minutes limitation per each recording)
Note : Photo and Video will be stored on the
internal memory of your Smartphone
or tablet.
5. Camera Album: Tap icon to view and
manage photos/videos. Tap and hold to delete
for Android, press “Edit” for iOS.
8
1. Name: Camera’s name, tap icon to
change camera’s name.
2. Password: Enter the correct password to
access the camera. (See A10.)
3. UID: Each camera has a unique ID (UID)
and you can share live video with your friend
by UID.
4. Temperature: Tap icon to change ℃/℉.
5. Notification: Tap icon to activate Sound and
Temperature. You will receive push
notification once the sound reaches the level
that you have set on Monitor.
6. Delete camera: Tap icon to delete
camera.
7. Change password: User can change the
camera password in local area network
(LAN). The camera default password is
1
2
3
4
5
No Video (Monitor)
Ÿ Make sure the camera’s power plug is pushed all the way in.
Ÿ Make sure the monitor has enough battery power and is turned on.
Ÿ Restart your camera, please unplug power adapter and replug. The
camera will finish reboot in 25 seconds.
Ÿ If the power LED ison but only voice signal input is detected,
the monitor can be in audio onlymode or VOX mode. Press the
Menu button to turn on the screen.
Noise interference on your monitor
Ÿ There is at least 5 feet (1.5m) between camera
and 2.4GHz products, such as Wi-Fi router,
Bluetooth or microwave ovens.
Ÿ Make sure thecamera and the monitor are within range of each
other.
6
A10
7
A11
6.8
LED indicator (Camera)
Troubleshooting
7
7.1
7.2
Indication Status
Blinking Green Camera is ready for pairing
Solid Green Camera is linked to the Internet
Solid Orange Lost connection to the Internet
Solid Red
Lost connection to the Wi-Fi router
(refer to troubleshooting 7.5)
Care and Maintenance
Ÿ Keep all parts and accessories out of children's reach.
Ÿ Fingerprints or dirt on the lens surface can adversely affect camera
performances. Avoid touching the lens surface with your fingers.
Ÿ Should the lens become dirty, use a blower to blow off dirt and dust, or a
soft, dry cloth to wipe off the lens.
Ÿ Keep the camera dry. Precipitation, humidity, and other liquids contain
minerals will corrode electronic circuits.
Ÿ Do not use or store in dusty, dirty areas.
Ÿ Do not store in hot areas. High temperatures can shorten the life of
electronic devices and warp or melt certain plastics.
Ÿ Do not store in very cold areas. When the system warms up (to its normal
temperature), moisture can form inside the case, which may damage
electronic circuit boards.
Ÿ Do not attempt to open the case. Non-expert handling of the device may
damage the system.
Ÿ Avoid dropping or strong shocks.
Ÿ Operate this product using only with the power supply included or provided
as an accessory.
Ÿ Do not overload electrical outlets or extension cords this can result in fire
or electric shocks.
9
Camera connecting status continues (APP)
Timeout: Make sure your smart phone or tablet is connected to Wi-Fi router or
4G LTE network.
Offline: Make sure your camera is connected to the Internet.
Video issues (APP)
Ÿ No video play: Please check the status of the camera on camera list.
Ÿ Video streaming is not smooth: The video performance is related to your
internet bandwidth or interference.
7.4
7.5
7.6
7.3
2.3
Ÿ To comply with FCC RF exposure compliance requirements, a separation
distance of at least 20 cm must be maintained between the antenna of this
device and all persons.
Ÿ This Transmitter must not be co-located or operating in conjunction with
any other antenna or transmitter.
Ÿ Changes or modifications to this unit not expressly approved by
the party responsible for compliance could void the user authority to operate
the equipment.
FCC Statement
Caution
This equipment has been tested and found to comply with the limits for a
Class B digital device, pursuant to Part 15 of the FCC Rules. These limits are
designed to provide reasonable protection against harmful interference in a
residential installation. This equipment generates, uses and can radiate radio
frequency energy and, if not installed and used in accordance with the
instructions, may cause harmful interference to radio communications.
However, there is no guarantee that interference will not occur in a particular
installation. If this equipment does cause harmful interference to radio or
television reception, which can be determined by turning the equipment off and
on, the user is encouraged to try to correct the interference by one or more of the
following measures:
10
Monitor
Frequency
Display
Display colors
Brightness Control
VOX
Dimensions
Weight
Power Adapter
Battery Capability
Operating temperature
2.4 GHz
4.3” TFT LCD touch screen
Full-color
8 levels
Voice activation, Audio mode
128(W) x 90(H) x 45(D) mm
209g
Input: 100-240V~0.2A, 50/60Hz 12-16VA
Output: 5.0V DC, 1.0A
3.7V, 2600mAh (Li-ion)
0℃ ~ 40℃ (32℉ ~ 104℉)
Specifications
Specifications subject to change without notice
Camera
Frequency
Image Sensor
Lens
IR LED
Dimensions
Weight
Power Adapter
Operating temperature
2.4 GHz
CMOS image sensor
f 2.8mm, F 2.0
8 pcs
85(W) x 110(H) x 100(D) mm
223g
Input: 100-240V AC, 50/60Hz, 0.5A
Output: 5.0V DC, 2.0A
0℃ ~ 40℃ (32℉ ~ 104℉)
Following the safety tips
To prevent deaths and injuries associated with
baby monitor cords :
Ÿ Make sure the baby unit and AC adapter cords are always out of reach of the
baby at least 3 feet (1 meter) away.
Note : It's important even if your baby is not yet standing or mobile.
Ÿ Use a wireless baby monitor to avoid risk of strangulation.
Ÿ Never use extension cords with AC adapters. Only use the AC adapters
provided.
11
* iPhone, iPad are tradema rks of Apple Inc., registered in the U.S. and other countries.
* Google Play is a tradema rk of Goo gle Inc.
ESPAÑOL
DEUTSCH
ITALIANO
Connect
ESPAÑOL
DEUTSCH
ITALIANO
Please read carefully before using this equipment.
User's Manual
Manuel de l'utilisateur
Manual del Usuario
Bedienungsanleitung
Manuale d'uso