NI VirtualBench Calibration Procedure | © National Instruments | 19
Note Use the values in the 24 Hour Limits column for a post-adjustment
verification only. Otherwise, use the values in the 1 Year Limits column.
7. Repeat steps 4 through 6 for each verification point listed in Table 10.
8. Reset the calibrator for safety reasons.
9. Disconnect all cables from the calibrator and VirtualBench.
Note Consult the user documentation for the amplifier used in step 10 for the
recommended warm up time (at least 30 minutes) to ensure that the amplifier
circuitry is at a stable operating temperature.
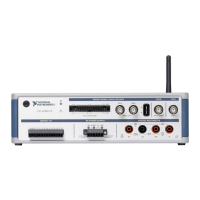
10. To verify AC current ranges ≥500 mA, connect an amplifier to the calibrator, connect the
connectors on one end of the low EMF copper cable to the VirtualBench A and LO banana
plug connectors, and connect the connectors on the other end of the cable to the HI and LO
binding posts on the amplifier. Figure 7 shows the correct connections.
Figure 7. Cable Connections for AC Current Ranges ≥500 mA
11. Wait 2 minutes for the thermal EMF to stabilize.
12. Generate 30 mA verification point on the calibrator.
13. Call
DMM Configure Measurement with the following parameters:
• Function =
AC Current
• Auto Range = FALSE
• Manual Range = 0.5
1 VirtualBench DMM
2 Multifunction Calibrator
3 Low EMF Copper Cable
4 Amplifier
5 Shielded Interface Cable
HI
LO
HI
LO
HVI
SENSE
VΩ
OUTPUT
VΩA
AUX
CURRENT
GUARD GROUND
HI
LO
5
1
2
4
3
 Loading...