Table 4. Figure components
DescriptionLetterDescriptionLetter
ComputerEGS110EMX switchA
WiFi access pointF10G aggregation switchB
10G NAS deviceGNetwork routerC
Note: Red lines indicate 10G connections. Black lines
indicate 1G connections.
InternetD
To set up the switch in your network and power on the switch:
1.
Connect devices to the RJ-45 network ports on the front panel of the switch (A).
The following sample connections are shown in the previous figure:
•
1G link to a computer (E)
•
1G link to a WiFi access point (F)
•
10G link to a 10G network-attached storage (NAS) device (G)
Ports 1 through 8 on the switch support 1G, 100M, and 10M. Ports 9 and 10 on the
switch support 10G, 5G, 2.5G, 1G, and 100M. Use the cables that we recommend
in the previous table.
2.
Depending on nature and size of your network, do the following:
•
Business network. Connect port 9 or 10 on the switch (A) to a LAN port on a
10G aggregation switch (B) that is connected to a network router (C) that is, in
turn, is connected to the Internet (D). This network setup is shown in the previous
figure.
•
Small office or home office network. Connect the switch to either the LAN port
on your router that is connected to your Internet modem or directly to your
Internet modem.
Note: The switch can provide 10G speeds only if your Internet connection
supports 10G. Depending on your setup, if your router, Internet modem, or both
do support 10G speeds, connect port 9 or 10 on the switch to your router or your
Internet modem.
3. Turn on the switch by connecting the power adapter to the switch and plugging the
power adapter into an electrical outlet.
User Manual16Install and Access the Switch in
Your Network
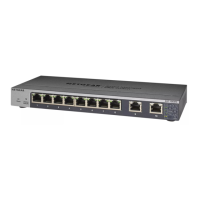
8-Port Gigabit Ethernet Smart Managed Plus Switch Model GS110EMX